By Wyatt Mangum
Top-bar hive beekeepers need straight interchangeable combs in all hives, so they can manage colonies efficiently.
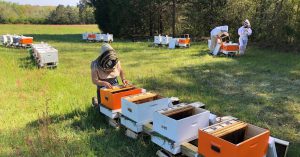
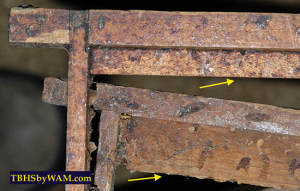
Figure 1 Assembling combs for top-bar hive mating nucs on the tailgate of my bee truck. These are one-foot long hive bodies partitioned in the middle (arrows). A pair of mating nucs is in each hive body, six total on the tailgate. The efficiency of my nuc assembly depends on combs that fit any
top-bar hive body.
For example in routine colony management, a beekeeper may move capped (pupal) brood combs from a strong colony to a weak colony, providing it with a boost of young bees. To complete the swap, typically the same number of empty combs from the weak colony go back to the strong colony, giving it some growing space. The exchange of top-bar combs requires them to be straight and centered in the top bar (not lopsided). Beekeepers have a similar procedure for equalizing nonsurplus honey. Combs of honey from a heavy hive, a colony with too much honey, can be moved to another colony low on food. Empty combs go from the light-weight hive to the heavy hive, completing the exchange. Again the top-bar combs must be interchangeable.
Even with top-bar hives, specialized jobs can depend quite heavily on straight combs centered on their top bars. For example, the top-bar hive design is ideally suited for queen production by grafting. To mate the queens, I have special apiaries with a couple dozen small top-bar mating nucs. To start the mating nucs, I move top-bar combs (with brood, honey and bees) from established colonies and assemble them in hive bodies only one foot long (see Figure 1).
In frame hives, bees build straight combs from sheets of comb foundation. Usually comb foundation is not a part of top-bar beekeeping. For a substitute, beekeepers use wooden comb guides under the top bars. The comb guide could be a small strip of wood inserted into the center groove of the top bar. The wood strip projects out at a right angle (like popsicle sticks in the center groove). Another comb guide has the lower side of the top bar cut in a “V” running the length of the bar.
Perhaps it is not well known, but these comb guides are not new (see Figure 2). During past times (ca 1870’s) when comb foundation was not generally accepted, not available, or too expensive, beekeepers used the wooden guides shown in Figure 2, and guess what? They had problems with crooked combs, similar to top-bar hive beekeepers of today. As an apicultural historian hearing about the current frustrations with crooked top-bar combs, I see the difficulty as a replay of the past.
-
- Figure 2 Rare Survivors: frames over a century old with wooden comb guides. One frame has the wood strip projecting from the center groove of the top bar. The other frame has the “V,” once called a “triangular comb guide.”
-
- Figure 3 Comb built from foundation. Beekeepers designed the frame hive with foundation for honey production. The hive design may inadvertently suppress some bee behavior, particularly with comb construction.
Of course, comb foundation banished wooden comb guides and eliminated their problems of crooked combs. As Figure 3 reminds us, comb foundation literally dictates to the bees exactly where they must build the comb. Foundation forces the bees to build the combs straight. All that appears so obvious. Keeping numerous colonies in more than one hive design has helped me see different biological aspects about bees because the hive design itself can restrict some of the bees’ behavior.
Comparing frame hives and top-bar hives, here is something I have observed that is fairly subtle. First off, comb foundation determines the location of the comb, which is obvious. Comb foundation does something else, which is not obvious. Comb foundation seems to keep the honey bands (at the top of the comb) from bulging out too wide. That bulge can cause an “abnormal” shift in the placement of subsequent combs. Looking back at Figure 3, on the side of the tilted comb that the bees were building out, the length of the cells, particularly near the top (the future honey band), is influenced by the adjacent foundation sheet. Even if the bees are not building out that foundation sheet yet, it still seems to influence the length of the adjacent growing cells.
Of course we have a feel for that. Using nine frames versus 10 frames in a super changes the thickness of the honeycombs. With nine frames, the honeycombs can grow thicker, and they are easier to uncap. In a super, the beekeeper has already determined the location of the combs by spacing the nine frames (usually with drawn comb). The comb thickness has been determined too, provided the bees completely fill the super and the combs bulge out until only a single bee space remains between the capped honeycombs.
With wooden comb guides, the top-bar hive situation is more complicated. Both variables, the location of the combs and their thickness, can be determined by the bees (not the beekeeper). The wooden comb guides do not prevent the honey band from becoming thick and bulging wide at the top of the comb. The bulge is mostly into the empty space for the next comb. That lopsided bulge of a growing comb affects the placement of that next comb. In turn that comb, shifted over a bit, shifts the placement of subsequent combs as the colony builds the sequential combs filling the hive. Numerous times, I have heard top-bar beekeepers say their brood combs were fine but the bees crossed up the honeycombs. With this observation in mind, let’s watch how crooked combs can occur with a special top-bar hive; at least this is one way the combs can become crooked.
-
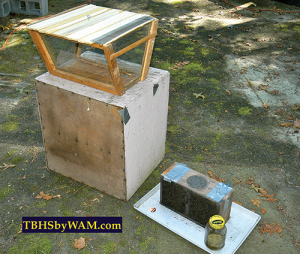
- Figure 4 A top-bar hive with glass on four sides for better viewing. I built this hive in the late 1980s. The bee package for the demonstration is to the lower right.
-
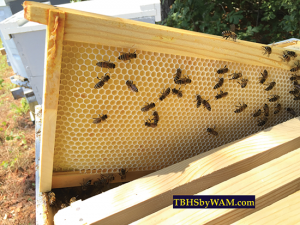
- Figure 5 The bees hived in the glass top-bar hive. The queen cage hung from the top bars, which determined the initial location of the colony. I put an open-top feeder on the right side of the hive to give the bees plenty of syrup to support their comb construction. I removed the feeder when the bees could forage for themselves. The entrance is through the hive floor.
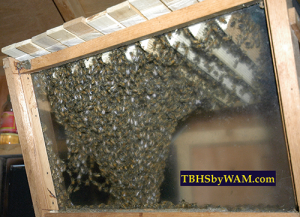
In my bee house, I study honey bee behavior with various observation top-bar hives. For this comb placement demonstration, I used a four-sided glass top-bar hive. The colony for this hive began as a homemade package (see Figure 4). I shook the bees into the glass hive, and the colony grew as a typical top-bar colony (see Figure 5). Initially, the bees built a few brood-nest combs, roughly at the same time. Later on, the bees constructed a sequence of honeycombs into the remaining volume of the hive from left to right (see Figure 6).
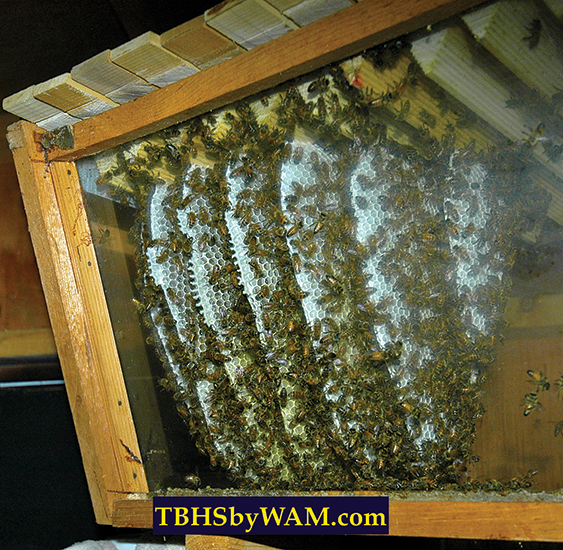
Figure 6 The growing top-bar colony. The bees appear to follow the lower edge of the “V” comb guides. However, the combs could be lopsided from the older (larger) combs bulging into the space for the newer (smaller) combs.
When the colony constructed the first group of brood combs, the extra thick right-lopsided bulge was present, but slightly. Obviously for additional honeycombs built sequentially, the bees cannot bulge the newest comb back into the (left) previously built one. So naturally, the bees bulged new combs into the open space on the right. Figure 7 shows that shift with a close-up through the glass at the very top corner of the hive where the “V” comb guides end–a revealing location. Nothing obstructed the bees from bulging the honey band on the right (like a strip of comb foundation hanging from the next top bar).
-
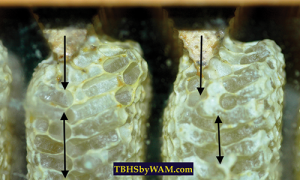
- Figure 7 The right-lopsided distortions of two combs near the initial brood nest. For a comb, the reference point is the tip of the “V.” The midrib of the comb should begin there. The cell walls should be the same length on either side of the “V.” At this end, when the left comb grew, the end of the right comb was not present. Consequently, the cell lengths on the right side of the older (left) comb extended into the space of the younger (right) comb. The bees may have tried to compensate by right-shifting the midrib of the younger (right) comb. The lower double-headed arrows mark the estimated location of the midrib. The left comb seems matched with its comb guide while the younger comb was right shifted. (The midrib consists of the cell floors, or the “foundation” part of the comb.)
-
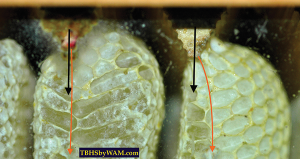
- Figure 8 An extreme lopsided distortion further from the colony’s starting place, the initial brood nest. The older (left) comb bulges deeply into space for the younger (right) comb. No matter the distortion, the minimum spacing between honeycombs is one bee space. Including that gap, the left side of the right comb has hardly any space for cell length. As the lopsided distortion increases, the bees cannot begin the comb near the tip of the “V.” Consequently, combs begin crossing among the top bars. The orange arrows give the approximate curving midrib location as the bees try to right shift the combs.
As the colony constructed more combs, the lopsided comb distortion tended to increase (see Figure 8 and compare it to Figure 7). Seeing all the combs together, Figure 9 shows the lopsided comb distortion tending to increase as the colony’s combs filled the empty space of the hive to the right. Moving to the right, the growth direction of the colony, the combs tended to become more lopsided with the thick side on the right. The center of the comb should have been directly under the tip of the “V,” as indicated by the black arrows in Figure 9.
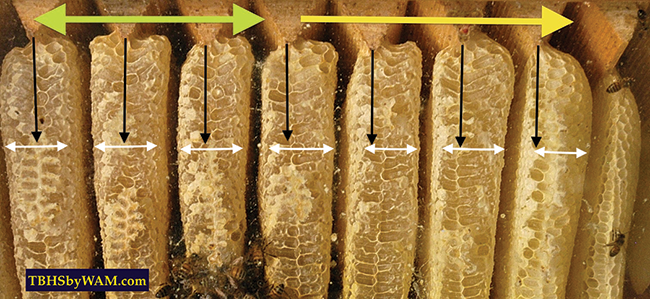
Figure 9 Crooked combs: an increasing effect. This view is like we have “zoomed out” from the close ups of Figures 7 and 8. The big green double-headed arrow shows roughly the initial brood nest combs. The large yellow arrow points to the direction of sequential comb growth. The black arrows pointing down from the “V” tips tell where the center of the combs, the mid ribs, should be. The white horizontal arrows measure the comb width. Both sets of arrows indicate the amount of asymmetric comb growth (lopsidedness) from very little on the left to a large distortion on the right.
If the glass hive were longer, the honeycombs would eventually cross between top bars, thus reproducing the observations of top-bar beekeepers, who reported no problem with the brood combs, but their honeycombs were crossed up and connected to more than one top bar. However, now we understand the problem actually began in the brood nest, and increased as the bees built more honeycombs, until the combs became so crooked they crossed between top bars.
In addition, lopsided combs can be mostly straight on their top bars. Yet the combs may not be interchangeable with combs from other top-bar hives. In fact, the combs may not be interchangeable within its original hive. For a badly lopsided comb, it cannot be turned around and placed next to another lopsided comb, bringing the two thick sides together. They may not fit in the hive because the extra thick lopsided honeycombs crush together. Or if less than one bee space remained between the combs, the bees would not tolerate that gap (too narrow). They would chew the narrow gap wider to at least one bee space. While the bees chewed open the narrow gap, small hive beetles could use the narrow gap as a place to reproduce. (Bees allow a minimum of one bee space between honeycombs. Brood combs have two bee spaces between the combs, allowing the nurse bees to work back-to-back.)
Here is another way, a typical way, for combs to become crooked and connect adjacent top bars.
Comb construction begins at the middle of the top bar and proceeds to the ends. In the middle of the top bar, bees build comb relatively quickly compared to finishing the comb at the ends of the bar. So for an older longer comb (reaching the ends of the bar) next to a younger shorter comb (not reaching the ends of the bar), the bees can lengthen the honey cells in the corners of the older comb. Those longer honey cells can crowd into the space for the ends of the younger comb. When the bees lengthen the younger comb towards the ends of the top bar, they must curve the ends of the younger comb to keep a bee space between the two combs (older and younger). Similar to the situation above, near the brood nest the combs curve just a little on their ends. The curving usually increases with successive combs until the attachment of the combs appears as a “C” for difficult cases (but the middle of the “C” could be straighter). The ends of the “C” would be where the honeycombs curved so much they attached to adjacent top bars, a big mess (see Figures 10 and 11).
-
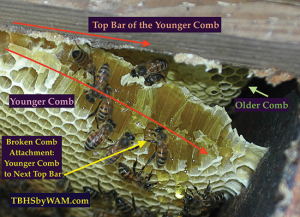
- Figure 10 A top bar and the end of its comb curving away. The comb should have remained attached and straight to the top bar across the top of the picture. But No! The bees curved the comb and attached it to the top bar that I have already removed, breaking the attachment as seen. The long orange arrows show the divergence of the comb from its top bar. The end of the comb under the top bar (green arrow) comes from the older adjacent comb behind the younger comb. The end of the older comb curved into the space for the younger comb, forcing its end away from its top bar as seen.
-
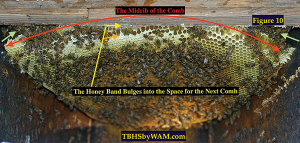
- Figure 11 A “C” shaped top-bar hive comb as seen from above. This view expands Figure 10, which was a close up of the upper right corner of the comb, so marked. Now we see both ends of the younger comb curve away from the bulging corners of the older comb behind it. The middle of the younger comb is roughly straight. However, the excessive bulge in the middle of its honey band produced a badly lopsided comb. The yellow and orange arrows show the amount of comb bulging that would invade the space for the next comb (plus one bee space). Thus, the younger comb will distort the placement of the next comb, and so on, until numerous combs become crossed up on several top bars.
I have seen two attempts at correcting the above comb misalignments. The first has wider top bars for honeycombs, trying to accommodate its thick honey bands. Other top bars are made narrow for brood combs. Beekeepers, especially top-bar beekeepers, have all kinds ways to keep bees. No doubt, some beekeepers can make this technique work. With two different top-bar widths, beware of a fundamental violation.
I have kept bees for over 50 years. In high school, I had 125 frame hives. I made honey by the ton with three different size frames. At times the different frame sizes restricted colony management. Critical movements of brood and honey among hives could not occur. Why? Trying to swap frames that would not fit in the other hive body. Having two different widths of top bars feels like the beginning of this old problem again.
Here is the future problem. Soon or later, during Fall management after a poor honey season, the wider honeycomb top bars will be needed to feed colonies. Wide honeycomb top bars will become mixed up with narrow brood-comb top bars. Different hives would have various mixtures of wide versus narrow top bars. Some hives might contain more combs than others, which would bound to be a problem at some point. I think it would be better to find a way where all the top bars would remain the same width, rather than have different top bar widths.
Another method I have seen has smaller spacer sticks next to the top bars expected to become the honeycombs, which would be ones away from the entrance. This plan has the advantage of keeping the top bars with only one width. Both of the counter measures rely on the hive implement as invoking a solution. Why not let the beekeeper become part of the solution?
Right after the colony finishes its first group of brood combs and begins expanding into the remaining part of the hive, inspect the colony and try turning around the top bars with new combs. The goal here is to cancel out the lopsided comb while the bees are elongating the cells. Open the hive from the rear (away from the entrances) to avoid disturbing the brood nest, unless it needs an inspection. With this method, one has more opportunities to learn about comb construction.
For myself, I use a strip of foundation (1½ inches wide, 3.81cm) securely waxed into the center groove of a top bar. In a top-bar hive, the foundation strips function like the top of the sheets in a frame hive, to prevent the bees from bulging the combs. Typically, I wax strips into some 700 top bars in an afternoon. When the bees build that much comb, I cannot have a crooked comb problem. I need a reliable method for getting straight combs.
As with any method, beekeepers have voiced concerns when I give presentations of top-bar beekeeping. Here are a couple of the most frequent comments. With comb foundation, there could be wax contamination from miticides. True. However, the amount of wax has been greatly reduced. One deep brood frame foundation sheet cuts into seven or eight top-bar strips.). Whenever I cut a honeycomb from its top bar for consumption, I leave the strip of comb that includes the original wax foundation strip.
Another concern is the foundation strips are subject to breakage. True. However, the strips need not be perfectly straight with no breaks. If a few strips have broken-out places, just put them between other strips in better condition. And do not fret over bent strips. I straighten them out some, and the bees do the rest. Brood foundation (always unwired for cutting) is the strongest, but it has fewer sheets per pound. The thinner, more delicate foundation for cut comb honey or section comb honey (where the comb is consumed) has more sheets per pound, but it is easier to break. (For more details in the procedure, see my book at TBHSbyWAM.com.)
Understanding why bees build crooked top-bar combs is a step towards finding ways for bees to produce straight combs. With straight combs, top-bar beekeeping is an elegant and thoughtful way to keep bees.
Acknowledgments
The author thanks Suzanne Sumner for her comments on the manuscript.
Visit TBHSbyWAM.com