


By: Ed Simon
 Every beekeeper has one. Some have two.
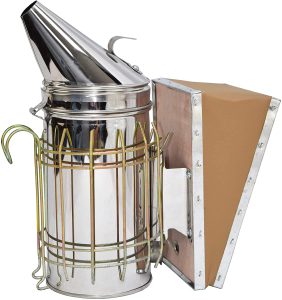
An essential piece of equipment for any beekeeper is the smoker. They are available in all sizes with different features, from the ones with heat shields to the old trusty, rusty smoker that your grandfather used. They are basically of the same design and provide the same function of producing smoke to calm the bees or to chase them away. Their smoke can even help you escape when that nasty colony decides it doesn’t like you.
Your choice of this tool is important. After discussing some features and what you need to consider when choosing one, I will provide some information on how to use one.
Selection
The first and major consideration is the size of the smoker you need for your operation. A two-hive hobbyist hasn’t the need for the large smoker that a commercial beekeeper will need. Size is basically a statement of the amount of fuel it will hold. The more fuel, the longer it will produce smoke. Other features make the smoker easier to use or safer. Here are some of the things you need to think about when purchasing your smoker.
Size
Two sizes are commonly available. There are other, less common sizes available from a variety of manufactures. Here are the two common sizes:
- 4” x 7” – 4” diameter and 7” tall
- 4” x 10” – 4” diameter and 10” tall
Obviously the larger the smoker, the more fuel it will hold.
If it is too large, it will get unwieldy to handle and more difficult to store. If it is too small, you will be adding fuel to it more often.
Material
Two metals are used for smokers:
- Galvanized steel
- Stainless steel
Stainless steel is more durable than galvanized steel. Nowadays, most smokers are made of stainless steel. If you have a choice, select the stainless one.
Lid Style
Two common lid shapes are available:
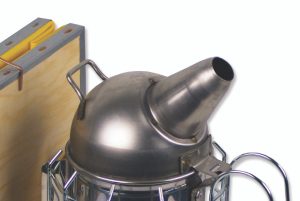
Dome
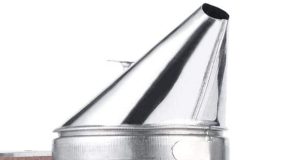
Cone
- Cone
- Dome
This seems to be a manufacturing or patent decision. I have used both types and either function equally well. It does seem a little easier to direct smoke with the cone-shaped lid, in my experience.
Lid Hinge
The sturdier the better. A weak, floppy hinge makes opening and closing the lid difficult. When you are in a hurry and have creosote buildup on the rim, you don’t need or want the problem of positioning the lid.
 Opener Tab
The opener is a small tab used to open the lid. This is an important item when you need to reload a HOT smoker.
Two common opener tabs are available:
- Shaped metal
- Coiled wire
The coiled wire opener seems to be more robust than a shaped opener. It is easier to grip between your fingers with gloves on than the smooth, bent opener. When you are having trouble opening the lid by grabbing the tab, grip the lid in your hand with your thumb under the opener and around the chimney. Then use your whole hand to remove the top.
Heat Shield
A smoker either has a heat shield or it doesn’t.
This is where safety counts. Get a smoker with a heat shield. The first time you bump your new smoker with no heat shield and burn yourself, it will convince you it is important to order a new smoker with a heat shield. In addition, the heat shield often provides a way to hang the smoker.
Bellows
Plastic, wood and probably many other styles are available. All of them work and are usually replaceable.
Usage
After purchasing your smoker, there are some tricks that will help you with its use. I’ll list these items in order of usage, starting with fuel selection, to extinguishing it and finally how to clean it.
- Fuel: You need something to burn. Almost everything that you can light on fire will work, but some items work better and are more convenient than others. Jeans, burlap, pine needles and wood chips are some of the fuels that are cheap and readily available. Whatever you choose needs to be dry enough to burn. When we lived in the country, I used dried cow manure. It was cheap, easy to obtain and burned great. Lately, I have been using landscaping wood chips available at any home improvement store. When you’re desperate, you can always steal wood chips from a flowerbed.
- Loading and Lighting: Lighting the smoker is easiest if you start with a loose wad of newspaper. Remember, it’s that thing you used everyday before all the news was delivered online? After starting it, add your fuel slow enough to get the fuel burning. Pump the bellows to force the rapid burn of the paper and get the fuel on fire. Once it is burning, add enough fuel to keep it burning for the length of time needed. What I really mean is FILL IT UP. You will always think of something additional to do that will take more time.
Stuff the chimney with some green grass. It will act as a filter and reduce the ashes blown on to your bees.
Close the lid and allow the fuel to smolder.
 Hint: Use a propane torch with a self-starting handle. Super easy and much easier than matches or a fire starter.
Hint: If you are having trouble lighting it, use a squirt of hand sanitizer. A good one usually contains 60% or more alcohol and will burn easily. - Usage: A couple puffs of smoke at the hive entrance and under the cover as you start the inspection helps calm the bees from the start. Rather than smoke the bees directly, allow the smoke to drift over the bees. This just seems to be a little gentler. Do not smoke the bees when flames or high heat is coming out of the smoker. You are using the smoker to calm the bees not barbecue them.
Warning: The smoker is Hot! Do not put it on dry grass. Do not try and hold it between your knees (this usually only happens one time). Setting it on an adjacent hive makes it handy and less likely to tip over. 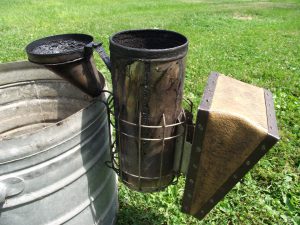 Extinguishing:
- Cork – Place a cork in the chimney. This works great, except a cork is usually hiding from you when you need it.
- Lay on its side – Lay the smoker on its side on a non-burnable surface. This was relayed to me by a University of Minnesota bee squad member. It worked, but you need to be careful. Supposedly, the air will flow above the fuel, not through the fuel.
- Pail – Set it in a metal pail and let it burn out. This is safe, but it is still hot. It is not safe when traveling to another bee yard.
- Allow it to burn – Allow the fuel to burn until it is used up.
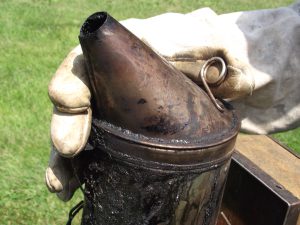
All these methods work. BUT they will cause a problem. To be effective, the smoker produces prodigious amounts of smoke which will collect at the body-lid seam. When cool, this collection (a form of creosote) seals the seam and makes a subsequent opening of the smoker difficult. Bad words, even though they may make you feel better, do not help to open the lid.
I recommend emptying the smoker’s unused fuel into a metal bucket. Then, leave the lid open and hang it on the side of the bucket to cool. It is safe and the lid will not be sealed to the body of the smoker. It will be open and ready for loading the next time you need it.
Warning: Be careful with the smoker’s unburned fuel and ashes. Even when dumping the ashes into a metal bucket, the smoker’s residue will probably be hot and can possibly flair up. Place the bucket in a safe place. Burning your shed down or catching your car on fire makes for a bad day.
- Cleaning: This can be a real hassle. It’s not much of a problem if you follow these simple directions.
- With your hive tool, scrape as much soot and creosote off the device as you can.
- Use a propane torch to burn the remaining soot and creosote. Let it burn until it extinguishes itself.
- After cleaning the big chunks out of the smoker, use a wire brush to remove the remaining ashes.
Hint: I use a three inch wire brush on an electric drill to remove the remaining ashes. You’ll probably never get it completely clean, but at least you can close the top.
Along with the hive tool, the smoker is the most frequently used tool in your beekeeping work chest. A good, reliable smoker is well worth the extra cost.
Get a copy of Ed Simon’s bee Bee Equipment Essentials with detailed drawings, construction hints and how-to-use instructions for dozens of beekeeping tools and equipment from www.Wicwas.com. Ed can be contacted through SimonEdwin41@gmail.com

