Winter Uses For Thermal Cameras
by Jerry Bromenshenk
It’s Winter in Montana, 17oF outside, and snowing. Obviously, it’s not a good time to open hives for inspection. Our hives are wrapped for Winter, sitting outside in snow drifts. Thirty miles north of Missoula, several thousand colonies are securely packed inside a new wintering building built by Bill Fluke of Arlee Apiaries.
Indoor wintering buildings have been used for some time in Canada (see Beekeeping in Western Canada, 1998) and are becoming more common in northern states. In Canada, hives are moved into Winter storage in October or early November and kept inside until Spring. In the U.S., migratory beekeepers are using sheds as safe, accessible places to keep hives from Fall through early Winter. Just before almond pollination, these hives will be loaded onto trucks and shipped to California.
It may seem extravagant to store hives indoors for only two to three months, it provides a place to keep the hives before almond bloom, protection from Winter cold and theft, and the convenience of hives close to home.
In Montana, we often have a thaw in January, before it gets cold again. This presents an opportunity to check colonies. If the bees have been rapidly consuming their honey stores, it’s time to feed them. In the sheds, beekeepers will be selecting hives to ship – it doesn’t make sense to pay freight on dead-outs and weak hives.
Time to get out the IR camera to check bee colonies. For outdoor hives, we image at night or on overcast days. It’s best to examine hives in early morning hours, since hive boxes retain heat from afternoon sun; and reflected sunshine masks emitted heat from clustered bees. Inside a wintering shed, time of day isn’t an issue. Hives are kept in dark; red lights allow the beekeeper to work within the storage unit with little disturbance of the bees.
Paint color can greatly affect IR accuracy. Reflective paint, especially silver, makes it hard, if not impossible, to image bee populations. Matt color paints and unpainted hives will vary somewhat, but you should be able to discern cluster shape, position, and size. Hives wrapped in quilts can’t be imaged; there’s too much insulation space between the surface of the hive and the outside of the wrap. Hives tightly wrapped in black plastic can be imaged, but any gap between the plastic and the surface of the hive will degrade the image – I pull the wrapping tight and staple to box surfaces.
The most accurate thermal image is taken from a vantage point centered-on and perpendicular to the face of each hive. In wintering sheds, hives are usually stacked on pallets. When hives are stacked as high as the ceiling in rows only two to three feet (~ 1 meter) apart, the problems are: (1) ability of the camera lens to focus on and image the full width of the hive due to insufficient stand-off distance, (2) seeing the image on the view-screen of the camera, and (3) getting the camera high enough to image upper tiers of hives.
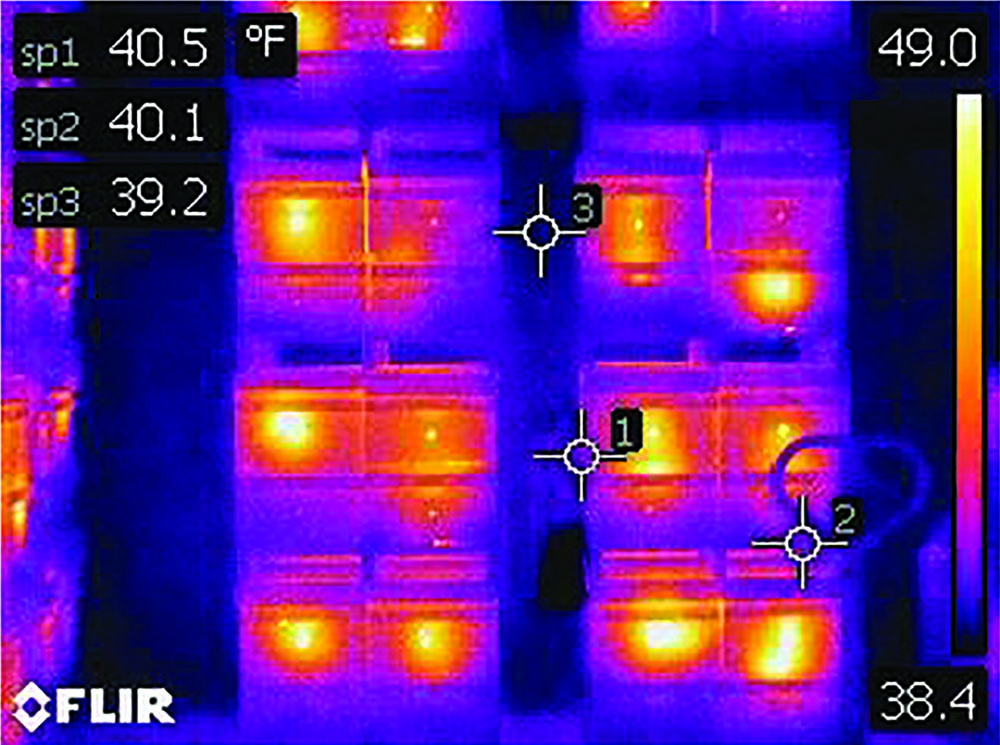
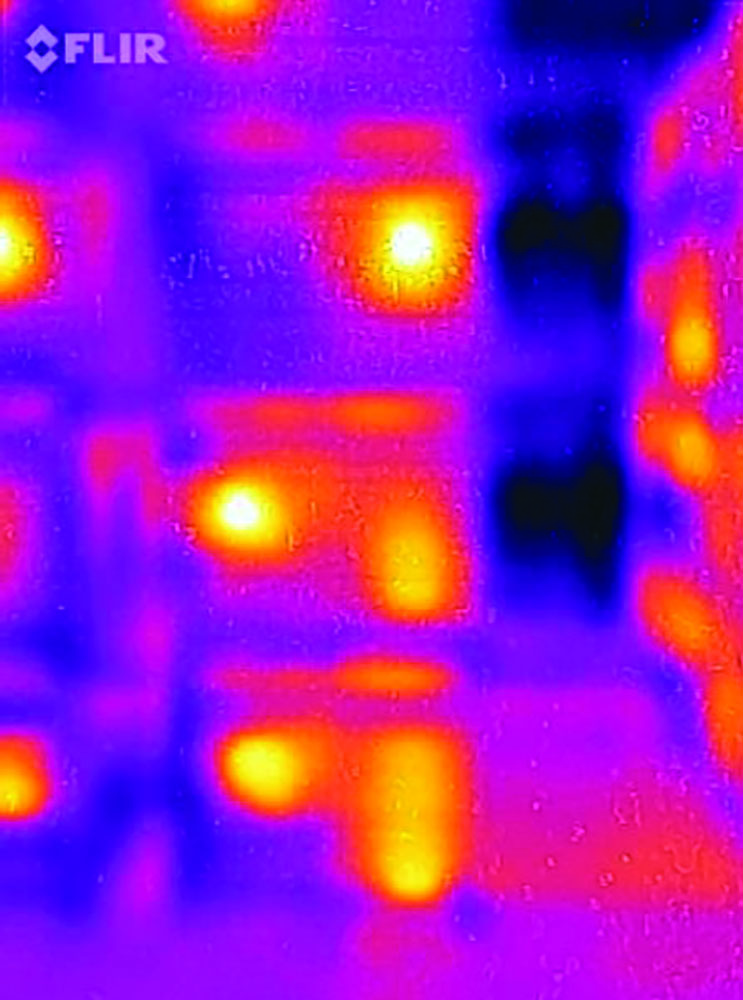
Pallets of hives in wintering shed, FLIRi7 Thermal Camera, 19,600 Radiometric Pixels.
Regardless, our outdoor hives and those in Bill’s storage shed offered opportunities for illustrating winter uses of IR cameras. Given that everyone wants a bargain, I’ll spotlight entry level, under $1000 camera options – namely the Thermal Compact and a SEEK Reveal, and the FLIR ONE, and FLIR C2 cameras.
As described in my preceding article, all of these cameras use newly developed sensor arrays, smaller than a postage stamp. The Thermal Compact and FLIR ONE cameras mount on mobile devices including Smart phones and tablets. Unfortunately, the same camera can’t be used on both iOs (Apple) and Android devices, since Apple uses a Lightning charging/data port and Android uses a microUSB. Some Android devices need an adapter cable, since the microUSB port is reversed. On these units, a camera without an adapter is only useful for taking IR selfies.
SEEK Thermal Compact and second generation FLIR ONE cameras are small devices sold as a dongle that plugs into the phone or tablet data port. That’s an inherently fragile (breakable) system. The cameras are so small that misplacement and loss are to be expected. Battery life is relatively short. Piggy-backing the software of a Smart phone or tablet keeps prices affordable, providing surprisingly versatile cameras that are also great fun. However, total cost includes the price of the Smart phone or Tablet. These cameras provide an affordable introduction to thermal imaging and also serve as a commercial for higher-end, professional thermal cameras.
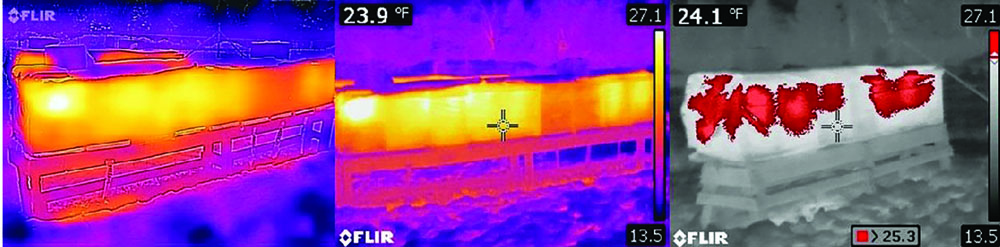
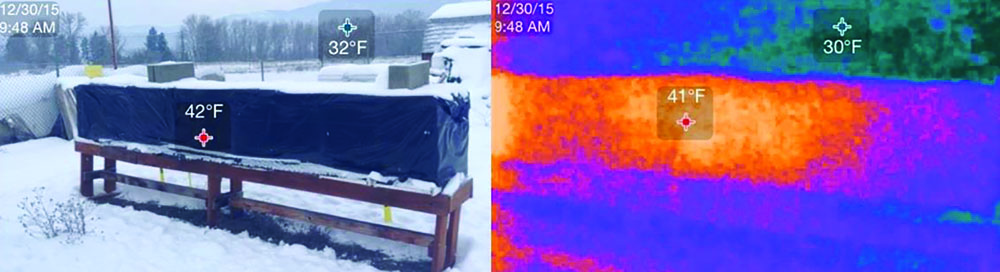
Wrapped hives at Ft. Missoula – FLIR. 1st Generation FLIR ONE with MSX technology (left), FLIR E60 professional camera (middle), FLIR E60 with grey/red (hot) thresholding set at 25.3°F. Stated resolution of the FLIR ONE 4,800; FLIR E60 72,800 radiometric pixels.
Don’t have a Smart Phone to spare or want something more rugged and simpler to use? Consider a stand-alone, point-and-shoot thermal camera such as the FLIR C2 or Seek Thermal Reveal. Housed in rugged cases, they are intended to be entry level cameras for professional use by electricians, plumbers, builders, and – beekeepers?
The FLIR C2 fits in a shirt pocket, with a lanyard for around the neck, reducing chance of a camera falling out when leaning over a beehive. The chunkier SEEK Reveal is designed to be carried in a toolbox or a jacket pocket. The SEEK Reveal has a built-in flashlight and the IR lens is perpendicular to the view screen, which has advantages in tight, dark spaces.
Let’s look at some specifications, pros, and cons for these entry level cameras. The first generation FLIR ONE is a clamshell style IR camera that only fits an i5/5s phone. The second generation FLIR ONE camera has a four-fold improvement in resolution compared to the first generation FLIR ONE, and FLIR has gone to a dongle, like that used by both first and second generation Seek Thermal compact cameras.
The bargain at the moment is the first generation, low resolution FLIR ONE, since it won’t fit the i6 phone. If you have an i5/5s phone, with a bit of searching, the first generation FLIR ONE can be purchased for $90-$150, while supplies last. The improved resolution, second generation FLIR ONE is listed at about $250 for either the iOs or Android format, but be prepared for a long waiting list (weeks to months) for delivery.
Pallets of hives in wintering shed, FLIR ONE, 1st Generation Camera.
Let’s start with a description of the first generation FLIR ONE. The camera is a clamshell case that slides onto an i5/5s phone, with an adapter plug to extend the audio output. The clamshell contains two cameras; a VGA visible camera and a FLIR Lepton™ IR camera. The dual cameras allow MSX blending. MSX is a term FLIR uses to describe blending or overlaying of a visible spectrum image with an IR image to enhance detail. The resolution of the IR camera is a relatively low 60 x 80 or 4800 radiometric pixels. The camera has an IR temperature range of 32°F to 212°F (0°C to 100°C), but I’ve pushed it lower, and it can detect temperature differences as small as 0.18°F (0.1°C). The clamshell weighs 3.9 ounce (110 grams) and only adds 3/8 inch to the thickness of the i5/5s camera. The good part is that with the FLIR ONE APP, many of the phone or tablet functions are enabled, such as a choice of up to seven color pallets, sharing to Twitter, Facebook, e-mail, SMS; image storage on the camera roll, and video.
There are some downsides to this camera. Temperature calibration has to be done manually by pulling down on a button on the camera before taking a picture. Battery life is claimed to be approximately four hours. I’ve not gotten more than one hour. The iOs Lightning plug does not charge the camera battery, so two different cables are needed to charge the phone and the camera separately. Also, the dual camera setup can’t enhance image quality at night or in a wintering shed since the light level is insufficient to register on the visible light camera. An upside is that the camera doesn’t drain the iPhone battery.
The second generation FLIR ONE changes to a dongle format, gains an automatic shutter, a higher resolution 60 x 120 sensor for 19,200 radiometric pixels, and extended temperature range -4°F to 248°F (-20° to 120°C). The companion app adds panorama, time lapse, and close-up options, improved spot measurement detects, and nine color palettes. However, actual functions may vary with the brand and model of Phone or Tablet. It’s also unclear whether the dongle has its own battery.
Seek Thermal’s Compact cameras draw power from the phone or tablet, so expect frequent recharging of your phone. Seek Thermal cameras are available with either a 20o or 36o fixed lens. The second generation Seek Thermal XR adds adjustable focus for close up to long range imaging. The thermal temperature range is listed as -40 to 626°F (-40 to 330°C), allowing it to provide subzero readings.
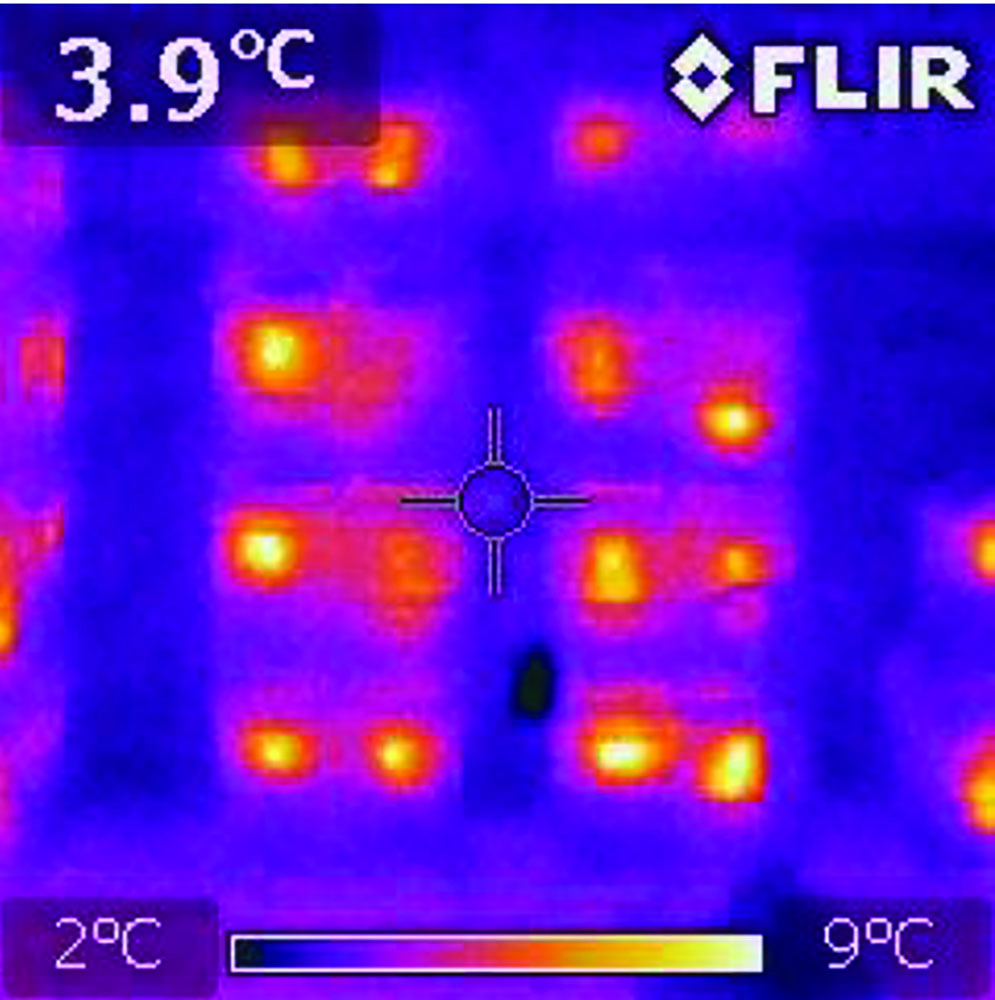
Pallets of hives in wintering shed, SEEK THERMAL COMPACT, 32,136 Radiometric Pixels
The IR sensor uses a 206 x 156 array for a posted resolution of over 32,136 pixels. As with the FLIR ONE, the picture or video, color palettes, image storage, and other functions use many of the iOs or Android (4.03 or higher) mobile device’s native camera capabilities. However, the Thermal does not have its own, standalone visible light digital camera. It’s strictly a thermal camera.
The SEEK app can access the camera in the phone or tablet to provide a split image, one half showing a visible image, the other the thermal image. However, depending on where the lens of the visible camera is positioned relative to the lens of the IR camera dongle, parallax problems may make it difficult or impossible to line up the visible and IR image. My iPod has its camera lens at the opposite end from the data port. Parallax issues can also occur in close ups with the FLIR ONE cameras, even though the visible and IR lenses are close to each other.
Both the FLIR ONE and SEEK Compact cameras have sensors with a smaller pixel pitch than in larger thermal cameras, crowding more pixels onto a small chip. With the larger, professional grade cameras, I’ve generally found that increasing numbers of radiometric pixels is predictably correlated with improving resolution and image clarity. That’s not necessarily the case with the inexpensive mobile device mounted cameras.
When used in a wintering shed, my professional grade FLIR i7 thermal camera with 19,200 pixels provided a more detailed image than either the first generation of the FLIR ONE or the Seek Thermal Compact. The first generation FLIR ONE, with only 4,800 radiometric pixels, did produce a clearer image than the Seek Compact with 32,136 pixels. My ~$7,000 FLIR E60 camera with 76,800 pixels provided the clearest images, but at 23-28 times the cost of a second generation FLIR ONE or SEEK Thermal Compact.
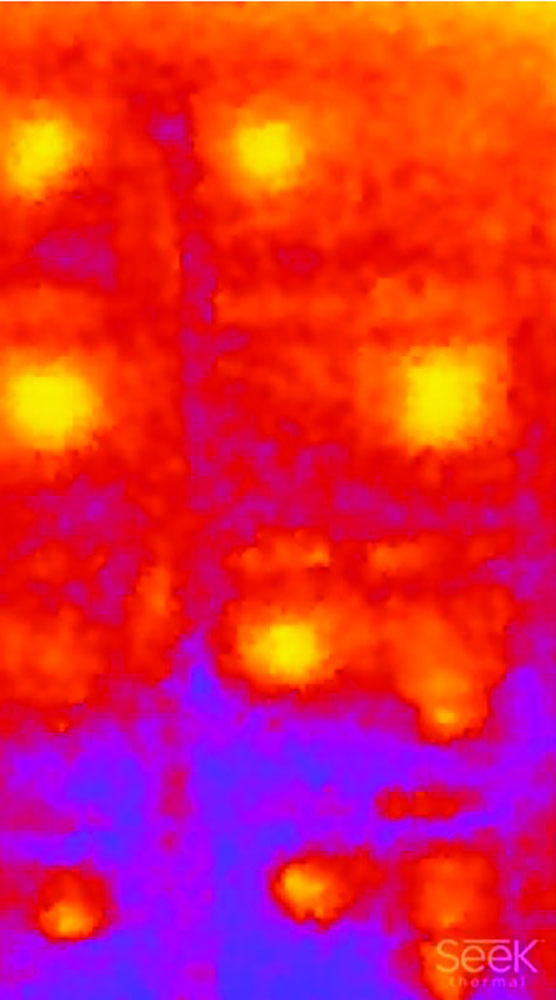
Pallets of hives in wintering shed, SEEK THERMAL COMPACT, 32,136 Radiometric Pixels
Inside the Wintering Shed, I discovered that light levels were too low to register a visible image, negating any advantage of the FLIR MSX technology. Although the FLIR IR thermal camera can image an object in the dark, the FLIR’s visible light camera was useless in the dark or under red lights. Essentially, inside the wintering building, all of these cameras only functioned in thermal mode.
To fully test these cameras, I imaged outdoor hives just after dawn, on an overcast morning. Air temperature varied from 24-27o F, relative humidity was about 91%, with a very light dusting of falling snow. The hives in our fenced wintering yard are wrapped in black plastic and placed on saw-horse style stands to both keep hive entrances out of snow banks and to make hives less accessible to mice, voles, and skunks.
The iPod’s visible light camera produced a clear, visible image of the front of the hives on a Table. However, it’s obvious that the temperature recorded by the attached SEEK Thermal Compact dongle was inaccurate, since air temperatures were in the mid-20s, not 30-32oF. For comparison, I imaged the same Table of hives with my clamshell FLIR ONE and with my FLIR E60.
From previous testing, I know that the FLIR C2 provides images similar to those of a 1st generation FLIR ONE. I haven’t been able yet to access either the second generation FLIR ONE or a SEEK Thermal Reveal, so I can’t address their performance. I’m working on getting them to test. The FLIR E60 is my go-to professional camera. Not only is its native resolution sufficient for imaging of hives, but it has many more functions and capabilities, within the camera itself and the available Apps, including FLIR Tools and also FLIR’s research grade software for thermographic analysis. I’ll address the E Series cameras in my next article.
In my next article, I’ll focus on the next step up, FLIR’s E-series cameras. These are professional grade instruments, ranging from just below $1000 to almost $7,000. I’ll also discuss why, at least some beekeepers should consider having one or more of these cameras in their tool kit. Entry level cameras have their place, but have limitations. Beekeepers, who buy the wrong camera for their needs or who do not know how to use their camera, are likely to conclude that the technology doesn’t work. If in doubt, borrow or rent a camera before purchasing one. I’ll explain why in following articles.