

By: Morris Ostrofsky
Recently I was corresponding with a German friend for whom English is a second language about bait boxes.
It seems that I was referring to enticing swarms with a temporary hive with frames and boxes while he was thinking about the type of box used for storing and transporting fishing gear. Once that was cleared up (with some mutual embarrassment) I realized that there was an additional similarity. With both fishing and catching swarms the first successful catch is memorable. In short you are hooked.
Here’s some practical uses for bait hives, suggestions for when and how to set them up, placement strategies and how Oxalic acid can help eliminate 90% of the Varroa mites before moving a swarm to a standard hive.
Bait boxes are used during swarm season with the goal of attracting swarms. These swarms may be from your own or from other colonies. Of particular interest may be swarms from feral hives. In addition to just being fun, there are many practical uses for bait boxes:
- Instead of a swarm leaving one of your hives and flying off into the sunset, a bait box can provide an easy way to lure them and prevent a loss of bees. This is helpful if you are gone at the time the swarm issues from one of your hives.
- An easy and practically free way to increase your numbers. The swarms literally come to you.
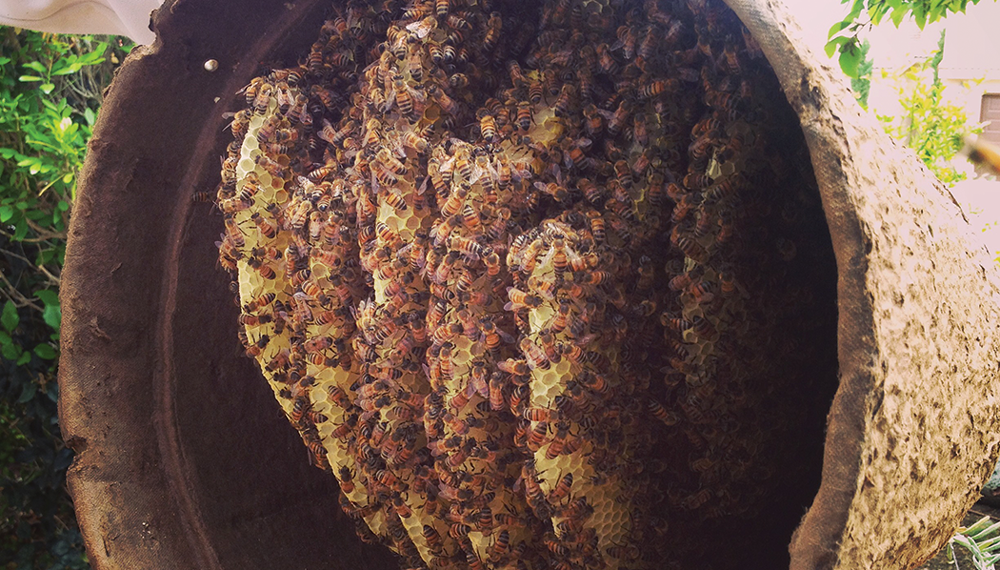
- Provide the opportunity to capture feral swarms. In my opinion the greatest potential value can be achieved by placing bait boxes in locations that are in the vicinity of feral hives that have been continuously occupied for three or more years. The greater the distance from managed hives the greater the likelihood that the captured swarm came from a feral colony. If these bees are doing that well, even without being treated, these are the swarms you want. Ideally these colonies may have developed a tolerance or resistance to Varroa mites.
A swarm of bees in May is worth a bail of hay.
A swarm of bees in June is worth a silver spoon.
A swarm of bees in July is not worth a fly.
There are various renditions of this saying. Regardless of the verses the take home message is that swarms captured early in the season are more valuable than those caught later. Be aware of when swarms start in your area. The goal is to have the bait boxes in place when the scouts start looking for a new home. Here in the southern Willamette Valley, Oregon, the first swarms start around April 1. I set up my bait boxes around three weeks before this date.
Bait hives come in a variety of designs. They range from standard hives to molded paper mache plant pots. While the plant pot containers are convenient, I do not recommend using them. Not only are they expensive but it can be a mess to transfer the bees and comb from them to a standard hive. Removing comb from these can result in lots of dead workers and possible queen loss. This is especially true with remote boxes that are not checked on frequently.
I choose either a Langstroth deep with a solid bottom board or a cardboard box depending on where I place them. I use Langstroth bait boxes in an area I consider to be secure such as my or a nearby friend’s property. In these locations there is little or no chance of vandalism. An important advantage of using standard Langstroth deeps is that the volume is consistent with Dr. Tom Seeley’s recommendation of 40 liters (1.4 cubic feet). Additionally the deep frames can be moved into and out of a box making it easy to transfer them into a permanent hive later.
When using a Langstroth deep the entrance must be reduced to two square inches with a block of wood. Again this is consistent with Dr. Seeley’s research results on bait hives. He found that scout bees preferred this size when given a choice. The down side of Langstroth deeps is that they are heavy. So safety can be a concern if the box is positioned in an awkward location or in a tall tree.

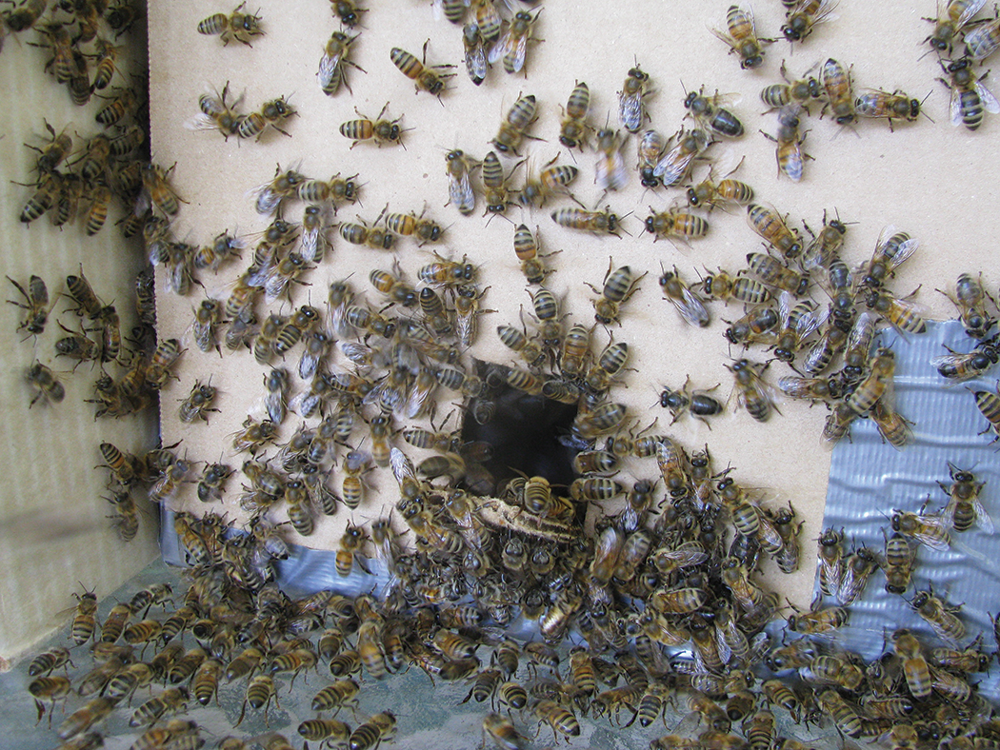
Cardboard box with drawn frame in back, starter strip toward front. You are looking at the entrance end.
I use cardboard bait boxes in remote areas (two or more miles from managed colonies) where the possibility of loss is higher. The investment is minimal so if the box is vandalized it is not as much of a financial loss. I have found local home improvement stores to be a rich source of free cardboard boxes. Armed with a tape measure I select boxes approximately 20 X 16 X 10 inches. These dimensions are close enough to those of a Langstroth deep; 40 liters (1.4 cubic feet). I use a long staple to attach not only the frame rest but also the outside handle to the box. Including the handles gives the box greater support and ease of handling when transporting it.
Regardless of which bait box I use, the configuration of the frames within the box is the same. One old drawn brood frame FROM A HEALTHY HIVE is placed at the end of the box opposite the entrance. This frame serves as an attractant to the scout bees looking for a new home. It also acts as a pre-made location for the bees to start housekeeping. One possible problem with drawn frames is wax moth damage. If the wax moths are actively chewing up the wax, the scout bees will find this offensive and avoid the box. The drawn frame can be protected from wax moths with a biological control called Bacillus thuringiensis or Bt. (formerly marketed as Certan). This is a Bacillus spore that is non-toxic to bees or people but deadly to wax worms. The product is now marketed as XenTari and can be found on the internet.
In addition to the drawn frame, I place nine wired frames with foundation starter strips in the remaining space. The open space created by using starter strips vs. full sheets of foundation makes it easier for scouts to measure the volume of their prospective home. Starter strips also act as a guide when the bees quickly start building new comb. As in any situation when using starter strips, the box should be level. The wire supports newly made fragile comb so there is no damage when being transported.
Moving in.
The final addition to the box is the application of a lure. Last Spring I tried a new product called Swarm Commander Swarm Lure. This swarm lure was formulated to mimic the “Nasanov” pheromone which is used by workers forming a swarm cluster. In the past I used lemon grass essential oil. I have found Swarm Commander to be more attractive than lemon grass essential oil. I increased the number of swarms I caught this year to 10 from a previous average of one to two a season. The lure should be refreshed about every two weeks.
Other than the entrance, the box should be completely sealed so no light or water can enter. The entrance should measure about two square inches, or a round hole about 1 ¼ to 2” in diameter. A nail placed across the entrance will discourage birds from taking up residence in the box.
When trying to attract a swarm from your own apiary, the bait box should be at least 300 yards from your own hives. When choosing a remote location, look for an area that has older trees and is at least two miles from managed colonies. Ideally the box will be about 15 feet off the ground. This is not always practical. I have attracted swarms to a picnic table top. The bottom line is to consider the ease of box’s placement, retrieval and your safety. For a more detailed description of bait box guidelines see “Bait Hives for Honey Bees” by Dr. Thomas D. Seeley Information Bulletin #187 Cornell Cooperative Extension publication.
Swarms offer an opportunity to start a colony off almost mite free. Oxalic acid and Hop Guard can be used to deal with Varroa mites while still in the field. This way you can avoid bringing a mite bomb into your apiary and you can deal with a mite population that is phoretic (outside of brood cells). Swarms with mated queens do not produce brood for at least the first three (3) days after going into a bait box; it takes 15 days for virgins. The time to take advantage of the opportunity to treat is limited but worth the effort to give your new colony a healthy start. Follow the label directions for either product.
I usually leave the occupied bait box in place for at least two weeks before moving it to my apiary.* I find moving it early in the day before the bees are flying is the easiest method. A screen can be attached over the opening to insure that the bees will stay put until you are ready to release them. If you used a wooden hive box be sure both the bottom board and the cover are securely attached. If moving a cardboard box, make sure all the tape is secure and that dampness hasn’t weakened the box.
Let the bees settle for a couple of days before transferring them to a permanent hive. This is where using movable frames makes this step quite easy on both the beekeeper and the bees. If the new colony does not have brood at the time you transfer them, give them a frame of open brood from another colony. This is very effective in preventing them from absconding.
Hygenic test from Glenn Apiaries.
One and a half to two weeks after you have transferred the bees to your apiary, you should see the first capped brood. One of the ways to improve the genetic make up of your colonies is to test for hygienic behavior. The Pin Prick method is simple and does not require any special materials. Cappings of newly sealed brood cells are punctured with a fine pin to kill the larva beneath. After 24 hours, the number of cells uncapped and cleaned out are counted and recorded. After several replications under different environmental conditions, colonies which have cleaned at least 90% of the cells within 24 hours are considered hygienic. See the Glenn Apiaries website (http://www.glenn-apiaries.com) for specific directions.
Colonies that exhibit little or no hygienic behavior can be requeened with a hygienic queen. Note the assumption is that any Varroa mite infestation was previously controlled before the captured swarm was taken to your apiary. If this was not done, Varroa must be dealt with prior to requeening. Defensive temperament or a poor brood pattern are also good reasons to requeen with commercial queens that are advertised to have hygienic behavior. In areas that are known to have Africanized bees, the queens should always be replaced with marked queens.
I have a different strategy for my bait boxes for the Spring of 2017. My long term goal is to establish an apiary that requires the use of less miticides. My focus will be to place bait boxes in remote locations. Because the bait boxes will be placed away from managed colonies, I hope to capture feral swarms issued from colonies that have the genes for mite tolerance or for hygienic behavior. I plan to check the bait boxes every three days. Checking this frequently will allow me to determine when the boxes are occupied and take advantage of the limited opportunity to deal with mites. When I see bees busily going in and out carrying pollen it will be a sure sign that the box is being used as a new home and not merely being scouted.
Once I determine that a box is being occupied, I do not plan on moving it for at least two weeks because I want the virgin queen to be mated in the remote area. I will wait this long to account for afterswarm queens who need approximately 10 days to be mated and to start producing brood. If the weather has not been good enough for a mating flight, I will leave them longer than two weeks. While the odds of capturing a swarm with the hoped for genetics are low, I believe it is worth the effort and it is a lot of fun too.
Catching swarms in bait boxes is like receiving a genetic box of chocolates – you never know what you are going to get.
I would appreciate hearing from you after trying the suggestions outlined in this article. Please contact me at Ostrofsky@pacinfo.com.
*The exception to leaving the swarm in the bait box for two weeks is for those who live in areas occupied by Africanized bees. Africanized bees do not show defensive behavior until they start producing brood. While you still need to reduce the mite population, the existing swarm queen must be replaced before she starts brood production. Move the swarm to your apiary after controlling the mite population and requeen immediately. Use a marked, hygienic queen to do this.