
Our Most Valuable Resource
By: Dewey Caron
Empty bee boxes, all too common with varroa mite enhancement of virus epidemics in our bees, need bees. In those boxes our bees need drawn comb. Drawn comb is the most valuable resource for the bees and also for the beekeeper.
A good time to produce additional drawn comb is when establishing new colonies. Depending upon which hive we use and our beekeeping philosophy, we might use pure beeswax foundation, plastic frames with the comb template, empty frames or top bars with a leading edge to obtain more drawn comb. The bees may cooperate and draw the foundation orienting their comb within the frame or they may adopt their own (different) cross- comb orientation.
The best condition for comb building is an intense nectar flow. Good weather for forager flight and crowded hive conditions likewise helps. We can stimulate the bees to build comb by feeding bees or by hiving a swarm. Newly started colonies need comb fast and can be good comb builders as they are intent on raising brood. Once colonies grow a larger population, they need to continue to draw comb to store incoming nectar.
Started colonies need drawn comb fast. But if you add a second box too soon, outer combs of foundation not yet drawn may be ignored as the bees naturally prefer to move upwards. Positioning of foundation frames is critical to obtain the best comb. You can re-position frames – switch frames from outside toward the middle – but like everything else in beekeeping, timing is critical.
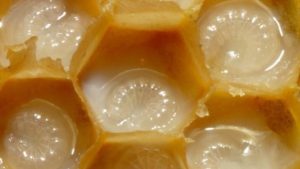
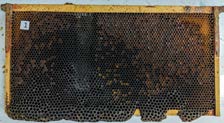
Parallel drawn natural comb
Starting a package
New beekeepers starting bees from a purchased package most likely means starting new frames lacking drawn comb. In advance of package arrival, you need assemble boxes then frames to position in the boxes. Next you secure the foundation in the middle of the frame. This is the most natural means. Assembly will take some time and positioning the sheets of foundation properly takes practice. Some beekeepers like to add only a starer strip (approximately one inch), rather than use entire sheets of foundation to save costs.
Use of plastic frames that have the six sided cell template will be an easier lift. Plastic frames with holes simulating cells are also available. Prices are comparable. Preassembled plastic foundation frames may require assembly of a wooden frame and then position of the plastic frame template. Others made entirely of plastic mean no assembly required.
Alternately you can purchase knocked down frames and assemble them and allow the bees to draw comb cells in the frame (foundationless). Warré hives have such frames. Top bar hives like the Kenya Top Bar hive feature just a leading edge to the lower surface of a bar at top that encourages bees to build their comb from the lower edge.
However you start, it is critical that bees draw their comb, whether from six-sided cell template foundation or top bar or foundationless frame, within the frame outline. You might have to cut comb built otherwise. This will waste their time and effort and be frustrating for the inexperienced starting beekeeper.
Frame to cull
Making more drawn comb
Bee colonies started as nucs or splits/divides will include some drawn combs from an existing colony. Nucs, smaller versions of starter colonies, mean you will purchase someone else’s drawn comb (usually three to five frames). Splits/divides are the same except the drawn comb comes from your donor colony. When the bees expand, you transfer the original nuc/divide frames into a standard eight or 10 frame box. At this transfer you will need to add additional frames of foundation unless you have drawn comb in storage to use.
Positioning the new frames on the outside of the drawn comb at time of transfer might be sufficient to get good drawn frames but the bees might ignore the foundation or only slowly add beeswax to draw the foundation. If weather is good and nights remain above 60 degrees, you can put the new frames right in the middle, positioning the drawn frames on both sides. There is danger of chilling brood with this division.
Alternately you can intersperse the new foundation frames among the drawn combs. One management option is one or two drawn combs, then a single foundation frame, then drawn comb. You sandwich the foundation frames between drawn frames.
You can also position two to three foundation frames together. If warm enough the bees will draw combs faster than putting the foundation frames on outside.
Whatever method used you can reposition foundation/foundation- less frames as the bees draw the new comb.
Paul Kelly of the University of Guelph has an instructive video on drawing of comb. View it at: https://www.youtube.com/watch?v=Q-8j5UExrg2o
When using foundationless or top bar hives, you will need to monitor progress of the bees drawing comb. They may not follow the desired outline. If you have some drawn comb, you can sandwich the foundation-less frames between them helping ensure the bees stay within the frame outline. Top bar frames are a different challenge as comb can be built at any angle and may wander off within a single top bar. After the bees start two to three combs new top bars can be positioned between the combs being drawn to achieve desired results.

Foundation frames (new wood) interspersed between drawn comb
Culling older drawn comb (and producing newly drawn comb)
Early Spring is a time to cull some of the oldest frames, especially those of the bottom box once the bees move upward. New foundation frames are best drawn at the middle of the top box (where heat and bees are concentrated). Some of the capped brood can be moved to middle of lower box and the new replacement frames put in the middle of top, either as group or sandwiched between brood frames. At time of movement of frames down, the frames to be culled can be removed. Since bees will be in upper box you do not need to cull them immediately – move them to outside edge of the lower box and mark them so you remember which ones you wish to replace.
If you divide a strong colony, replace the frames removed with foundation or foundationless frames. Put these new frames to be drawn in the middle of the top. If the nectar flow is not strong, feed the colony sugar syrup at the top. You want the bees to give immediate attention to drawing comb. They must need the comb cell space.
The longer it takes to construct new comb, the greater the chances you will not obtain top quality comb. Ideally a foundation frame should be attended to within a matter of days by the bees. With foundationless or when using only a starter strip of foundation, you may get combs that have considerable drone sized cells. Since you are seeking “natural” some drone comb should be expected.
Why will bees delay drawing foundation? Perhaps the foundation is not close enough to the middle warmth of the colony. Or the colony is just not strong enough to need to expand their brood rearing area. Or the weather is too cool and the foragers are not able to get enough nectar or pollen to push colony expansion. Or you are seeking to draw foundation frames at a time other than the spring time when daylength is increasing (meaning bees are not in an expansion model).
If foundation is not being drawn ask a neighboring beekeeper, preferably a more established beekeeper in your club (via club message board, forum or during a meeting) for suggestions. There is no one right way to drawn foundation. If you ask three beekeepers you might get six responses and all of them might be correct.
Drawing comb for honey storage
If you are asking the bees to produce comb for nectar storage, the same conditions are applicable. Bees must be strong, there must be incoming nectar, brood or previously stored honey occurs in the majority of cells of brood boxes and weather allows the foragers to get at nectar-secreting plants. We super above (hence the name). Early in the season we recommend oversupering, using more super space and as the nectar flow is winding down to undersuper so bees can consolidate their stores.
Getting good drawn comb for honey might involve use of a queen excluder, or not. Some colonies are reluctant to move through an excluder — some term them honey excluders. It is good practice to “alert” the bees when you add a super. Let them know you added space. Challenge them by adding more space than they might initially need (oversupering).
If boxes are the same size, moving a frame from a lower box on which the bees are storing honey is one way of advertising your addition. Creating a mess by dribbling scented sugar syrup or honey on some of the frames is another way. Using previously used drawn comb helps too. If you don’t have enough, try mixing some foundation frames into boxes with some drawn comb.
After adding the initial supers, the same strategy will apply to adding more supers. Move a frame from existing super up into added super (bait the super), make a mess in the added super to draw the bees into it to clean up or you can bottom super – add the newest super below existing supers in which the bees are using to store honey.
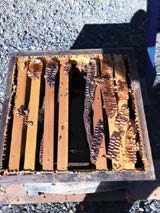
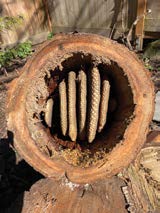
Warre cross comb
Troubleshooting
Make sure you have your frames arranged so that they are tight up against each other when drawing foundation or they are tightly sandwiched between drawn combs. Do not leave any extra bee space – frames are designed with bee space in mind.
With top bar hives or foundationless frames, the bees might not follow the orientation you desire. If the spacing is wrong bees will start building comb as they please. You don’t want bees building across two frames rather than within the frame outline. If left uncontrolled, it can lead to more problems and you will basically end up with a cross comb hive. Your hive no longer will have comb that is removable. You will not be able to continue inspecting/removing comb with such a hive.
Sooner or later all of us forget a frame and discover that the bees have built frameless comb in the space. If filled with honey remove it and cut the comb to let the honey drain from the cells. If it contains brood, turn it into a foundation-less frame, keeping it until the brood emerges. Or simply cut it out and get rid of it. Most of us will attempt some salvage considering the time and effort the bees went through to cover which hive we use and our beekeeping philosophy.
Level hive
Kanoe Reidel in https://www.beepods.com/why-level-hives-areso-important-for-you-and-yourbees/ asserts gravity plays a big role in how bees build comb. She points out that “Bees naturally build comb in line with the pull of gravity. So, when a hive is level, they create that ideal comb structure.” Good drawn comb begins in a level hive.
Ms Reidel asserts that when a hive isn’t level and leans in one direction or another, “the bees are thrown off. “Instead of building a vertical comb, they might “build their comb in an asymmetrical or undesirable shape.” The comb drawn in a hive that is not level might then “encroach on adjacent frames, creating a… significant source of frustration for beekeepers that requires a lot of work to fix.” This can mean cross combs built outside the frame outline Note to self: level hives when drawing comb.
Burr comb
Burr comb, sometimes termed brace or bridge comb is wax comb which bees have built to fill in spaces greater than bee space. It usually is considered a nuisance for beekeepers because it bonds hive parts together and can interfere with frame inspection. Burr comb isn’t an uncommon occurrence, so we try to remedy the situation that gave rise to the unwanted comb building.
Burr comb can make a beekeeper’s life more complicated. In an ideal world, honey bees would build nice, neat frames of comb, and nothing else. But, given a chance, bees will bridge gaps with wax comb. If a space is too small bees plug the gaps with propolis to keep their hive clean. Anything bigger and you get burr comb.
So what can a beekeeper do to prevent burr comb, and what should you do when it (inevitably) appears? One approach is to remove any superfluous beeswax that is built in unwanted places. The bees have spent time and energy building comb that you don’t want and means you spend time removing it and the bees waste more time cleaning up behind you.
Our Langstroth hives and all other contemporary hives are designed with bee space dimensions in mind. Bee space is often taken into account below the bottom bars but also above the top bars. Bees can’t jump from one box to another, so they build burr comb as ladders. We remove it and they then replace it. If we use equipment from several manufacturers, the dimensions are slightly different, and bees do what bees do – fill the “extra space.”
Alternately we add a spacer – say for Apiguard use – and then we forget it. This is extra space and if conditions are right the bees will fill it. Or we put a feeder on in the spring and then an empty chamber to contain the feeder. When we forget it, the bees begin to fill it with comb. Alternatively, if we don’t space the frames correctly, the bees will build between two frames, which makes removing the adjacent frames complicated.
It’s generally recommended that we remove burr comb. But that creates a disturbance and if there is brood or honey in some of the constructed cells it will create a mess. Bees that don’t get out of the way are squished. Unless you have container for the scrapings, such as a plastic pail with a lid, you then have to contend with the bits and pieces. Some beekeepers leave the burr comb on top of the inner cover or inside an empty hive box so that bees can recover any nectar and wax. Don’t throw it on the ground or you might attract skunks or step on it and track it into a vehicle or your home. It might even begin robbing in the apiary.
A word of precaution. When you remove burr comb or cut out “extra” beeswax comb make sure the queen isn’t on the piece that you take out of the hive.
Building comb. Basic to our bees and a good management practice we can “play with” to help make beekeeping fun and profitable. How do you build drawn comb? For best results work with your bees.