


Maybe?
By: James Masucci
I’ve been a scientist my entire adult life, which means I always experiment. The question that interests me the most is “how”. How does it work AND how do I make it work? So, it makes sense that I am trying to figure out the “hows” of beekeeping. This Winter is no different. How do I successfully Winter MY bees. I know the answer… plenty of healthy bees with plenty of Winter stores. Lately, I haven’t been very good at achieving that.
Before I expanded my operation, my track record was pretty good. My overwintering success rate was 15/30, 33/35, and 84/89. Then I doubled my size again and it all fell apart. The next year, I blamed COVID and the sugar shortage. I needed thousands of pounds of sugar and was limited to a single bag. That didn’t work and experienced >30% losses that I attributed mainly to starvation. The following year, it was laziness on my part. I couldn’t fit enough sugar in my truck so I fed less than I needed to and again experienced >30% losses. This year, my wife had major surgery so I couldn’t feed as much as I needed to (though better than last year). It seems like there is always an excuse, though I needn’t look any further than the mirror when assigning blame. The point is, we as beekeepers are not perfect and we always make mistakes. Are there things that we can do to minimize the impact of our mistakes?
I’m going to talk about two strategies that I am trying this year to help my bees get through the Winter. The first one will relate to my colonies that are in 10 frame boxes. I will refer to these as my production hives. The second one will relate to my over wintering nucs. These are in four frame boxes stacked two high (eight frames total). You may be asking why I am writing this now, and not this Spring when I know if any of the strategies work. Scientists know that only a small percentage of their experiments “work”. We fail more often than not. Usually, no one hears about the failures, making it likely that someone else will make the same mistake. So, I am putting it out there. My actions and the logic behind my actions, forcing me to report later on how my bees fared. This gives you time to think about my logic and take bets on whether I am an idiot or a genius.
My production hives
What I am doing to my production hives is pretty straightforward, but there are a few lessons to be learned. My first change relates to Winter feeding. For years, I have been putting dry sugar on top of my hives as an “insurance” policy. Typically, half the colonies eat the sugar. The set-up is simple. A sheet of newspaper, a spacer and several pounds of sugar. The sugar absorbs excess moisture and acts as insulation. The problem is this can be messy. The newspaper breaks, the sugar falls to the bottom and you have a mess to clean up in the Spring. So a couple years ago, I found pre-cut parchment paper to use instead of newspaper. It made the set up simple and the bees don’t chew through parchment paper so there is no mess in the Spring.
Ahh, but here lies the rub. Is it coincidence that I experienced my first heavy losses the same year I switched to parchment paper? I still had colonies eating the sugar. Here’s my thinking. When bees chew through the newspaper, the sugar is directly above the cluster. They have easy access to the sugar as they need it. With parchment paper, the bees must go around the paper to reach the sugar. That limits their access. During cold spells, when the bees are clustered, they have a pile of food right above their heads but can’t get to it. Hence, the strong colonies survived because they could wait for some warmer weather, but the weaker colonies starved. I am going back to newspaper. I have a pile of newspapers and I bought some precut newsprint. I will see if one works better than the other.
The second “experiment” on my production hives is to add some reflective insulation above the hive. I have argued for years that strong colonies don’t need extra insulation, especially in Missouri. I know beekeepers in Northern climates wrap their hives, and that makes sense. But I’m not in a northern climate. Besides, I have successfully overwintered 84/89 colonies, right? I already had starvation on my mind when I heard a first-year beekeeper speak at our club. She had an internal hive thermometer in her hive and showed what happened when she put two inches of foam insulation inside the outer cover of her hive. The internal temperature rose 20 degrees! If you think about the energy required for the bees to heat that space, imagine the Winter stores saved by raising the inside of the box 20 degrees. Being on our clubs program committee, I found Ashley St Clair from U of I to talk about her experiments with insulating hives. Same thing, insulated hives used less honey stores. If I am worried about my bees starving, then I should insulate my hives.
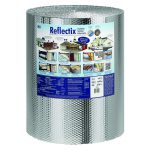
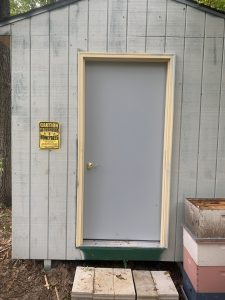
Image 1: This reflective insulation is only ⅛ inch thick and has an R-value of 3.7. It’s easy to cut to size and should help keep heat within the hive. To the right is how it looks when insulated.
 I make my own hives. My inner covers are made of ⅜ inch plywood and my outer covers are either ⅜ or ½ inch plywood. Pine has an R-value of one per inch thickness which means my hives have very little insulation on them. Even with a ¾ inch lid, you have an R value of less than one. Strong, well-fed hives can deal with this. But less than perfect hives struggle. Ian Steppler, out of Manitoba, uses some reflective bubble wrap insulation on his hives. I found some at the local building supply store (see image 1). It has an R-value of 3.7. This is the equivalent of a 3.7 inch lid yet is only ⅛ of an inch thick. All my hives now have this insulation on them. Hopefully, between the newsprint and the insulation, I will see a better outcome this Spring.
My Overwintering Nuc Facility
Each year, I overwinter several smaller colonies in four frame boxes stacked two high. This set-up is more robust than you might expect, especially when the colonies are side by side. These colonies are typically left over mating nucs or splits that I made after running out of 10 frame equipment. My business model is evolving to sell more overwintered nucs in the Spring and I’m trying to do that without selling off my production colonies. How can I efficiently overwinter more nucs?
Several years ago, I built a six frame observation hive that I had in my spare bedroom. I never failed to overwinter a colony in that hive, regardless of size. I learned a lot from that hive. The bees would loosely cluster all Winter long even though it was 68°F in the bedroom. I couldn’t feed them when it was cold outside. But, when they were flying, I could. My thinking is the warm surroundings made the Winter less stressful for the bees. They behaved as they should during Winter, conserving energy, but didn’t need large amounts of stored honey because they didn’t have to struggle to keep warm.
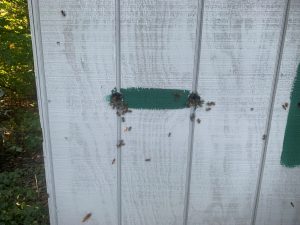
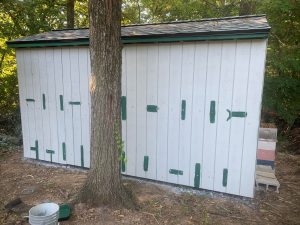
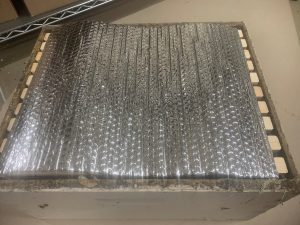
Image 2: My overwintering nuc facility. An 8×16 shed that holds 20 nucs per row, two rows per side. I used 1¼ inch holes as entrances to each hive and painted patterns on the side to allow the bees to orient to their home.
 Enter the idea of my overwintering nuc facility. When I visited Germany for work a few years ago, I got to see a working bee house. The colonies are kept indoors, with holes cut into the side of the building allowing bees free flight. The beekeeper worked the bees indoors and had overlapping window panes to allow bees that flew out of the hive to escape the building. This set-up mimicked my observation hive. My idea was to build a shed that allowed bees free flight to the outdoors, allowed me to work and feed the bees indoors and allowed me to “control” the temperature throughout the Winter. Before I invested in such a shed, I contacted both John Miller, a commercial beekeeper out of North Dakota, and Brandon Hopkins at Washington State University. Both thought it was worth trying.
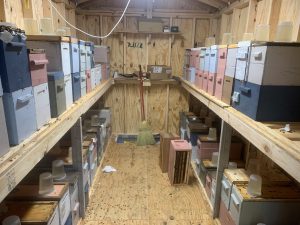
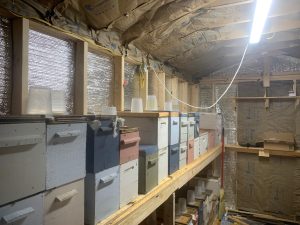
Image 3: The overwintering nuc facility has two rows of hives on each side allowing room for 80 nucs. There is sufficient space between the bottom and top hives for me to remove frames if necessary. Holes in the lids allow easy feeding as seen by the quart-sized food containers on each colony. The picture on the right shows the house after insulating. Reflective insulation was used on the walls and traditional fiberglass insulation was used on the roof.
 The shed is 8×16 with eight foot walls and can hold 80 nucs (see image 2). The studs are at 18-inch centers so there is 16.5 inches between them. That is enough for one 10 frame box or two four frame boxes. There are two rows per side (see image 3). I set the floors up as commercial beekeepers set up pallets. Permanent spacers and a permanent opening that leads to the outside (see image 4). I had to place a spacer on the wall of the shed to allow room for the handles I have on my nuc boxes. To add a colony to the shed, I just remove it from the bottom board and slide it against the wall into its space. There are holes cut into the lids so I can easily feed using plastic quart containers (see image 3). For lighting, I have both white light and red light. The idea behind the red light is so I can work the bees without having them attracted to the light. Unfortunately, I must have the wrong type of red light because they still fly to it. I also found it necessary to “plug” all the holes except the escape route. I found many dead bees near the door, until I went in and saw all the light coming through the edges of the door. After weather stripping all the cracks, that problem went away.
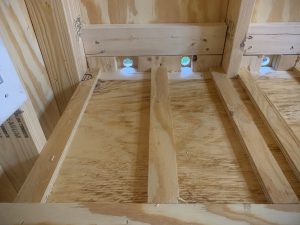
Image 4: Spacers act as bottom boards. By simply placing the boxes on the spacers, they have instant access to the outside. The 2×4 spacers on the wall allow for room for the
handles I have on my nuc boxes. I use corks to plug any holes that aren’t being used.
The big question for me was temperature. The controlled environment facilities commercial beekeepers use to overwinter thousands of colonies would overheat if they didn’t have a means to lower the temperature. Each hive produces the equivalent heat of a 60-watt light bulb. In my bee house, though, the bees have access to the outside. They should be able to control temperatures using their own air circulation. This has the added benefit of controlling CO2 levels as well. I put the bees in the shed without insulating to see what would happen. After having the bees in the shed for a few weeks the highest temperature I recorded was 78°F (it was 80°F outside) and the low temperatures were typically 10 degrees higher than the low outside. My plan is to keep the internal temperature around 45-50 degrees, and it can get below zero here in the Winter. So, I decided to insulate. I had some left over R13 insulation from my honey house project that I used to insulate the roof. And I used the reflective bubble wrap R=3.7 (image 1, previous page) on the walls (see image 3). I couldn’t use thicker insulation on the walls because the hives needed to butt up against the spacers. The insulation helped. But it was clear the bees weren’t putting out a lot of heat.
In addition to the insulation, I purchased a small baseboard heater that I could set to 50°F as a source of supplemental heat. We had our first cold spell of the season and the low got down to 25 degrees. The temperature in the bee house was 42 degrees (my unheated honey house was 32). On normal nights, I can maintain about 20 above the outside temperature. Not bad, but I still worried about our zero-degree weather that is coming. I purchased an oil-filled radiant heater that has a thermostat and also made the decision to insulate the tops of my nucs. In this case, I used Styrofoam insulation (R-4) with a small hole cut into it to allow feeding (Missouri gets warm spells where it is feasible to feed). The morning I put the insulation on was 15 degrees and the baseboard heater said 32 degrees on the floor. I hooked up the new heater and within a couple hours, the baseboard heater said 50 degrees. It was actually too warm and I had to adjust the thermostats. I found my set-up.
I currently have 70 colonies in the bee house. Their sizes range from two to six frames of bees. I don’t have a lot of hope for smallest ones, but I am hopeful for most of the colonies in there. Between the warmer ambient temperatures and the insulated tops, they should have an easier time surviving. Similarly, I have close to 200 “production” colonies outside that now have insulated tops and will soon have a supply of dry sugar. Hopefully, these steps make up for any mistakes that I made preparing them for Winter. We will know in the Spring.

