


Click Here if you listened. We’d love to know what you think. There is even a spot for feedback!
Read along below!
Off the Wahl Beekeeping
New(ish) Beekeeper Column
Mites on the Rampage
By: Richard Wahl
Mites: Not If, but When
As a beginner delves deeper into the art of beekeeping they often hear variations of the adage, “If you ask eight beekeepers a question about how to do something, you will get ten different answers.” This is largely due to the number of choices a beekeeper has to make based on their own finances, abilities, time constraints and the environment in which their hives will be kept. Experienced beekeepers often face a myriad of questions from the new beekeeper like, “How much will it cost?”, “What style hive should I get?”, “Where should I site my hive?”, “Should I go chemical free?”, along with a list of questions that could fill this article by itself. But there is a near 100% certainty that current beekeepers will face, more likely sooner than later. That is the question of what to do about the current mite infestation, when to test and whether those test results warrant treatments. If there is one question about beekeeping that all beekeepers will likely answer the same way, it is that if you do not test and treat for mites when it is appropriate, your hives will surely die.
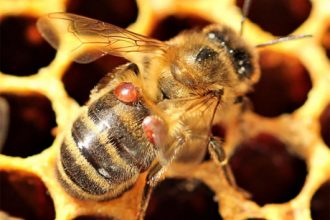
Two mites on a bee abdomen
A recent example of this came by way of a student’s remark during an in person bee school class this Spring. I assist four other experienced beekeepers teaching the ins and outs of beekeeping to new beekeepers as part of the SEMBA Bee School program. The individual who spoke stated he had lost his bees during the past two years and decided to take the class to find out what had changed since his experiences as a beekeeper in the ‘60s and ‘70s. As most experienced beekeepers are aware, the mite infestation first arrived in the states around 1987. It quickly spread through the beekeeping industry with no hives immune from this pest. This pest along with the explosion of pesticide use has made beekeeping much more challenging than it was over 50 years ago. This has resulted in the need for the present day beekeeper to keep a close watch on the mite loads in a hive as well as any other signs of deterioration.
Varroa Destructor
The parasite in question has been given the appropriate scientific name, varroa destructor. It would seem quite applicable as the mites (varroa destructor), when left to increase in numbers without intervention, can easily destroy the bees in a hive in a single season. The uninitiated new beekeeper may not even be aware of the reason for their hive’s demise much the same as the returning beekeeper noted previously. I can understand the new or returning beekeeper’s lack of awareness of the destructive nature of mites as I was unaware of this demonic pest when I began working with bees. Even after being made aware of the need for testing, and treatment when appropriate, I sometimes got behind in mite treatments or let the mite loads get too great and lost an occasional hive as a result. Another fact that has only become recently well known is that a vast majority of feral bee colonies have been wiped out by the varroa mite. It is no longer common to walk through a wood and come across bees nested in a tree cavity or some hollow space unless it is a recent swarm from a nearby beekeeper’s hive.
My understanding of the mite development process is as follows. The varroa mite attaches itself to a bee or to a bee pupa in a capped cell and eats on the bee’s body fat as a food source. In doing so, the mites pass a variety of viruses to the bees including the deformed wing virus which is more easily spotted by the beekeeper than other hidden viruses. As with any parasite, the mites are clever and have figured out how to sense bee pheromone in order to know about when a larva is to be capped. Just before that capping, a female mite will crawl into the cell to attach itself onto the soon to be capped pupa. While feeding on the capped bee pupa, the female will lay an egg that develops into a male mite. The three or four mite eggs that follow at roughly thirty hour intervals will be female mites. The male mite egg matures first and then mates with the female mites which follow in development. Once the bee larva grows into a mature bee, now carrying a number of viruses passed on by the mites, the process starts over as the new bee emerges and the female mites move to new bee hosts or into new soon to be capped cells after about a week of living on their initial host bee. The male mite dies after they have mated in the capped cell. Once mites are found to be present in the hive they will cut down the life span of any host bee due to the viruses that have been passed to that host. A super resource published by Honey Bee Health Coalition (HBHC) that is free online is the 8th edition of the Tools for Varroa Management Guide found at: https://honeybeehealthcoalition.org/wp-content/uploads/2022/08/HBHC-Guide_Varroa-Mgmt_8thEd-082422.pdf
As bees forage among flowers or move about the hive, mites may disengage from their initial host and move to another bee. In this way, bees that stray to other hives may carry a mite or two with them to infest a different hive. I have found that when testing a captured swarm for mites there is often a greater number of mites found among the swarm than I find in my own established hives. An excessive mite load in a hive may be one of the reasons for a hive to decide to swarm. I make it a point to test any captured swarm for mites within a few days after their placement in a hive. The suggested treatments that follow, coupled with the brood break as the swarm reestablishes itself in a new hive, cut the mite population down considerably.

Deformed wing virus, one of many viruses passed on by mites. Photo by Honey Bee Health
Brood Breaks as Mite Control
A natural brood break occurs when a hive decides to swarm. Since the mites need capped larva to reproduce, a swarm will not provide immediate capped brood. It will take the new swarm a few days to build new comb and another nine days after the queen starts laying eggs for cells to be ready to be capped. During this time the mites have no way to reproduce. Mites can live up to two months and will be able to wait out the brood break time. During the Winter, much like the bees, mites can survive for much longer hidden between the sclerite plates of a bee’s exoskeleton. This is why it is good to treat for mites during this brood break as any mites living on the host bees will be exposed to any mite treatment the bees come in contact with. Any mites that were already in capped brood that was moved to a new starter nucleus (nuc) or hives will be able to reproduce in the cell and emerge with the bee to continue the cycle. A typical brood break will last about three weeks for a new virgin queen that needs to go out on mating flights before beginning her egg laying. Since drone brood remain in capped cells for three more days than worker bees, mites prefer to enter capped drone brood cells if they are available.

Mites on a drone pupa
Green Drone
Comb Foundation
Bee supply companies sell green drone foundation used for the purpose of capturing mites.
Depending on the manufacturer a standard deep frame has approximately 3,400 available cells on a side while a drone frame has only about 2,100 cells due to their larger size. Drone frames work best in the Spring and early Summer when hives are producing drones. After I do a split, with capped brood frames placed in the center of the super, I add a green drone frame next to the capped brood frame for the bees to draw out. Since the larger drone cells are near the capped worker brood, the mites will tend to favor the slightly larger drone cells that the bees make on the green drone frame. This gives the mites nearly three extra days under the capped brood during which time the female mite can lay an additional mite egg or two. It is important to know when the first drone cell eggs are laid or when the first capping of drone cells takes place. Drones take twenty-four days after the egg is laid, twenty-one days after the egg turns into a larva or about fifteen days after the cell is capped to reach maturity and emerge. These times can then be used to estimate when a beekeeper needs to remove the drone frame from the super in order to destroy those drone cells and mites a day or two before drone and mite emergence. The drone frame cells can be scraped off or frozen for a day or two, left out to rewarm and be returned to the hive. Another method I know, used by beekeepers who also have chickens, is to set the frames out where the chickens can feast on the drone pupae. Using the freeze, thaw and return method does not require the bees to build new comb. The bees will uncap the dead drone pupae, clean out the cells and allow the queen to re-lay eggs in them. Since it is estimated that bees require about eight to ten pounds of honey to make one pound of wax, this savings in resources is an asset for the bees. I like to repeat this process once or twice in the early Summer nectar flow season as it seems to cut down on my mite counts significantly as we move into late Summer and early Fall.
Another advantage of this system is that it remains free of chemical treatment use as part of your Integrated Pest Management (IPM) treatment plan. Getting an early start on mite problems may well result in less need for chemical treatments later in the season.

Green drone frame, a hard tap on cement partially shook out some of the capped drone.
Another method to get the bees to build drone comb is to place a medium frame next to a deep brood frame. The bees will draw out drone comb in the extra space below the medium frame which can later be scrapped off or frozen using the same technique as for the green drone comb frame. Care must be taken to be sure any form of drone comb is removed before the twenty-four day egg to emergence of the drones or one is simply adding to their mite problem.
Testing for Mites
There are several ways to test for mites and I have used three of the most common methods. The first is a screened bottom board also called a sticky board. After years of beekeeping and keeping records of mite counts that occurred on my sticky boards, I know when I should consider further testing or whether a mite treatment may be needed. A one inch grid on the white sticky boards makes counting mites a bit easier. I clean my mite sticky boards by scraping off any refuse with a three inch wide paint scraper. I then spray the board with cooking spray or give it a light coat of cooking oil that was previously used for a deep fry which would have gotten discarded anyway. The idea is to have just enough of a sticky surface such that any mites, hive beetle or wax moth larva get stuck on the oily surface. I leave the cleaned screened sticky board under the hive for three days. I will check it after twenty-four hours and typically, if there are more than five to ten mites dropped in a twenty-four hour period in the Spring, it is time to treat. In the Spring and early Summer, most mites will be under the capped cells. Mite counts may be heavier in the Fall due to the larger number of bees or size of the hive and more mites moving about outside of capped cells. I believe Fall mite counts should not exceed twenty in a twenty-four hour period. Leaving the sticky board under the hive for three days and then dividing the mite count by three gives a more accurate mite count. The one problem with this method is that it does not take into account the strength or how large the hive is. A single deep may have a very different count than a triple deep. The underlying concern is the number of mites per bee as opposed to the simpler mite count per hive. Although I still like the use of screened sticky boards I also make it a habit to use the powdered sugar roll or alcohol wash method of testing for mites.
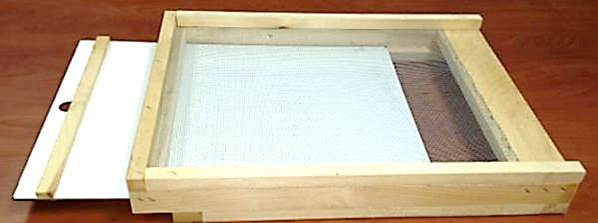
A light coat of oil or oven spray is put on the removable white “sticky” board
After a captured swarm has settled into a hive and there is capped brood apparent, I like to do a powdered sugar roll mite test. This involves collecting a half cup of bees from a brood frame and placing them in a jar with a tablespoon of powdered sugar. It has been determined that the count of half a cup of bees is 300. The jar needs to have a screened lid. Roll the bees around in the jar until all the bees are coated with the powdered sugar. This may take a few minutes. Let the jar sit for two to five minutes as the bees proceed to clean themselves off. Then invert the jar and vigorously shake the bees and powdered sugar over a white container with a bit of water in it. The powdered sugar will dissolve in the water while the mites that have released or simply been cleaned off by the bees will easily show up in the white container for a mite count. The powdered sugar dust makes mite breathing difficult and also makes it difficult for them to cling to the bees. If the count is more than three in the Spring or Summer and more than nine in the Fall or early Winter one should consider a mite treatment so as the mite problem does not get out of control. Dividing the count by three gives a threshold of 1% in the Spring or 3% in the Fall and anything over this threshold indicates it is time to treat. Allowing hives to exceed these percentages may result in a growing mite infestation with their resultant virus spread that often leads to a hive unable to recover or survive the following months, in particular if going into the Winter. Those who favor the powdered sugar roll feel it does not kill as many bees as the alcohol wash test. However, it has been found that the vigorous shaking does nearly as much damage to the bees as an alcohol wash.
For the alcohol wash, the steps are nearly the same as for the powdered sugar roll. The difference is that rather than powdered sugar, a half cup of 25% or greater alcohol solution is used. This will kill all the bees as well as the mites but is believed to be a more accurate mite test. The same half cup of bees is collected off a brood frame, placed in a jar with a half cup of alcohol. It will be a little less expensive if blue or green car window washer fluid is used which works equally as well as the alcohol. After shaking, the mites will fall off the bees and can be counted in the liquid in the bottom of the jar. Treatment recommendations are the same as for the percentages given in the sugar roll method.
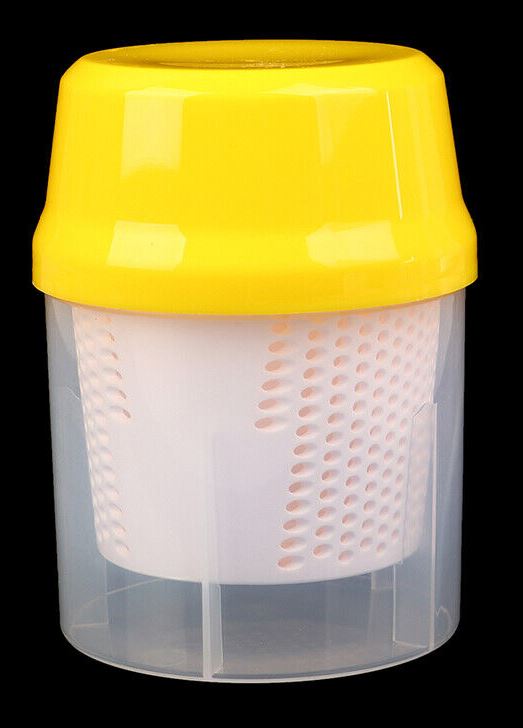
A commercially sold mite collection container.
Other Treatments for Mites
When I first learned of the extent of the mite problem well into my second year of beekeeping, I used a product called Check-Mite. At the time it was effective against both hive beetles and varroa mites. It was enough to get me through my next year or two, but seemed to have less effect as the years went by. At some point, I was made aware that mites were starting to build a resistance to reuse of some treatments, much the same as human antibiotics have become less effective due to over use. I then began to use different treatment types on a rotating basis.
As noted previously, I start with the green drone frames and made sure I painted the plastic foundation with a coat of beeswax before putting them in a hive. The coat of beeswax painted on any plastic foundation will entice the bees to draw out comb on that foundation much sooner than if it is left uncoated. After one or two cycles of using the green drone foundation, I normally follow that up with a Formic Pro treatment in late June or early July if a mite test calls for it. An advantage of using Formic Pro is that it is the only treatment that penetrates the caps of brood cells to kill the mites reproducing within, and it can be used with honey supers on the hive. If needed, I use another treatment of Formic Pro in the late August or early September time frame. I do not stick to a specific schedule of treatment use but base the need on what I find in my tests for mites.
In a recent Summer, I had a hive that was not showing any mites. Not having faith in this result, I quickly tested a second time and got the same results. The following Fall my test on that hive came in just below the treatment threshold. Other than the green drone frame, I did not treat that hive through the Summer and made sure to note it as a future parent hive when doing splits due to its very low mite counts. Although there is a philosophy that proposes treating all hives if you have to treat any one hive, I feel this might only add to mites building a tolerance for treatments.
In the very late Fall, I will use an oxalic acid dribble. I do not use the oxalic vapor method since the dribble method requires less expensive equipment and I have had good luck with the dribble. I believe the dribble method works well for the hobby beekeeper although it is a bit more time consuming. The dribble method amounts to dissolving oxalic crystals in water and dispersing five milliliter per frame seam directly onto bees between the frames using 50 ml max per a 10 frame deep. I do this only on a warm day when the following nighttime temperature will remain above freezing. For the treatment of nucs, I like to insert a HopGuard II strip at the time of making the split as noted in last month’s article titled “Nucleus Hives”. Whichever treatment method is used, the beekeeper should follow the labeling instructions to the letter. A great resource that explains the variety of mite treatments currently on the market is the manual, Tools for Varroa Management Guide as mentioned previously. It provides an excellent guide to IPM.
Another source that provides a good explanation of mite treatments, with recently updated survey information as to what options most beekeepers use, is found at: https://www.beekeepingfornewbies.com/
comparing-varroa-mite-treatments/. The comparison listing near the bottom of that article compiles data related to percentages of non-chemical IPM methods that are often employed by beekeepers. Add the completion of mite tests to your inspection regimen and choose treatment options when necessary that work best for your beekeeping needs. Avoid the inevitable mite rampage in your hives from getting out of control.

