By: Roland Gerner
With this method, even beekeepers who have difficulties with grafting due to failing eyesight or other reasons can breed queens. It is based on the “Cell punch method” described by the late English beekeeper David Cushman.
Material
– one 2 ml disposable syringe per cell (a box of 100 costs less than five euros on the Internet. If you only need a few syringes, you can also get them at a pharmacy. Or ask your dentist or family doctor.)
– Express clamps 7-12 mm, for example from the hardware store
– a sponge cloth
– a sharp knife.
The steps of procedure
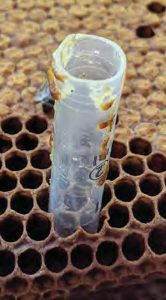
1.Pull out the plunger completely from the syringe and cut off the two ends of the syringe barrel with the knife.
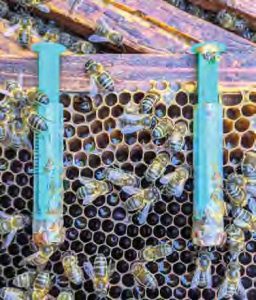
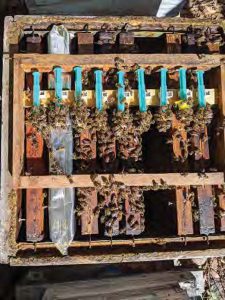
2. Prepare your breeding frame by placing a crossbar in one frame and attaching the express clamps to it (see large picture above). If you want to cage the queen cells, you can drill a hole in a queen cell cup according to the outer diameter of the syringes and attach them to the syringe barrel with wax or superglue.
3. At the given time, remove a comb with open brood from the colony from which you wish to graft eggs and sweep off the bees. Then look for young larvae, which should be in the largest possible amount of royal jelly. Place the moistened sponge cloth on a flat surface and the comb on top of it. The area from which you want to punch out the cells should be above the sponge cloth. It prevents the wax from sticking to the table when punching out a cell. Pay attention to the wires so that you do not hit one.
4. Hold the syringe barrel so that the two rings visible inside are at the top and punch out the cells you have selected using circular movements. You must press until the cylinder hits the sponge cloth. Then pull the syringe cylinder out of the comb again, leaving the punched-out cell in the cylinder.
5. Then insert the syringe plunger on the side of the syringe where the punched-out piece of comb is located. Push the piece through the cylinder until the plunger is stopped by the lower ring in the syringe.
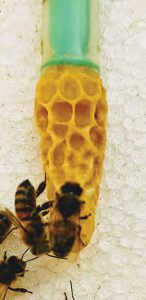
6. Make three vertical incisions in the walls of the cell with the knife, fold the cell walls down, and press them onto the outer surface of the syringe barrel.
7. Then insert the syringes with the cells into the clamps of the breeding frame. Afterwards put it either in an incubator or in a nursing colony. The acceptance rate by the bees is normally quite high.
Additional tips
Practice punching out first on old combs that you want to melt down anyway, or on drone combs. I recommend that you process all the cells you need up to step 4, then put the frame with the breeding material back in the colony and only then continue with steps 5 to 7. By the way, the holes created by the punching are rarely closed again by the bees.
If you give a syringe with a nursed queen cell into a hopelessly queenless colony 36 hours after punching out the cell, you don’t need to cage the cell and the queen will hatch in the colony. The syringe can be hung between two frames.
Summary
The method is much easier in practice than the description might suggest at first. Since I need only a few queens, it is ideal for me. In contrast to grafting, it can be done anywhere, even if the conditions are not optimal. Try it and you will see, it is really quite simple!
The advantages of the method
– The larvae remain in their natural cells.
– The queen does not have to be found in the colony.
– The cost of materials is very low.
– With a little practice, the cells are punched out very quickly, and the comb can be hung back in its colony after a short time.
– The syringes with the queen cells can be easily removed and placed between two frames.
– Reprinted with permission from Deutsches Bienen Journal