


By: Alice Eckles
Beeswax is the most inspiring and accessible art material I can think of, and I have been a professional artist and art teacher for many years. I am also a certified Waldorf teacher. Beeswax plays a prominent roll in Waldorf education. The children become experts at modeling colored sheets of beeswax into many imaginative scenes. They draw with real beeswax crayons, both block and stick. The Waldorf educational system values beeswax as a high quality natural material that when used as an art supply, nurtures children’s imagination and helps develop life skills.
I have enjoyed using beeswax in encaustic painting, at Easter creating Ukrainian eggs with my family, and exploring the art of batik. In the instance of Ukrainian eggs as well as in batik beeswax resists the watery dyes and provides a crisp contrast between colors. I have tried using non-beeswax from a regular commercial candle for Ukrainian eggs and it simply didn’t work. Beeswax has many special qualities not fully understood. I don’t mind not knowing exactly why beeswax works so well for so many artistic purposes. I like the mystery of this material that is so pleasant to work with.
As a beekeeper and an artist I am excited that there are so many art supplies I could potentially make with our beeswax if only I had the time. I could make beeswax crayons, colored modeling beeswax sheets, and encaustic paints. I could make sealing wax for sealing important letters. I have made encaustic paints for myself on an as needed basis, and I make bulk wax that can be used for various projects, such as Ukrainian eggs, but that is as far I have gotten in making art supplies. This fall the leaves and black-eyed-susans were so pretty I was inspired to dip some in beeswax to decorate our honey booth. People often ask, “What do you do with beeswax?” when they see the bulk wax at our honey booth. There are many uses for beeswax and beeswax as an art supply is my favorite category. Beeswax is the chief wax used for artists’ materials. Here are a few art techniques employing beeswax.
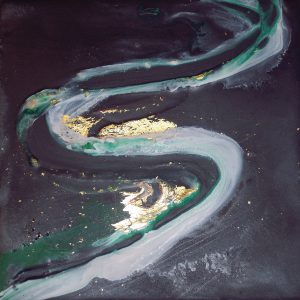
Alice Eckles, Cosmic Swirl, Encaustic, 2010, 9×9.
Encaustics
Encaustic painting, or painting with hot beeswax, is an art that comes to us from ancient Greece. Greek painters in Egypt painted the famous Fayum funeral portraits in the 1st through 3rd centuries A.D. The word encaustics, or in Greek enkaustikos, means literally to burn in. Though encaustic painting may be man’s earliest easel painting method, it was not the most convenient way to paint and was later displaced by new mediums such as tempera and oils that did not require heating. Encaustic painting became for a time “a lost art”. However during the eighteenth century mural painters sought a new material that could withstand dampness over time, and the beeswax based paintings by ancient Greeks offered a potential solution in this regard. With much research the lost art was found. The revival of encaustic art continues today, aided by electronically heated equipment.
The classic encaustic painting process is quite simple. You will need beeswax, resin, and pigments. Light or white beeswax is best for color clarity. A muffin tin is a handy item for melting your colors in. For my “hot palette” I use a single electric burner and a metal plate on top of a few bricks to make a table over the burner. Then I set the muffin tray on that with mostly beeswax, a dollop of resin (one part darmar resin crystals to eight parts beeswax), and various colors for the different compartments. For pigment I use oil paint, oil pastels, ground chalk pastels, or pure artist’s pigments. Some spices and even shades of dirt will work to add color. The surface you paint on should be hard, so that the paint cannot crack off. Clay board, masonite, and matt board are commonly used. To paint I choose brushes that I won’t need for anything else and I dedicate each brush to its own color. No brush cleaning is necessary. Metal palette knives can be heated and used almost like a brush, but also as carving tools.
Encaustic painting is a versatile art that is used by many artists to expand the way they are already working with materials. For instance an oil painter might simply add oil paints for pigment to the melted beeswax and resin, or a collage artist might use the melted beeswax and resin to glue papers to a backing material. As a multi-media and print making artist myself I use encaustics with oil paints, to glue papers, image transfers, relief carving, and with pastel drawings.

Jennifer Hansen Vyhnak, ‘Thank You, Vincent,’ batik, 2014, unsigned, 11×10-5/8. Artist’s collection.
Batik
Batik is a way of producing colored designs on fabric. First designs are painted with hot wax, and then the fabric is dyed. The waxed areas resist the dye and thus an image is made. A mixture of beeswax and paraffin wax are used to paint the designs. Beeswax is excellent for adhering to the fabric but does not give the crackled effect that some artists want. If crackle is not a desired effect pure beeswax can be used. The word batik may have been derived from the word “ambatik”, meaning “cloth with little dots”. Batik was developed in the Far East, Middle East, Central Asia, and India, and reached its greatest peak of accomplishment in Java where it is still popular.
Designs are drawn in beeswax with a Tjanting, or stylus, onto the cloth before it is dyed. The cloth can then be dyed repeatedly with new designs between each dye color so that there is an overlapping effect; each new beeswax design preserves the color of the cloth before the next dye bath. Therefore preplanning the color sequence is important. Starting with the lightest colors first and using related colors helps the color scheme develop in the way you intend. Cotton, muslin, or silk are good choices for batik. Be sure to wash out any sizing, the chemical residues left-ever from the manufacturing process, from the material before beginning. A frame, or stretcher to hold the material flat as you draw your designs with hot wax may be useful. When the wax drawing/painting and successive dying process is completed to the artist’s satisfaction the final step is to remove the wax. An easy at home method is to place a few layers of newsprint (unprinted) or brown paper bag paper over and under the fabric, and iron with medium heat until wax is melted out and absorbed into the paper.

The Eckles family Easter eggs, 1999.
Ukrainian eggs
The batik method is also used in Ukrainian egg dying, a traditional Ukrainian practice begun long before the birth of Christ. In early sun worshipping cultures, birds were magical as they were considered the only creatures who could get close to God, and their eggs were also believed too have special powers. As a source of life the egg was honored in rights–of–spring festivals and decorated with nature symbols. Today Ukrainian egg decorators embrace Christian symbols and celebrations as well.
I can’t over emphasize how much fun this activity is when shared with family, friends, and community. I recommend a visit to Ukrainiangiftshop.com before Easter. There you can buy excellent dyes, kistky (stylus), a Blas-fix egg blower with egg drill, beeswax, as well as guides and design books. I recommend getting many kistky, for all your friends. In a pinch I have made a stylus using a pencil, a paper clip, and the metal from a wine bottle. I made a wax reservoir from wine bottle metal, then made a loop around that with the paper clip, and inserted the metal ends of the loop into the eraser of the pencil. Voila.
To make a Ukrainian egg, first wash the egg in soapy water or vinegar water. Have your dyes mixed and ready. Dry the egg. Next use the Blas-Fix egg blower and tiny drill included to empty the eggshell of egg liquids. Make sure the egg is clean and dry. Next some people draw the design with a pencil on the egg first but I don’t recommend it because you will be able to see the pencil in the final design and if you try to erase it the wax and the dye don’t work right and instead there will be a dark smudge. A good way to start your design is to draw wax lines with your kistky dividing your egg into quarters vertically and then in half horizontally. Then dye the egg in a light color. Use your kistky again to draw designs, pictures, and symbols inside each of the sections, dying the egg in a new color before you add more details. After you have been through this process a few times, use your darkest color, and if you believe your design is complete it is time to remove the wax. This is an exciting step as the beauty of your colors and drawings is only now revealed. One way to remove the wax is to hold the egg above a candle flame, rotating and wiping with a paper towel while being careful not to get any smoke marks on the egg. Another way is to warm the eggs in the oven at a very low temp and gently wipe off the melted wax.
Beeswax remains the most versatile and broadly used product from the hive. Uses for beeswax include candle making, metal casting, modeling, cosmetics, food processing, industrial technology, textiles, varnishes and polishes, printing, and medicine. For the artist there are many opportunities to use beeswax: in painting, in modeling, in crayons for drawing, Ukrainian egg dying, batik, sealing wax for love letters, carving, lost wax sculpture. Artist Aganetha Dyck collaborates with honey bees to create her beeswax covered sculptures. See http://laughingsquid.com/artist-collaborates-with-honey-bees-to-create-fascinating-beeswax-covered-sculptures.
So you see when it comes to beeswax you are only limited by your imagination.

