


by Jim Thompson
Honey bees are amazing insects, but you already know that but I just wanted to reaffirm that information. The strongest geometric shape is the circle. It is the concept behind steel toed shoes which are made to protect a person’s toes from heavy weights. A chicken’s egg cannot be broken by a human when placed in the center of one’s hand and that person tries to squeeze it. Of course there are a few stipulations; the egg must not be cracked prior to placement, no gouging of the egg with your finger nails, and no beating or pounding on the egg.

Wax dipping tank.
You can surround the most area with the least amount of edge material, if the area is in the shape of a circle. That is why many companies use tin cans to package their food. If we try to stack or package tin cans into a compact area we find that there is much less wasted space between the cans if they are staggered. However every row contains a half can at the end of each row and therefore the purpose of staggering the rows is defeated.
I am reminded of the story about a ship that sunk and when a case of cans was recovered, the pressure from the water had reshaped the cans into a hexagonal shape. Thus the hexagonal shape is close to the circle in strength but also has a small amount of wall material needed to enclose the area. The hexagon also shares common walls when stacked together, thus is very efficient in saving material.
I don’t know how honey bees know how to make their cells hexagonal, but they do. In the wild, the honey bees will build their comb from branches or some other object that serves as a “roof”, but in rare instances they can support their comb from the side or bottom.
In order for a bee to produce wax she usually hangs from a support. On the underside of her body the wax glands are exposed and wax flakes can be excreted. By using her free legs, she can scrape off the wax flakes and transport, shape, and attach the flakes to the area where beeswax is needed. Younger bees are generally better suited for this activity, but sometimes older bees that have gone through winter may be required to become wax producers.
Over the years, beekeepers have used different tactics when raising bees and have found that by providing a foundation for the bees, the production of honey and brood is increased. At one time beekeepers simply used frames that had a “V” foundation guide. Later when foundation was made, the beekeepers would cut the foundation into strips that would be put in frames to hang down about ⅜”.
Starter Strips & Wax Tubes
To install a starter strip in a frame was a common practice of placing beeswax in a groove of the frame top bar and waxing it in or pressing the foundation into the top of a basswood section.
To wax the frame, it was turned upside down and a wax tube, (tool), was filled with hot wax and kept in the tube by placing a finger over the vent hole on the handle. You would then position the end of the wax tube between the starter strip or foundation and the top bar and release your finger from the vent hole. Wax would flow out and so you would move the tube along the frame and tilt the frame to help the wax flow.
Many times the wax would get cold and thus this process didn’t work as well as it was intended. I found it better to modify an “old” serving spoon. You bend the end of the spoon so it has a smaller and sharper tip. You want to be able to pour wax off the end of the spoon in a small stream. After a little practice and experimentation you may decide to bend the handle of the spoon to be like a gravy ladle so you may dip into the hot wax reservoir and yet be able to pour the wax easily.

You position the foundation and frame as you would with the wax tube, but your activity is more of a pouring and tilting process. You pour a little wax in the junction of the wax and frame and tilt the frame so the wax runs down the desired junction. If you run out of wax, you move down the frame to that point, add wax and continue tilting the frame. When the wax comes close to the end bar, the tilt of the frame is reversed and the wax goes in the other direction. If the wax is too hot, it may take several cycles of tilting the frame for the wax to cool and solidify. You will be surprised how quickly this method of attaching the foundation goes once you get set up and determine how much wax is needed.
Make Your Own
There were two methods in making your own foundations. The leaf press was a large form or mold that had the hexagonal pattern and a corresponding heavy top. You would simply pour beeswax into the tray and lower the top and let the beeswax cool. If everything went well you could open the mold and peel out a sheet of foundation that would need to be cut to size. The problems that one would encounter with this method were to get the proper amount of beeswax in the mold, getting the beeswax to release from the mold and having the mold with the desired cell size.
Another method was to render about three gallons of beeswax and have it in a tall dipping tank. You would then dip a long, wide flat board in the tank until there was a build-up of about 1/8” of wax. After cooling slightly, you would scrape off the wax from each side of the board thus having two sheets of plain wax. You would then run the sheets of wax through a set of foundation rollers to get the desired thickness and design on the wax.
Again the common problem was being able to have foundation rolls that had the desired cell size. Efforts have been made to make the cell size the same as the bees normally make, but bee cell sizes change with the race of honey bees, life habits of the bee, time of year, and weather conditions. The early foundation mills were slightly off from the size that the Italian bees used. Then starts the discussion of what is the perfect cell size. Do you prefer a larger cell as it will allow you more honey per cell or do you choose a smaller cell to allow bees to develop faster? A larger cell may help in raising drones for queen rearing operations and could also be used in mite control by freezing or killing the drone larva, but there might be a reduction in brood and honey production due to the missing or damaged comb.
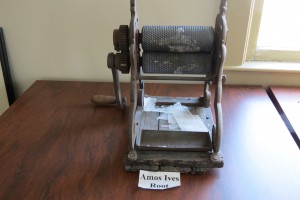
Old Mills
The foundation rolls pictured were made in the time period of 1886 and you will notice that this is the smaller 6” set. The common practice was to cut the foundation into strips or squares for comb honey production. The larger 10” rolls (not pictured) were used generally for sheet foundation for the deep frames and you could adjust the thickness of the foundation. An improvement in making the foundation was to have the sheets of wax come off three different mills and be joined together in one sheet. This was known as triple ply foundation and was a little stronger due to the plies and was a slightly thicker sheet.
The early foundation mills had cylinders that had holes at the center points of the cells. A hexagonal headed lead or soft metal “pin” with the three sided base pattern of a cell was inserted into the holes. Therefore one could repair the rolls by replacing the pins. However the cell size could not be changed.
The proper orientation of the cells was found to have the points of the cell vertical in the hive. It is interesting that if bees were living in a tree and if that tree is cut down or breaks causing the bees to have a change the cell orientation, that change takes place in a very short time. A similar situation happens when you are trying to have bees leave the comb by reversing the slope of the cell. If you don’t remove the “old” comb soon enough, it will be reworked and the bees will continue to use it.
New Mills
The newer foundation rolls are meant to make foundation in continuous sheets, so there is a process to form beeswax in large rolls of wax that consist of flat wax that is wound around a spindle. As the wax passes through smooth rollers it is pressed into the correct thickness and cut to the proper the width of the sheet. Then the wax will pass through the embossing rollers which will determine the cell size. The foundation from these rolls would be cut to length.
The wired foundation is made from bigger foundation machines that produce the foundation coming out with the correct width. The vertical wires will join the foundation after the rolls, be embedded, and be cut and bent. Thus you can see that there could be several foundation machines running or several different set ups required to run the different sizes and thicknesses of foundation needed.
New foundation rolls are available and you may choose cell sizes or smooth rolls and whether the rolls are hand operated or electrically driven. The newer foundation rolls are about 10½” in length but there are larger models.

The machine that makes the foundation rolls is a three headed milling machine and to those that are machinists it is a common machine. However you rarely see one as there aren’t many applications where a three headed machine is needed. Thus you will see one that was pulled out of production and still has a foundation roll still in its vice.
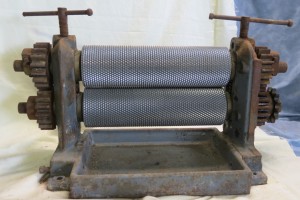
Small set of commercial foundation rolls for regular
worker cell foundation.
When I was a county bee inspector, I came across a beekeeper that put regular door screen instead of foundation in his frames and his bees would build on it. It seemed to work.
During World War II there was a shortage of beeswax as one of the uses of wax was to lubricate gun barrels. So for a time foundation was made out of a thick aluminum foil. The bees did not like to use it but with some coaxing with sugar water, the bees would draw out nice looking comb. However it was found that in the northern states the cold of the Winter would transfer through the hive and raise havoc with the cluster.
Another form of the aluminum foundation was made in fully developed cells. A major drawback in this foundation was that cells could be damaged by rough handling or bumping the cells against other objects as well of the heat transfer problem.
After the war, beeswax became more plentiful and then there was confusion caused as to what thickness one should use. Do you use single ply, triple ply, thin surplus, or wired? The size that you use is determined by the type of frame top bars and bottom bars used and the planned use of the foundation.
One mistake made by many beekeepers is to use single ply or plain foundation for comb that will be used in chunk honey, cut comb honey, or sections. Yes it is heavier and provides a straighter comb but it also makes the end product chewy, due to the extra wax. The foundation that one should use in “eating” comb is either the thin surplus foundation or starter strips or squares. When you use starter strips, the bees will then make their own delicate foundation. A trick that I learned while I was an inspector was to horizontally wire the thin surplus frame. Then just before cutting out the comb, you cut the wires on the end of the frame and put an electrical short on each strand to heat up the wire and pull it out the end of the frame. A battery or a train transformer works well for the electrical current.
If you extract with foundation that is unsupported, thin, or very new, there is a good chance that you could have it blown out of the frame.

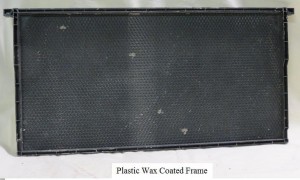
There’s also a plastic sheet about the same thickness as the aluminum foil sheet. It was embossed with the hexagonal pattern and had communication holes in the lower corners of the sheet and a metal strip on both ends to keep it straight. It is coated with a generous amount of beeswax on both sides and the bees like to use it. However if the beeswax coating is removed down to the shiny plastic, the bees will have nothing to do with the foundation. So you are left with the decision of replacing the sheet or try to apply a thin coating of beeswax back onto the plastic.
Adding Wax
If you decide to add beeswax on to the frame, there are still more considerations that you face. Do you spray on the coating of wax? Do you brush or pour on the coating of wax? Will you destroy the hexagonal pattern of the base plastic? Are you sure that the beeswax that you use is clean and free of diseases and insecticides? These are the same problems that the manufacturers of all the other plastic foundation face.
When you use beeswax foundation in a frame it is just a matter time until a mouse comes into the hive and chews a large hole in the foundation. Besides the nest, hair, and smell of the mouse, bees will stay away from that area. In the Spring when you find the damage, you will try to clean up the mess. If you put back the frame with a large hole in the hive the bees have a tendency to repair the hole with drone cells. Thus you have choices; cut and install a piece of foundation to fit the hole, replace all the foundation in that frame, or do nothing and raise drones. If you opt for the latter choice, I would recommend that the frame be placed near the inside wall of the hive to discourage the queen from laying eggs in the cells.
Plastic foundation is available in sheets to be inserted into frames or in complete frames. They are available in different cell sizes, plain plastic, coated with beeswax, and in a variety of depth of the cells. It is a real time saver in that you can open the box, put the frames in the hive and you are ready to put the super on the hive. You do not have to worry about wiring the frame or the foundation slipping. Wax moths and mice do not do as much damage to the plastic as they normally do to a wood and wax frame. So I can see that eventually we may be forced to use plastic equipment. However bees do not like plastic as well as they like the wood and wax and so you will have to learn how to make the bees accept it.
The early plastic foundation must have had an odor that either killed bees or caused the bees to avoid certain areas. When you looked at the brood pattern on these frames it look similar to the pattern of American Foulbrood. However after one season of use, the bees accepted the frames and you would notice a good brood pattern.
If you place plain beeswax foundation and undrawn plastic foundation in frames that are adjacent to each other, you will notice that the bees will work on the beeswax foundation to the extent that it will encroach upon the plastic frames.
If you use all undrawn plastic frames in a super, most bees will develop brace comb that will connect two frames together or will develop a new foundation that is a bee space away from the plastic. Shake the bees off those frames, cut out the unwanted beeswax, and spread out the honey and beeswax over the effected area. This procedure has the same effect as spraying the foundation with sugar water or coating the foundation with beeswax. It is recommended to spray sugar water on the plastic foundation when putting it into the hive to get the bees on the foundation.
Once frames have been drawn out, you can use them as dividers for frames that you are trying to be repaired. Also the drawn frames could be spaced further apart in the honey supers with less problems of brace comb or when you notice a “free” standing comb between the frame.

