by Jim Thompson
Any one starting beekeeping today may not realize the discovery, manufacture, assembly, and use of the frames in a beehive. If you captured a swarm of bees and put them in a plain box that the bees accepted as their home, you would soon find the box filled with honeycomb that twists and turns in many directions and that the box will not be easily opened without destroying some of the comb. This leaves you scratching your head as you may have noticed that in early times bees were kept in clay pots, skeps, and log gums. What is not mentioned is how the early beekeepers got the bees to accept these containers as their home. One of the most important items that the early beekeeper did was to wedge one or more sticks across the inside top of the container, giving the bees a place to hang and the sticks would serve as guides for the comb.
Some of the very early box hives didn’t have frames but had a provision for sticks or top bars across the top of the box. A problem was soon noted that the bees would form comb that would be attached to the sides of the box and thus it was difficult to remove honeycomb.
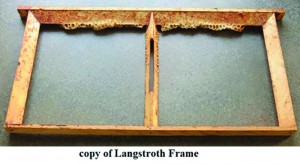
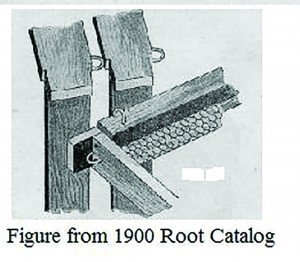
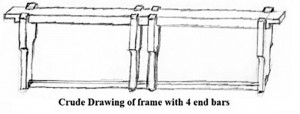
Reverend Langstroth discovered between frames and between frame and the walls of hive that if the bees were given a space of ¼ to ⅜” the bees would not generally fill that space in with brace comb. Thus the movable frame was invented. The first frames had a convex “V” on the underside of the top bar. This “V” served as the guide for bees to use in forming their combs. There was also a vertical “V” edge on the inside of the Langstroth frame ends. In the center of a few Langstroth frames, you would have noticed that there was a square column that would also provide the “V” edge to correspond with the sides. However the center of the square column was cut out to provide “bee space” for the bees to travel from comb to comb. Most beekeepers will call this a communications gap and it could aid in some movement of the bees while they were in their Winter cluster. This idea of a communication gap was again used on the shallow frames in the 1920s as the center frames in a hive could have four end bars. Hives during this period of time would over Winter by using a deep super and a shallow super.
In later years the communication gap was accomplished by holes being put in the lower corners of Duragilt foundation which is a plastic sheet foundation covered with wax. Some plastic sheets of foundation are made with the lower corners of the foundation perforated so the corners could be broken off, providing horizontal travel from comb to comb.
A later adaptation of this “V” shaped top bar in a hive can be seen today in the Top Bar Hives. If the sides of a hive are sloped, it has been found that the bees do not generally attach the comb to the side walls of the hive. A variation of the top bar hive can be made by cutting a 55 gallon steel drum in half top to bottom and putting “top bars” across the opening, with the top and bottom closed. This kind of hive was developed to be used in countries where wood is scarce. Of course one would have to make some provisions to keep it from rolling or tipping over.
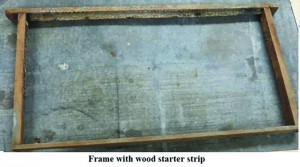
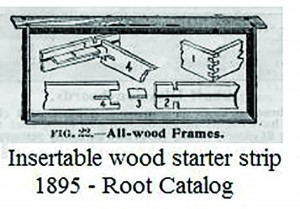
The “V” edge was soon replaced by the insertion of a thin wood strip which would be the guide for the development of comb. Later beekeepers would use a strip of foundation instead of the wood and they would call it, starter strips or starter foundation.
The starter foundation was usually waxed in when the top bar was grooved. Some of the illustrations for this article consist of photographs of the actual equipment and since they have been used, there may be damage caused by wax moths and other damage from rough handling and the passage of time. Other illustrations may consist of advertisements from catalogs or line drawings.
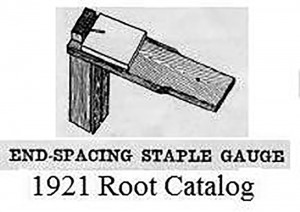
The next development in frames was to have staples driven into the sides of the top bar or upper part of the end bars to keep the frames from touching. Along with the use of the staple spacing, a jig was developed to help determine the length of the exposed staple.
Since the Langstroth frames were all uniform in their width, the frames would be spaced apart so bees could have vertical movement.
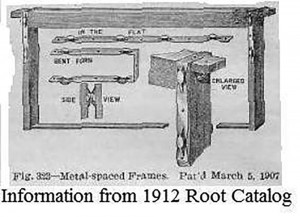
In 1912 a metal spacer was available in the Root Catalog. This spacer would fasten to the end bar edge and wrap over the frame and attach to the other edge. Then the desired width between frames would be attained and additional strength in holding the frame together was achieved. Later frame spacing devices became available that could be built into the hive or were hand held devices used by the beekeeper.
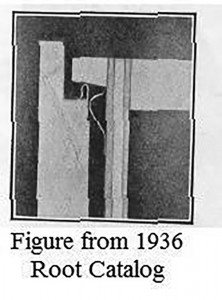
Then came the idea of a “spring” or slanted wire that was inserted below the ear of the frame that would help hold the frame firmly in the hive and center the frame in the super. This improvement worked well when the frames were new but soon the frames would became encased with propolis, and wouldn’t move well or would be destroyed by the beekeeper when the frames were being cleaned. The width of the frame was now determined to be approximately 1½” wide and there were eight and 10 frame supers that looked like a beekeeper could almost fit in another frame if just a little amount of wood was shaved off the side of each end bar. The result was that the frame could be added when everything was new and all frames had been shaved, but the bee space had been altered. After some use, it was even more difficult to move frames or add “new” frames to the hive as the frames may have not been altered the same amount. This practice in shaving frames was a step backward in frame development.
However, reducing the number of frames in a hive was found beneficial in the production of honey. A common practice is to use eight or nine combs in a 10 frame super so the bees will draw the cells out further for easier and straighter uncapping. This technique is used in the frames that are being used in honey supers but not in the brood supers. If you space the frames out with just foundation, you run the risk of having combs being built with cross comb between the frames or an extra comb being built parallel in between the frames. Thus frames that are being spaced wider apart should be of developed comb prior to spacing to prevent burr comb problems.
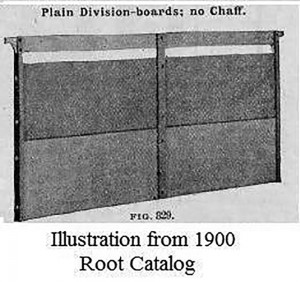
To help a beekeeper remove frames from a hive, a follower board or division board was used. The follower board is a board that takes up the space of either a half frame to a frame in width and usually placed next to the side wall of the hive. When you work the hive, you remove the follower board and that gives you space to move the frames laterally in the hive. Some beekeepers used a follower board on each side of the hive and so they could move frames from either direction. The extra space also helps to assure that you do not roll bees or the queen when frames are moved around.
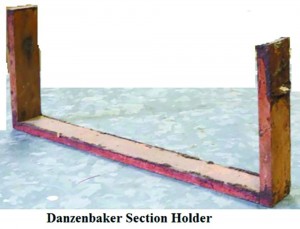
It is important to have the hive level so the frames hang perpendicular to avoid combs that are drawn out on one side and indented on the other side of the frame. To help with this problem, the Danzenbaker hive was developed. The Danzenbaker’s frames had a pin in the end bar that would support the frame in the super. This pin was handy to keep the frames vertical, if the beekeeper just happened to place the hive on a slope, the frames would only “rock” sidewise. The supers were much heavier than the other supers due to the extra wood that was on the end of the supers to support the frames and after use the top portions of the supers would be filled with brace comb and propolis due to the violation of bee space.
As I mentioned there were frames used in the 1920s that used four end bars. The “extra” two bars were placed in the middle of the frame with a ⅜” communication gap in between. The frames worked well for over wintering bees but created difficulties when one was trying to install foundation as you would have to cut it to the correct length for each side. If these frames were used in a honey super, the center end bars prevented a clean cut when you were uncapping. In the automatic uncappers the center “end bars” would be cut flush with the comb by the uncapper. People raising queens would use an idea similar to these frames by cutting the frames in half to be used in the queen mating nucs. In the “off” season, a metal clip could hold the two halves together so the frame could be pulled out in a regular super.
Other changes in the frames were to have different types of bottom bars. The first type was the one piece solid bottom bar. The solid bottom bar was followed by the two piece bottom bar and the slotted bottom bar. Your initial reaction to these differences may be that these differences are minor, but when you couple them with the differences of the top bar used, there are many different sizes and thicknesses of foundation that could be selected. Many beekeepers would purchase deep foundation and cut it to the height that they desired.
The frame top bars usually are available as grooved or wedge type. Today’s grooved top bar is usually meant to be used with plastic foundation which can be bent to spring into the groove. Another way to use the plastic foundation sheet is to assemble the frame around the sheet.
The wedge type frame has a wedge that is meant to be removed, the remaining wood flash on the wedge is cleaned up, and the wedge reinstalled by nailing or stapling over the bent part of the vertical wires in the inserted foundation or creating pressure against the foundation to hold it in the frame.
There are “top loading” frames on the market. One type of top loader frame is for comb foundation where you spread the top bar and insert the foundation from below the top bar and staple or nail the top bar shut. The other type is to slide the foundation into the frame from the top and it is held in place by the thick grooved end bars and grooved bottom bar. Plastic foundation works best in this type of frame.
We live in the age of plastic and composition frames. One of these is a frame that uses a wood top and bottom bar and plastic end bars that snap into place and are secured with a nail.
Other plastic type frames include those for the round sections, half comb cassettes, and bee-o-hex frames. These frames snap together and hold parts that are essential for harvesting the sections. These frames may also have provisions for holding foundation and rings while providing a bee fence between combs. The original round section frames were made out of wood and held rings that were cut out of glass bottles.
There are some plastic frames that will snap together to hold the foundation in place. The most common type of this frame has intermediate columns of plastic to help keep the foundation straight.
At one time there was a Styrofoam frame that would hold thin surplus foundation. The idea for this frame was to develop section comb honey in the shape of a hexagon and to cut the sections apart with a hot wire when the sections were ready to harvest. These frames worked well if there was a honey flow, but during a dearth the bees would chew up the frames.
There are entire frames that are made of plastic that include foundation. Some of these frames are available in different sized cells, coated with beeswax, or plain plastic. Other plastic frames have differences in the depth of the cell. The style that has about 1/8” deep cell encourages the bees to develop worker cells. The fully drawn plastic foundation was developed to save the bee’s time and wax, but also to save the beekeeper time in extracting honey. The idea was to have a high speed extractor spin off the cappings and extract the honey without uncapping. These frames are available for the 6-5/8”, but at one time were offered in the full depth size.
There was another medium depth frame that were made of plastic and divided into three parts that one could used for cut comb honey production.
During World War II, beeswax was scarce as it was being used in the war effort and thus there were frames that had drawn aluminum cells. If the bees used these frames the finished result looked beautiful, but the heat transfer during the Winter was detrimental for the bees.
The way I assemble a wedge top wood frame is to remove the wedge from the top bar. Then I apply water resistant glue to all joints of the frame. If the frame has six rounded end bar sides for spacing, I put the round part in my right hand and press it up into the top bar joint. I do the same for the other end and the result will be that the rounded sides will be opposite. I then turn the frame upside down and attach the bottom bar using two nails at each joint. I nail the top bar down to the end pieces and nail the bottom bar/bars into the end bars. My final two nails on each frame will be through the end bar into the top bar opposite to where the wedge was removed. This last nail is the most important nail in the whole frame as it will resist the separation of the end bar from the top bar when prying up of the frame. Several hundred pounds of torque are applied to the top bar when it is firmly stuck to the rabbet with propolis. That extra nail prevents the top bar from separating from the end bar. If a mistake is made in the assembly of the end bars as to the rounded side verses the flat side, it will not be a huge problem as the frames will still fit in the super.
Consistency in the method of assembly is the important item. Frames with two flat end bars have been used for years with no adverse effects.
You may call me old fashioned, but it seems to me that bees tend to prefer wood and wax over the plastic. However there will be the day where we all will be forced to use plastic and if you have some good drawn comb, you can work the plastic in to your operation easier.
The beekeepers that have switched to using totally plastic frames like it, because there is no more assembly of frames and the frames are cheaper to use if you consider the amount of time that you use in frame assembly.
However it may require some cutting out of comb as there will be times that the bees will want to build comb from one frame to the next. Other suggestions in using plastic foundation may include spraying the frame with sugar water prior to installation in the hive. Some beekeepers will brush on a new coating of warm beeswax, but the best hint is to use ALL plastic frames or frames with plastic foundation in the super so that the bees won’t have a choice in choosing which frame to work.