By: Ross Conrad
Fences, honey and queens.

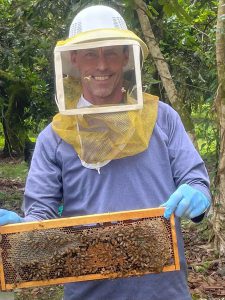
This electric fence was installed around an apiary located on a rocky ledge which prevented the grounding rods from being buried in the ground to the appropriate depth. Note that the rods are too close together and one of them is made of copper and is likely to fail as the metal corrodes over time.”
Electric Fence Considerations
According to the Vermont Fish and Wildlife Department, the black bear population in the state has about doubled in the last 10 years. This has resulted in a lot more interactions between bears, bees and beekeepers and has caused me to become intimately acquainted with the electric fence.
I have learned a few things about electric fences, some of them, the hard way. The most important thing to think about when it comes to an electric fence is the rating of the fence charger in joules. Joules are a measurement of power increments as applied to an electric fence. It is the amount of the pop, snap, shock, kick, or pain the output pulse causes to those that touch the fence when it is energized.
When it comes to discouraging bears with an electric fence, it is important to use a charger with a power rating of at least 0.8 joules. The more the better, but the more powerful the charger, the more expensive it will be.
The next most important thing to consider when installing an electric fence is how well it is grounded. All electric fences should have one six to eight foot grounding rod per joule of power. Thus, a 1.5 joule fence needs two grounding rods. The ground rods either need to be connecting together with a single wire, or set up with wires running from the ground on the fence charger, to each rod. The rods must be separated by at least 10 feet or else they will simply act as a single grounding rod.
I have also discovered that it is highly advisable to avoid copper grounding rods. Copper oxidizes and builds up corrosion over time (the green coloration that exposed copper picks up). Since this corrosion can interfere with the ground connection, I now stick to galvanized grounding rods – and make sure that only six to 12 inches of rod is sticking above ground when I’m done installing it. This means that I use a ladder and sledge hammer to pound it into the ground. In areas of rocky ledge, or extremely rocky soil, I find that sometimes it is necessary to install the rod in the ground at a sharp angle in order to reach maximum depth without hitting boulders or bedrock.
Many authorities encourage the “training” of bears by hanging a strip of bacon, a tuna fish can with a little tuna still in it, or a piece of tin foil smeared with peanut butter from the fence. The bait attracts the bear who touches it with their wet tongue, or nose, and the jolt the bear receives is so shocking it teaches the bear to keep its distance. I live in an area where black bears are plentiful and common and I have never used any bait to try and train the bears in my area. It does not appear to be necessary – as long as the fence I am using is at least 0.8 joules and properly grounded. I have never had to fend off brown, grizzly, kodiak, or polar bears from my apiaries so if you are dealing with these bruins my experience may not apply.
A Good Use for Uncapped Honey?
In order to ensure that my extracted honey has a low enough moisture content (generally below about 18 percent), so that it will not ferment in the jar, I like to make sure that a least 75 percent of the honey cells in the comb are capped. That means that for every three frames of capped honey that I extract, I can extract one frame of uncapped honey without compromising the quality of my harvest. Some years however, the bees have trouble filling and capping those cells and I end up with many frames of uncapped honey. In the past, I have tended to put aside these uncapped frames and then extract them all at once so I can bottle them separately. I then sell this high moisture, “mead” honey, at a discount.
This year I have more nucleus colonies than normal that will need feeding due to the large number I had to make up this season in order to replace my unusually high winter losses. Regular readers will know that I prefer to feed my bees honey since it not only helps improve overwintering but results in stronger colonies in Spring.
In order to stretch out my honey supers, this year I am going to use those supers of uncapped honey for feeding – place them on hives that need a super of food and then feed fortified sugar syrup (Bee Culture May 2009) until they fill out the rest of the super and cap off the frames so the supers are nice and full.
Experience has proven that bees tend to overwinter better on honey than they do on sugar syrup. With this in mind I wonder if there will be enough natural honey in the uncapped frames to make up for the negative impact the sugar syrup used to fill out the frames will have on the health of the bees, even if it is fortified. I’ll let you know in spring.
Fast Easy Queen Introduction
A couple years ago while introducing 10 queens to splits made from my survivor colonies, I was having difficulty with four of the queens. They had not been released from their cages after 4 days in the hive so I tried releasing them manually. Unfortunately, observation of the queens upon release indicated hostile behavior toward the queens by some of the workers in the hives. Now normally I would have returned the queens to their cages and left them in the hives for another few days before trying to release them again in the hopes that the workers would eventually become accustomed to the queen and accept her. However, I was in a hurry and had heard that spraying a light mist of the drench concentration of lemongrass and spearmint feed stimulant could help with getting bees to accept a queen. Since I had some Honey-B-Healthy on hand I mixed up my drench spray (four teaspoons per quart of sugar syrup instead of one teaspoon per quart which is four times the normal feeding concentration) and sprayed a light mist over each comb of bees, brood, honey and pollen. I then released all four queens directly into their hives. A week later, all four were laying well and had been accepted by the workers.
I didn’t think much more about this experience until last year when I happened upon a small swarm that issued out from one of my hives in early October. Here in the Northeast an October swarm is as good as dead since almost every blooming plant that could be used for forage has completed its flowering cycle by then and the only significant food source that is typically available at that time of year is obtained from robbing out other hives. I gathered the swarming queen and some attendant bees in a paper bag (the only small empty container I could find quickly at that moment) and decided to introduce the queen into a colony in another bee yard that I had discovered was queen-less the day before. I sprayed a light mist of H-B-H drench over each of the frames of bees in the top two boxes of the queen-less hive (there were three boxes that made up the hive in total) and dumped the queen in. She was laying well a couple weeks later.
These experiences were encouraging and got me thinking that maybe this is a fast and easy method for introducing new queens into hives. Most notably, it eliminates the need for additional visits to the hive to check on the status of the queen in the cage, etc. However, I wanted to give the process another test before I really felt comfortable recommending it to others.
This year I obtained five queens in June to release directly from their cages into 24-hour old, three-to-four frame splits from some of my surviving colonies. After lightly spraying each comb in each split using the drench spray I opened the cage entrance and held the opening next to the top bars. I waited patiently until the queen found her way out of the cage on her own and scooted down between the top bars onto the lemongrass/spearmint scented combs below. I am pleased to report that all five queens were accepted without any issues.

Essential oils can help make the process of introducing a queen into a colony much easier and more likely to succeed.
It appears that the strong smell of the lemongrass and spearmint oils in the drench spray initially masks the smell of a newly introduced queen eliminating the initial hostility that the bees in the hive have toward a strange queen. Over time the scent of the essential oils wears off, but by then the queen has spread her scent around the hive, and may have even started laying eggs, so that her pheromones progressively overtake the scent of the essential oils. The worker bee’s awareness of the new queen’s scent is so gradual that it apparently allows for the seamless transition to their acceptance of the new queen in their midst.
I love being able to introduce queens this way since it eliminates the need to wait several days, to a week, for the bees to become acclimated to the new queen and saves a return trip to the apiary to check on the status of the queen in the cage. This method may prove especially important for the beginner beekeeper since I suspect that it will work just as well when introducing a queen to packaged bees as it does to a queen-less hive. If anyone uses the essential oil drench spray to install a package, please let me know how it goes.
While this queen introduction method has worked for me 10 times out of 10, just as with traditional queen introduction methods, I doubt it is foolproof. I am sure there are some circumstances, or conditions, under which the process of immediate queen introduction with essential oils will not work. Thankfully, I have not discovered them yet. I’ll keep you posted.
Ross Conrad is the author of Natural Beekeeping: Organic Approaches to Modern Apiculture, 2nd Edition (2013).