


by Petra Ahnert
Ahhhh… Fall. This is the time of year that we finally get around to transforming our cappings into beautiful yellow blocks of wax. It is also the time that people start ordering candles again. Time to get busy making more candles.
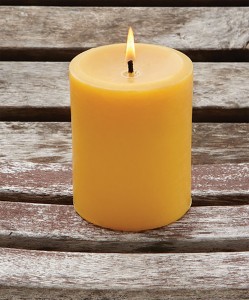
So, what makes a great candle and how is it achieved? Beeswax candles are more than wax and a cotton string. They are a symbiotic relationship between air, wax, and wick. Since the most challenging candle to get right is the pillar candle, I will focus most of this article on the components of making a great pillar candle. In my opinion, the perfect pillar candle will create a burn pool that extends out most of the diameter of the candle, but not all the way. The flame is nice and bright with no smoke trails and the candle burns down all the way to the bottom without looking ugly and misshapen. The latter is really hard to achieve with taller candles so, although I make them, I prefer the small and medium sized candles for personal use.
I will start with wicks… Big sigh… This necessary part of the candle seems like it would be an easy thing, but honestly, although it can be maddening to figure out, I can’t stress enough how important this is to the overall quality of the candle. When a candle is lit, a series of events take place. First the match lights the wick and the wick itself starts to burn. The flame then starts to melt the wax. The wick acts as a pipeline that carries the melted wax in the form of a vapor to the flame via capillary action. Some wicks allow lots of fuel to flow quickly through a big pipe, while other wicks pump fuel more slowly through a smaller pipe. If you give the flame too much or too little fuel, it will burn poorly, or sputter out. The balance of fuel and flow needs to be just right.
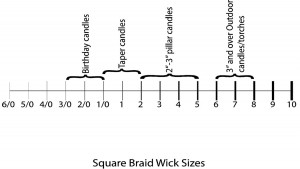
Square Braid Wick Sizes – Wick graphic: Although this is not completely correct in terms of actual diameter of wicking, it gives an overall picture of relative sizes, commonly available wick sizes and the range of uses.
The nomenclature of square braid cotton wicking refers to the number of bundles, the ply of the wick, and how tightly it is braided. The 6/0 to 1/0 range of wicks, are constructed a bit differently than the larger wicks, but all of them are square which helps to channel the wax fumes up to the flame. It is important to keep your wicks well labeled and separated since similar sizes look identical. Often the only difference is the tightness of the braiding.
The design and nomenclature of this wicking is, I believe somewhat unique to the U.S. Apparently wicking produced and sold in other parts of the world utilize a different grading system and are not the same. The fact that what we have here in the US isn’t universal is something I discovered after my book was published and I was contacted by European editors that needed conversion factors for the wicking I recommended in my book.
Square Braid wick forms a carbon cap on the top of the wick. The carbon cap radiates heat outward from the flame which helps melt wax which is further away from the flame. The wick also bends slightly as it burns which minimizes carbon build-up and makes for a cleaner burning candle.
The oxygen seems like it would be the easy part- either the flame gets oxygen or it doesn’t. But the type of the candle and the environment that the candle is burned in play a role in how much oxygen the flame receives. I have found that the more open to air the flame is, the better the candle burned. So taper candles are perfectly set up for this. Pillars and votive candles, on the other hand typically start off burning beautifully, but as they burn wax and the flame travels downward into the candle, the flame often has problems. Either the flame tunnels down the middle of the candle melting very little wax and starving the flame of oxygen or the flame melts too much of the wax and flame is flooded and goes out.
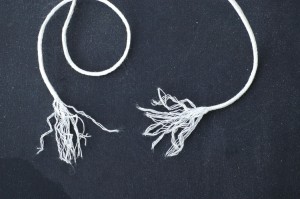
#2/0 on the left and #2 on the right. As you can see, the actual diameter is about the same, bu the number of threads and the configuration of the thread clusters that make up the wicks are different.
So how does one ensure that the candle flame gets the oxygen it needs? Look at the burn pool. The width of the tunnel created by the burn pool is usually determined with the initial burning of the candle. The burn pool, which is the extent of melted wax, establishes the ultimate diameter of useable wax that the candle will ever use in subsequent burnings. The solid wax remaining around the outside of the burn pool will help the candle to retain its shape. For this reason, I always tell my customers that beeswax candles are intended to be burned all evening, not just a couple minutes and then extinguished. The combination of proper burning protocol and correct wick size should ensure that the burn pool reaches the desired width.

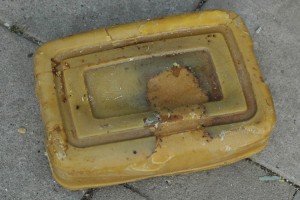
The blocks above, show the top and bottom of a wax block that I bought. From the top, it looks reasonably clean, but on the bottom, quite a bit of honey can be seen. This block will take some time and work before it can be used.
The last part of the candle trio is the beeswax itself. I personally hate to render wax, so I let my Karl handle the “heavy lifting” of rendering the cappings into big blocks of wax. I am not going to go into the rendering process here, since the process is often automated in larger operations. The wax that Karl renders out is really pretty clean, but since my candle business has outgrown what our hives can produce, I also purchase wax off another beekeeper in the area. His wax varies from relatively clean to blocks with rivers of honey buried inside.
For things like candles, especially pillar candles, the residual honey in the wax causes the wax to burn unevenly and to clog the wick. Even though a wax may “look” clean, it may still have honey in it.
The best way to get the last of the honey out of the wax is to allow it to clarify in a heated double boiler or wax tank. Admittedly, this task is easier to accomplish with the wax tank than a double boiler, since the wax needs to stay liquid for quite a while until all the honey has settled to the bottom. I usually let mine settle for a couple days. The best way to tell if it is done is by checking the clarity of the wax. When it is first melted, it has murkiness to it. As it settles, it starts to clarify. When the wax is clear, filter the wax through a clean piece of felt cloth and mold into useable portions. I usually do a variety of different sizes, so that I have the right size for whatever I am making. The resulting wax is still yellow and still has the signature honey-like scent, although the filtering may have lightened up the wax a little bit.
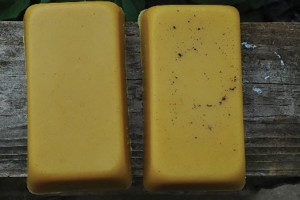
The dark spots are flecks of caramelized honey. Besides being unsightly, these are what ultimately can clog the wick, and ultimately keep the wax from reaching the flame.
The chart gives some general guidelines for wick sizes, but in order to ensure that the correct wick size is used, a burn test needs to be performed. Actually, the odds of getting it right on the first try is pretty rare, so this test probably needs to be performed multiple times until the right wick size is found.
The Right Size Wick
Use the following test to determine the proper wick size and scale up or down as needed.
Basic Burn Test
1. Trim the wick to a length of ¼” (6 mm). If you are testing more than one wick, make sure the candles are clearly labeled.
2. Place the test candles on a clean, flat, heat-resistant surface about 3” to 6” (7.5 cm to 15 cm) apart. Be sure to select a draft-free spot that is in full view of your workspace. Do not leave lit candles unattended.
3. Light the candles and record the time. It is critical to keep an eye on the candles while they are burning, especially when testing new wicks.
4. If testing pillar candles, allow them to burn for two hours then record the details of the melt pool and wick appearance. Ideally the melt pool will achieve the desired diameter by this point. If it hasn’t, the wick is most likely too small. Note any soot or mushrooming on the wick.
5. Allow the candle to burn for another four hours and record the details of the melt pool and wick again before gently blowing out the flame. At this point the melt pool of a well-wicked candle will have achieved the desired diameter and should be approximately ½” (1.3 cm) deep.
If the wick is mushrooming, the candle is sooting, or the melt pool is substantially deeper than ½” (1.3 cm), the wick is most likely too large.
6. Allow the candle to cool for at least five hours and repeat steps 4, 5, and 6 until the candle is completely burned. The quality of burn will almost always change during the entire burning of the candle. Burn the entire candle before deciding on a wick.
Wax from different batches can vary a bit not only in color, but also in behavior. Once the correct wick size is determined, test subsequent batches of wax to make sure that the candle still burns the way it should and if not, make the appropriate changes to the wick size.
So now, we can make some candles…
Petra Ahnert is a specialty candle designer living in the Milwaukee area, and is the author of Beeswax Alchemy.