


by Jennifer Berry
October in Georgia is lovely. It’s the month we cherish the most at the bee lab. The sun has mellowed, the air is consistently cool, and the evenings are crisp. Landscapes are turning into Afremov paintings, and the skies are crystal blue. AC units are no longer humming 24/7, and windows are open. The days of sweat soaked shirts, wilting attitudes and heat exhaustion are nothing more than a bad memory.
And most importantly for us, working in the beeyard is actually pleasurable. Yet, the steamy, hot and humid days are still upon us since it’s August while I sit and write. The saying for this month has been, “Boy, I can’t wait till October arrives,” as we slice through our days in the beeyard. It’s rough working colonies during the Summer, especially in the South, and I don’t remember a hotter one. During the month of August, nectar flows have pretty much dried up in most places – therefore thousands of bored, frustrated, little foragers are stuck in the hive – their only outing is to fetch a droplet of water to keep the colony cool. But, as you read this, it’s no longer August – it’s October. No more excuses about being too hot, too sticky, too tired. So before frosty limbs stand bare, we need to make sure our colonies are prepared for their long Winter’s nap.
There are three key principles you must pay attention to if you want your colony to survive the Winter:
Large healthy population headed by a productive queen
Sufficient food stores accessible to the Winter cluster
Protection from the elements (wind and rain)
Let’s get to work. The first thing we check during our Fall assessments is whether or not there is a queen, and secondly her performance. How is she doing? What does her pattern look like? Is she even laying eggs? You want a viable queen with a solid pattern that will be ready to kick it into gear by mid-Winter (in preparation for the Spring nectar flow). If she has been limping along all Summer, it’s time to let her go. Otherwise, the colony will suffer. However, if the pattern is spotty, you may want to look for other problems first, such as disease or mite infestation, before automatically assuming it is a poor queen.

Fall assessments.

Entrance feeder.
After we’ve made sure the queen is healthy, wealthy and wise, we need to check on how much honey supply the colony has. This is a crucial step in any honey bee management plan. Here at the bee lab, we always assume they don’t have enough. That way we don’t get caught off guard when conducting our mid-Winter inspections, and find starving or starved colonies. If colonies are lacking the required amount of honey to survive the Winter, you will need to feed. And, if your colonies need a substantial amount of food, you must start feeding today! Once the temperatures drop, the bees won’t be able to break cluster to collect the food. All the syrup in the world will be useless if the bees can’t get to it. Here in the south, we can experience a modest goldenrod flow this time of year, depending on location. Our experience with the goldenrod in the Piedmont region has been minimal to none. Don’t rely on it to supply their Winter nectar needs here. Now pollen, that’s a different story.
So, how much food is enough? For every frame of bees, (note: this is specific to the southeast ONLY), you should have one and a half frames of capped honey for Winter survival. We used to say between 35 and 40 pounds of honey for a deep box of bees here in the south, but my experience has proven this is not enough.
Let’s back track a bit. The nectar flow is usually completely over by July, and there’s not much after that. There may be a smidge of wildflower here, or a drop of Aster there, but basically it’s done. That means your bees have to survive from July to April with what they have in the cells. If your colony is shy on stores, then you need to start feeding, otherwise they will starve – which is one thing we can absolutely, hands down, prevent from happening. And please, don’t get caught up in the rhetoric that claims ‘if bees aren’t smart enough or don’t have the genetic makeup to find and store enough food, they’re not worthy – don’t feed them, let them die, letting the negative genes die with them! There are many reasons why bees don’t have enough to eat, most of which have nothing to do with the bees, their genetics, or otherwise. It has everything to do with poor location, extracting too much honey, badly timed swarms, improper management, rotten weather, too much or not enough rain. . . All of these have nothing to do with bees being “lazy.” Honey bees need your help these days to survive, so if they are light on stores you need to start feeding today.
There are many feeder options. Over the years, we have tried practically every type of feeder available. After years of trial and error, we have settled on a favorite. But before I reveal what we use, let me explain why the others have lost favor with us. The first feeders I was ever exposed to were entrance feeders (this may be your experience as well, since most starter kits come with an entrance feeder). These are my least favorite type of feeder, despite their convenience. All you do is fill a quart jar, screw on the lid, push the holder into the entrance, plop the jar on and walk away. And, with it being in the entrance, you can see when it is time to re-fill the jar – never once having to open the hive. However, you are feeding only one quart at a time. This method could take months before you have any substantial amount of stores build up. Another problem is robbing, which I’ve mentioned previously. The odor of the syrup will draw unwanted neighbors straight to the front entrance. If conditions are right, the “robbers” can overwhelm the colony leaving them with nothing to eat and in a weakened state or worse, dead. Even if you only have a few colonies, take caution because there may be a neighbor down the street that has numerous hives you know nothing about.
Division board feeders are also on our “No” list, but they do eliminate the problem of robbing, since the food is inside the colony. Division board feeders are the width and depth of a deep or medium frame, and are usually placed on the edge of a super (Figure 4). In addition to hive manipulation, and the loss of a functioning frame, bees can drown, sometimes by the hundreds, in the syrup. Manufacturers have added pieces of 8” hardware cloth or floats to help reduce the risk of bees drowning, but it’s still not 100%. Plus, beware, there’s still another issue lingering! Beetles love the dark, protected areas these feeders provide.
Next, we have hive top feeders which, as the name conveys, fit on top of the hive. To install, you remove the lid and inner cover, place the feeder directly on top of the upper super, fill it with the appropriate amount of syrup, put the lid back on, and walk away. There is little to no disturbance in the colony because you don’t have to dig around inside and manipulate frames. The bees will crawl up the hardware cloth from the super below and down to the syrup pool to feed. They are made to fit a standard 10 or eight frame hive body but there are ones available to fit nucs. Most have a self-enclosed, plastic unit holding one to five gallons of sugar syrup depending on the brand. These feeders tend to work the best, because they prevent leaking. If you need to put on a large amount of feed in a short amount of time, this may be a good option for you. There are a few pitfalls, though.
One issue with hive-top feeders: if not properly sealed, they can allow bees, yellow jackets and other snooping insects to get trapped in the inner chamber of the feeder and drown. Bees are able to squeeze their way through the smallest of openings, like under the inner cover, or they slide between the narrow openings in the wire mesh and outer wall. Producers of the newer hive top feeders have tried to eliminate this issue by making the feeders flush with the super, and by leaving no space for the bees to enter the syrup chamber from the outside. Then, if the slightest amount of sugar syrup leaks outside the colony it can draw in bees by the thousands. Even the strongest of colonies can be overwhelmed once clouds of bees force their way inside. There is also the issue of cost – they are expensive. If you have more than one colony to feed, the cost goes up considerably.
Entrance, division board and top feeders will not deliver the needed syrup if temperatures are cold. The food delivery method needs to be right on top of the cluster; it cannot be to the side, at the entrance, or in a top feeder where the bees have to traverse up and around cold surfaces to access the syrup. If temperatures are frigid, the bees will not be able to move any distance at all. Bees in cluster can starve with pounds of honey or gallons of syrup just inches away. This usually occurs when warmer weather is followed by extreme cold that sets in for days. The bees eat all of the surrounding honey and can’t move to access the rest. Normally, larger clusters are not as susceptible to this, but smaller clusters can loose the battle quickly if they get separated from the honey source. That’s why it’s a good idea during your fall assessments to move honey frames in closer and on top of the cluster. Remember bees prefer to move up and will do so during the winter so a good supply of honey above – not below – is recommended.

Division board feeder.
Besides the syrup pouring out, there are other issues to consider when using buckets. For one, the bees will coat the metal grid attached to the plug with propolis, which is a problem because the grid needs to be cleaned periodically. Secondly, you will need an extra empty deep super per colony. Some beekeepers avoid this practice by placing the bucket directly over the opening of the inner cover and then laying the outer cover (lid) on top of the bucket, but I fear this approach. A good wind gust and both the lid and bucket could be tossed aside, leaving an opening into your colony. However, I know several commercial beekeepers that use this method and have never had a problem. If your colonies are in the backyard, or otherwise nearby and easily accessible, this may be an option worth considering.
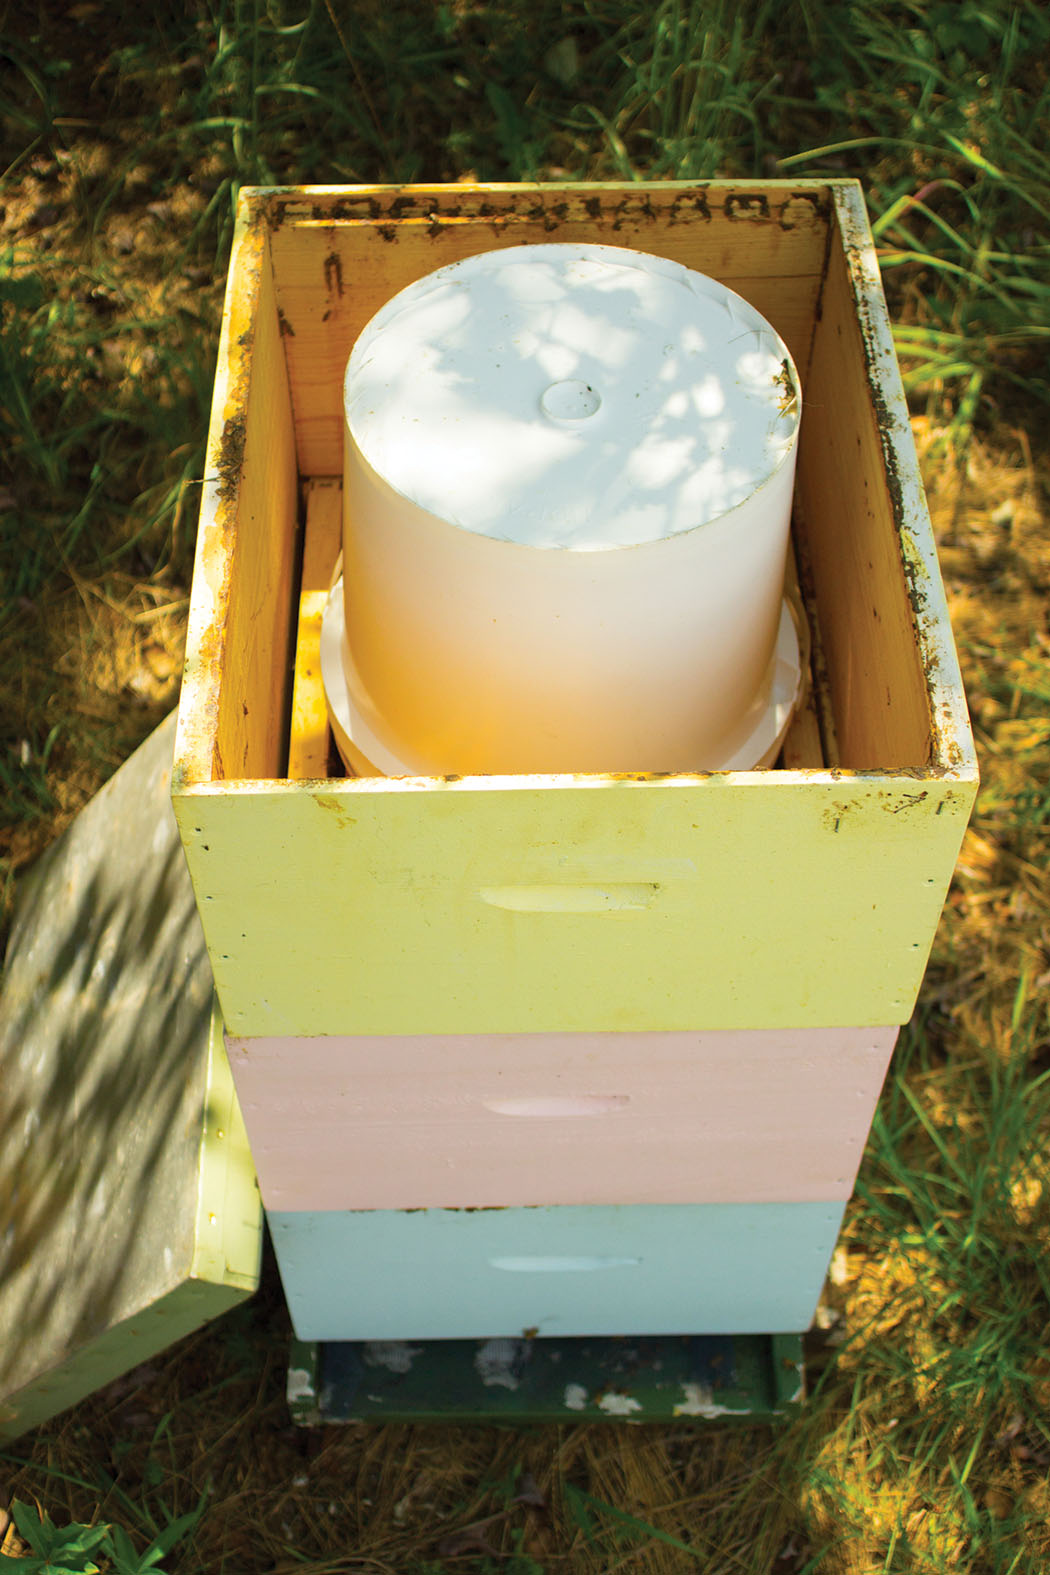
Bucket feeder.
Other feeding options include Ziploc baggies, plastic soda bottles, and trays. We’ve tried them all, and found issue with each, which is why we’ve settled on the ol’ standby to feed our bees: two-holed (with 2-7/8” apertures) migratory covers with inverted half-gallon mason jars. The feeder caps have dozens of small holes punched through to allow access to the syrup and, like the buckets, once you turn the jar upside down, vacuum suction prevents the syrup from pouring out. Yes, there are issues with this method as well, (glass breakage, leaks, and jars being knocked off to name a few) but at some point you just have to settle on one thing and go with it. No matter what time of year, if your colonies are close to starvation, place the opening of the jars or bucket directly on top of the cluster. This allows the bees to use minimal effort to collect the syrup, especially if the weather outside is frightful.
There’s also the question of what ratio cane sugar to water (by weight) to feed this time of year: 2 to 1, or 1 to 1? We’ve never been so meticulous at the bee lab (or home) as to weigh components; we just have a feel for it. Granulated cane sugar is added to about the ¾-full point in a five-gallon bucket and then hot water stirred in until full. I imagine that our concoction is somewhere in between.
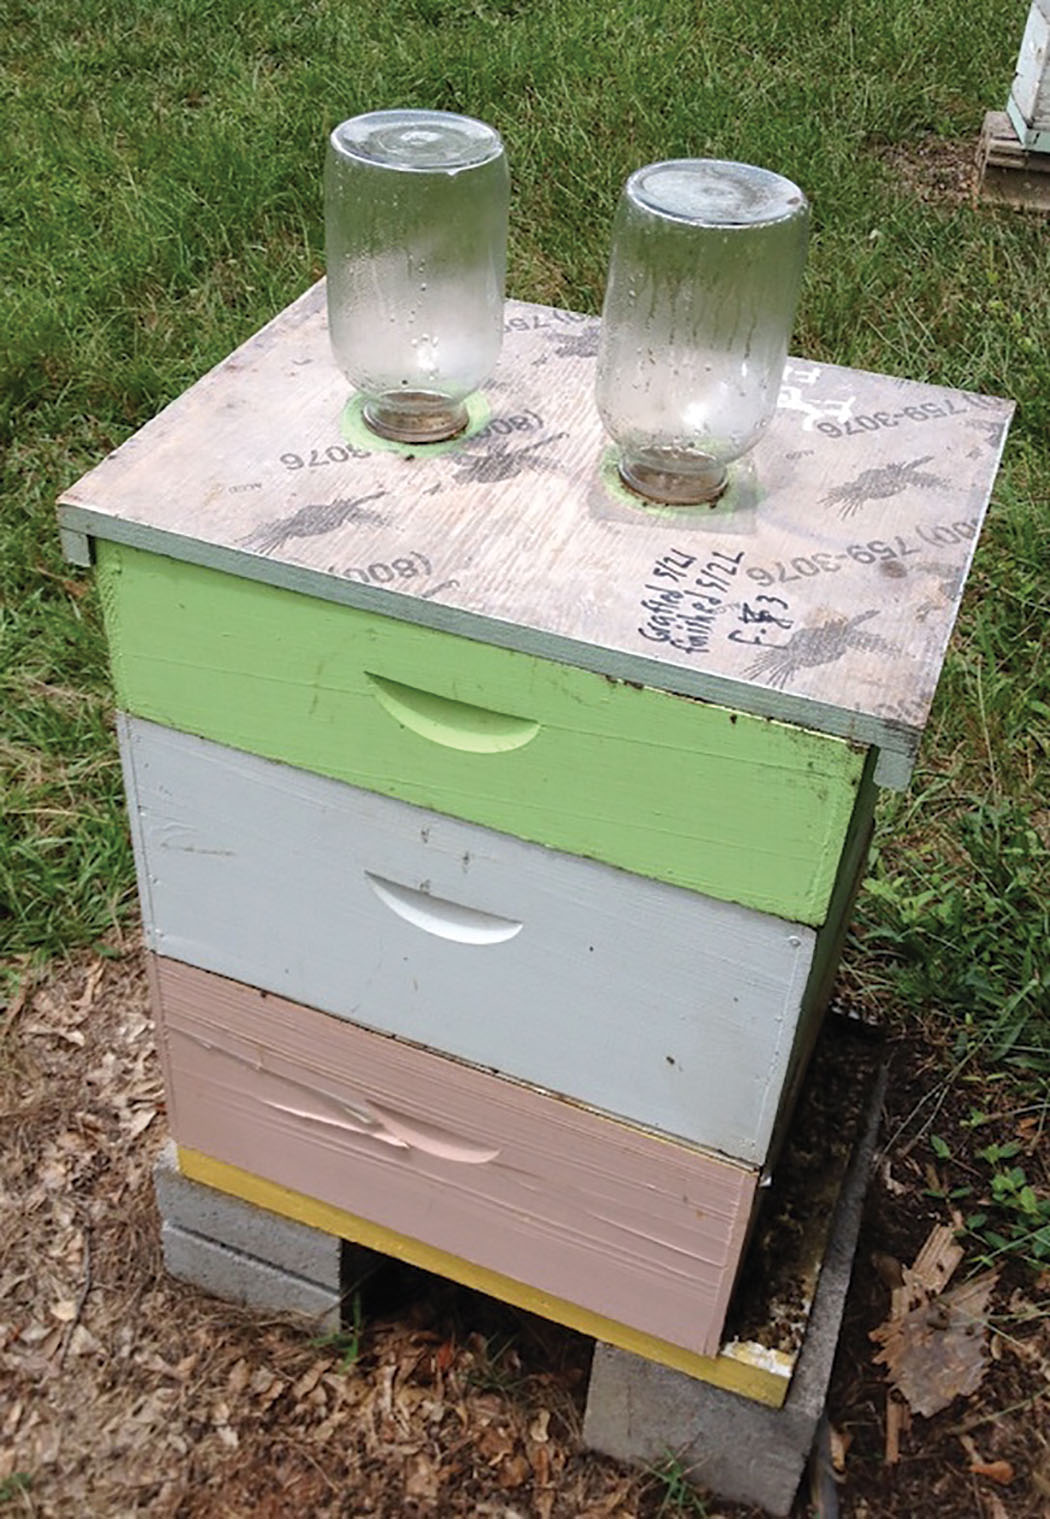
Feeding option we prefer. Two five-pound honey jars which equates to 1 gallon of feed being fed each time.
The last chore we need to perform before settling in next to the fireplace is to inspect equipment. First of all, move brood frames with old comb (three+ years) or nasty black comb in honey supers to the outer edge for removal next Spring. Research has shown that old comb is a reservoir for numerous contaminants, which is detrimental to the developing brood. Next, replace old, decrepit hive bodies, supers, lids, inner covers, and bottom boards with newer equipment. They don’t have to be pristine palaces, but they do need to protect the bees from the upcoming Winter weather. Holes, cracks, and crevices allow cold winds to wick away at the cluster. Plus, cold rain dripping down on bees and brood is a recipe for disaster. These holes also allow access for critters to come and go. Mice especially love to make beehives into a home. Continual food supply and a warm cozy environment makes a hive a suitable rodent dwelling. Structurally tight equipment along with mouse guards will deter these wind, rain, and critters.
A viable queen, healthy population, ample food stores and sound equipment are all you need for your colony’s survival. It may seem like a lot, but it really isn’t. We accept responsibility for these creatures when we decide to bring them into our lives, and sometimes they’re going to need a little assistance – but just think what they give back in return! I’m willing to help out, and I hope you are too.
Take care of you and your bees!
Jennifer Berry is the Research Leader at the UGA Bee Lab and beekeeper and queen producer.
