by Ross Conrad
There are at least two instances where a beekeeper may need to introduce a new queen to a colony. When a colony has been split and a queen is being introduced into the split or nucleus colony rather than let the colony raise a queen on their own from eggs or queen cells, or the hive may have become queenless for one reason or another and a new queen is being introduced into the colony before the workers, in the absence of a queen and developing brood, begin to lay the unfertilized eggs that will turn into drones. (I am not going to go into why I believe that for most beekeepers, the act of re-queening by purposely killing a hive’s current queen and replacing her is foolhardy. However if you’re curious you can peruse my article “To Requeen, or Not” in the December 2009 issue of Bee Culture).
Older worker bees will reject queens that they are not familiar with and tend to view them as a colony invader, even when they have no hope of raising a new queen on their own. This is especially true if the queen is unmated, or not well-mated, with numerous drones from unrelated colonies. This is why queen rejection by a colony will occur if the queen is released from her cage too soon.
Commercial Queen Cages
I generally like to begin the introduction of a queen to a colony as soon as possible, but sometimes weather or other circumstances will delay the start of the queen introduction process. For each day that a caged queen is unable to be introduced into a hive, it is a good idea to place a drop or two of clean water on the screen of the cage, so that the workers in the cage with the queen can use it to help dissolve the fondant candy and utilize it for food. The caged queen should be kept at room temperature, away from breezes and out of the sun until you are ready to introduce her to a hive.
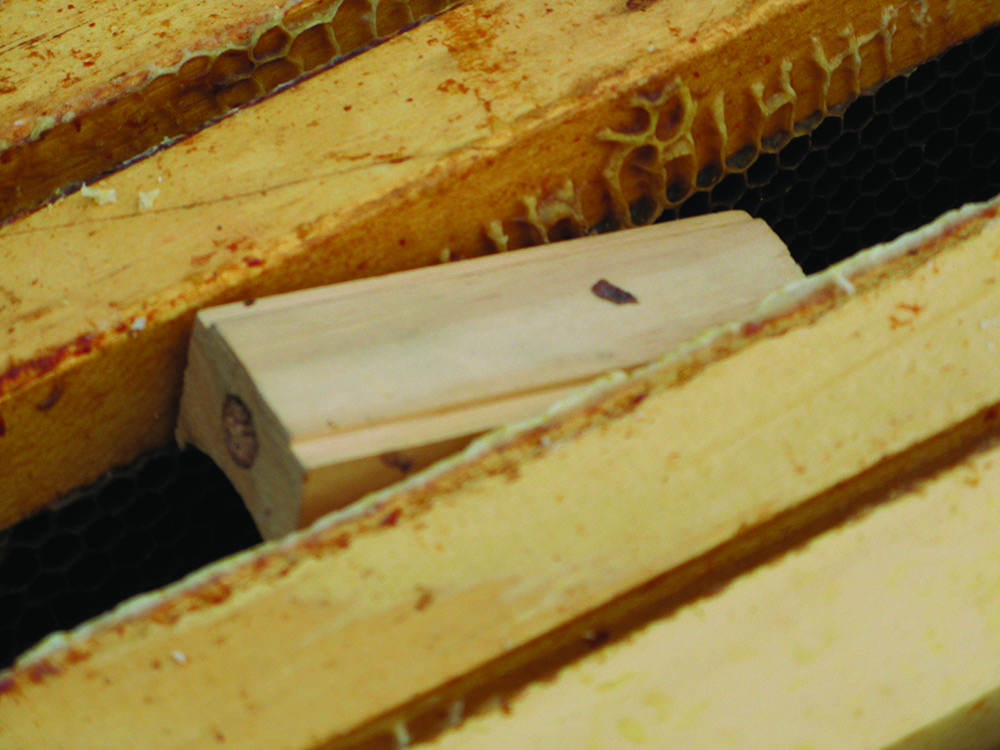
A standard
commercial queen cage installed in a hive body and wedged between the top bars of the frames.
When introducing a queen into a colony housed in a hive body full of frames, the cage will have to be pressed into the comb of the adjacent frames unless a frame is removed in order to make room for the queen cage to fit between two top bars. After a few days, if the bees have not chewed through the candy and released the queen, she should be manually released by the beekeeper provided the bees are not clinging tightly to the cage. If the bees are still clinging tightly to the cage, this is an indication that more time is needed, or some other approach is required before the bees will become accustomed to the new queen.
Manually releasing the queen used to be done routinely after three days or so, but more and more, beekeepers are waiting five days or more. Each beekeeper will have to find their own balance between allowing plenty of time for the workers to accept the new queen and not waiting so long that the hive is significantly set back from a lack of new brood being raised or possible additional stress on the queen from an overextended confinement period. All queen introductions tend to work best when the hive does not contain any queen cells and is left queenless for at least a day or so before a new queen is introduced in a cage.
If the queen needs to be manually released after several days, be sure to closely observe the reaction of the workers in the hive to the newly released queen, even if the workers didn’t appear to be clinging tightly to the cage and are easily brushed away prior to the release.
If the workers appear to act aggressively toward her, then the queen needs to be put back into the cage for a few more days. Although one should always be gentle and calm when working with bees, this is especially true when working with and handling queens.
Personally, I will only pick up a queen by her wing in order to reduce the chance of accidentally hurting or damaging the queen. A newly released queen that becomes excited and races across the combs will draw additional attention to herself. When necessary, one of the following measures can be used to help overcome worker rejection and speed up the queen acceptance process.
Push-in cage
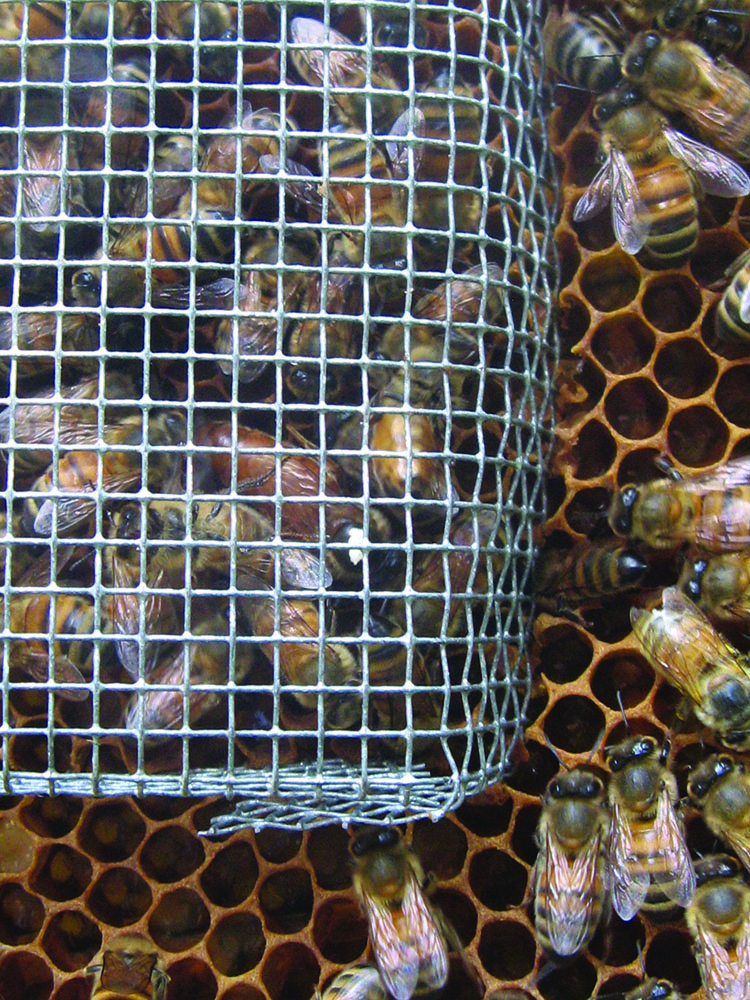
A push-in cage is a queen introduction approach favored by many beekeepers because it allows the queen to start laying eggs immediately and it allows a larger surface area for the bees to have greater access to the queen’s pheromones. However this method requires handling the queen, which some people may not be comfortable doing.
The push-in cage can easily be made from a piece of 1/8th inch hardware cloth with cuts about ½-¾ of an inch from the corners and the edges of the hardware cloth bent so the screen is folded over itself at the corners. This creates the side walls of the cage that are about ½-¾ of an inch tall.
The queen from the candy cage is placed under this cage, sometimes with the attendant workers that come in the original queen cage, and sometimes without. It is important not to allow any adult bees from the hive to get under the cage with the queen. The cage is gently pushed into the comb about a quarter of an inch (but not past the mid-rib of foundation) allowing the queen to move freely underneath. As with the regular queen cage, the push-in cage can usually be removed to release the queen manually after a few days, or once the bees are no longer clinging to the cage and are easily brushed away.
Sometimes the bees will release the queen by excavating the wax under the wall of a portion of the cage. If the bees have not released the queen and are clinging tightly to the cage it means they have not accepted her yet, and more time is needed before the cage should be removed.
Bermuda Queen Cage
An alternative to the push-in queen cage that does not require the handling of the queen is the Bermuda cage. This cage was designed and built by a very thoughtful and creative beekeeper named Albert Swan, who I met during my recent trip to Bermuda (see Bee Culture June 2015). The Bermuda Cage allows the workers in the hive an extremely large surface area in order to increase exposure to the queen’s scent. The cork is removed from the non-candy end of a wooden commercial queen cage, and the cage is placed into an opening in the Bermuda Cage that holds it snuggly in place. The Bermuda Cage then fits snuggly into a shallow frame, and a deep frame in the brood box is replaced with the shallow frame containing the Bermuda Queen Cage.
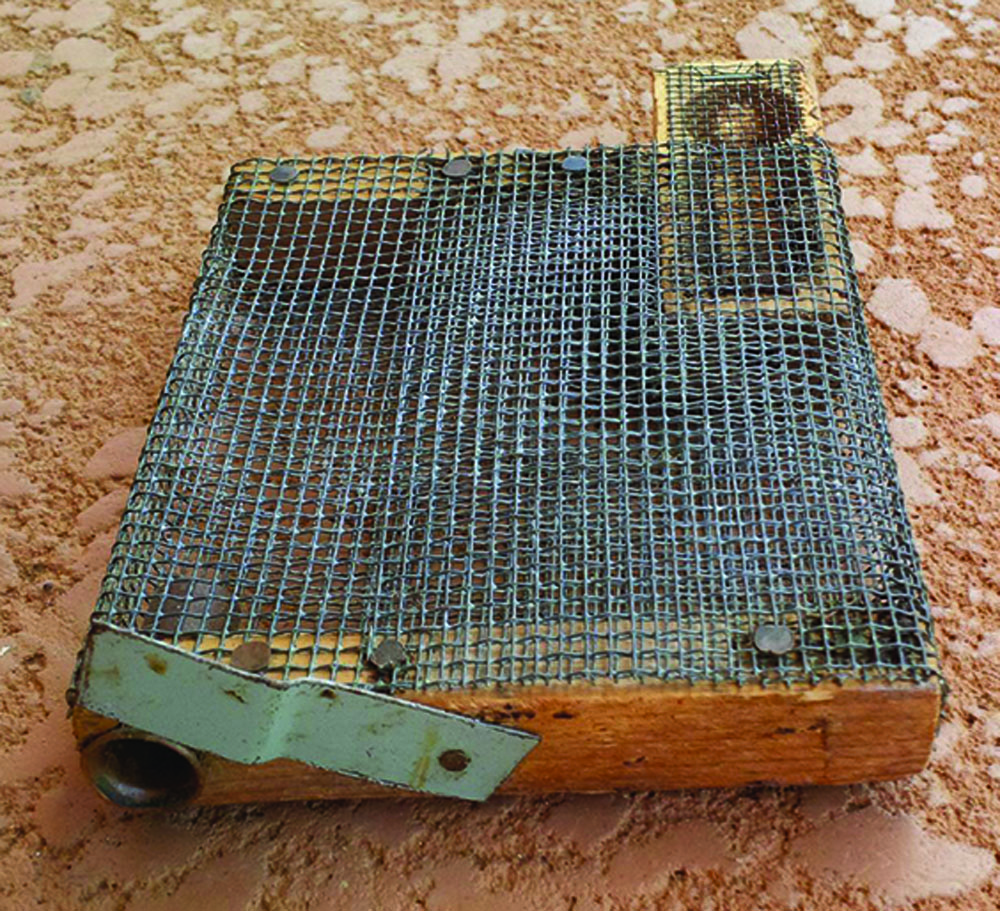
The Bermuda Queen Cage allows the beekeeper to expose the queen to a much larger population of workers in the hive during introduction that is possible when only the standard commercial queen cage is used. Photo by Tommy Sinclair
The Bermuda cage is only five inches long and 4½ inches tall as Mr. Swan did not want to make the cage so long that the queen might become confused and not easily find her way out of the cage once the candy in one or both of the openings was chewed away. Mr. Swan reports almost 100% success introducing queens using a Bermuda cage this size.
Successful queen introduction was extremely important to him since queens have never been commercially raised in Bermuda and the only queens obtainable on the island in recent history were shipped at great expense from Hawaii. Unfortunately, queen shipments were discontinued once varroa mites were found on the Hawaiian Islands in 2007 and Mr. Swan has not had the occasion to use his queen cages to introduce new queens into his hives since.
Essential Oil Queen Introductions
Sometimes, even after many days of being exposed to a queen in a cage, worker bees will still treat the new queen aggressively. One trick that can work for getting a group of workers to accept a new queen is to lightly spray emulsified essential oils mixed with sugar syrup all over the frames and the bees in the hive, immediately before releasing the queen (the queen is not sprayed). I have done this on several occasions when workers continue to act aggressively toward a queen even after the caged queen had been in the hive for about a week, and it has worked every time – so far. However, I feel that I need to try this queen introduction method several dozen more times before I will suggest that it works almost all the time.
The essential oil mixture I use for successful queen introductions is a combination of lemongrass and spearmint oils. There are at least three products on the market that contain these essential oils, any of which could be used for queen introduction: Honey-B-Healthy available from numerous independent distributors, Pro Health distributed by Mann Lake Beekeeping supply in Minnesota, and Essential-B distributed by Jester Bee Co., in Florida.
It appears that by spraying each frame of bees in a hive immediately before releasing a new queen, the scent of the essential oils along with the sugar in the spray that the workers start cleaning up, both act to distract the bees in the hive long enough that the released queen has time to both spread her pheromones around the hive and start laying eggs so that once the mess created by the essential oil infused sugar syrup is cleaned up, the queen has seamlessly integrated herself into the colony.
No matter what approach is used to introduce her highness to her royal subjects, one does not have to find the queen days later in order to confirm that a newly introduced queen has been accepted into the colony; the presence of properly laid eggs is enough to confirm that the colony is now queenright.
Ross Conrad is the author of Natural Beekeeping: Organic Approaches To Modern Apiculture, Revised and Expanded 2nd Edition

