By: Peter Sieling
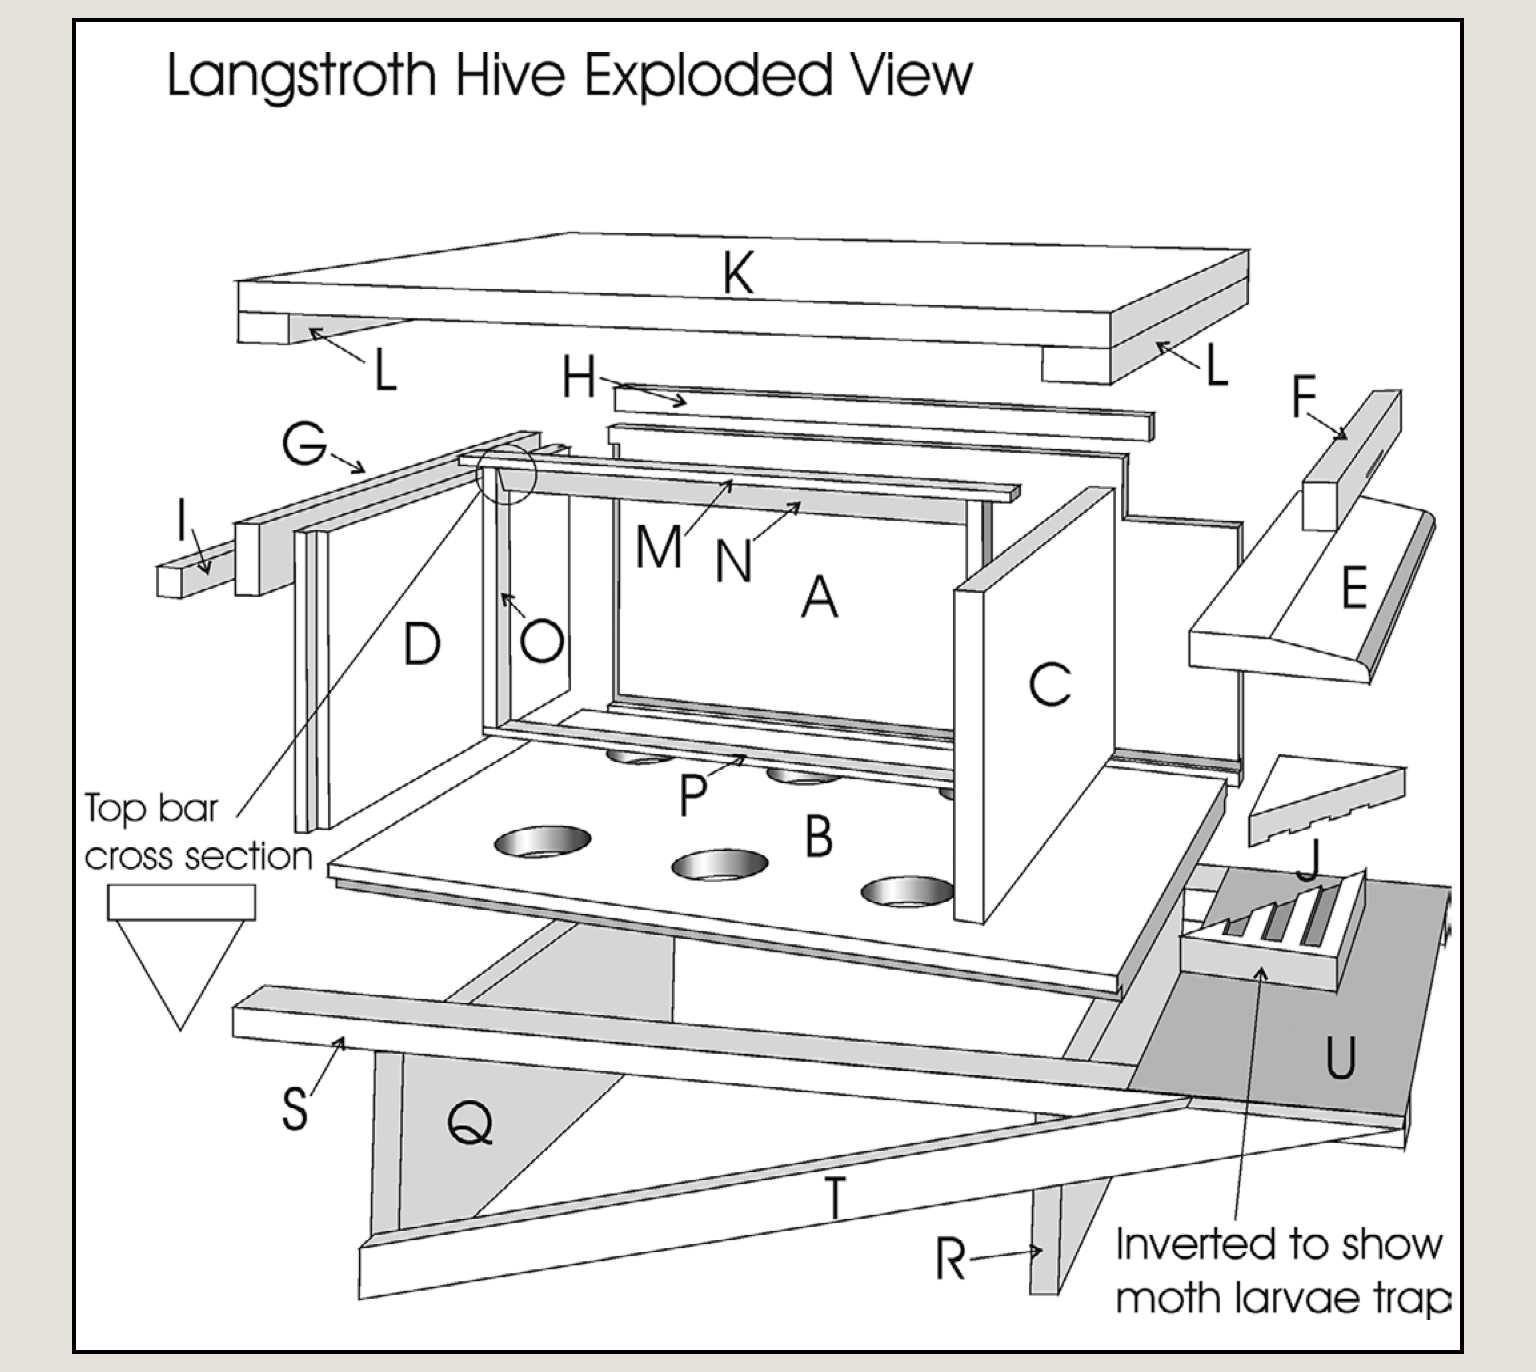
Langstroth’s 1852 patent moveable comb hive was the first practical hive that allowed the beekeeper to examine any comb in a hive quickly and with minimal disruption to the bees.
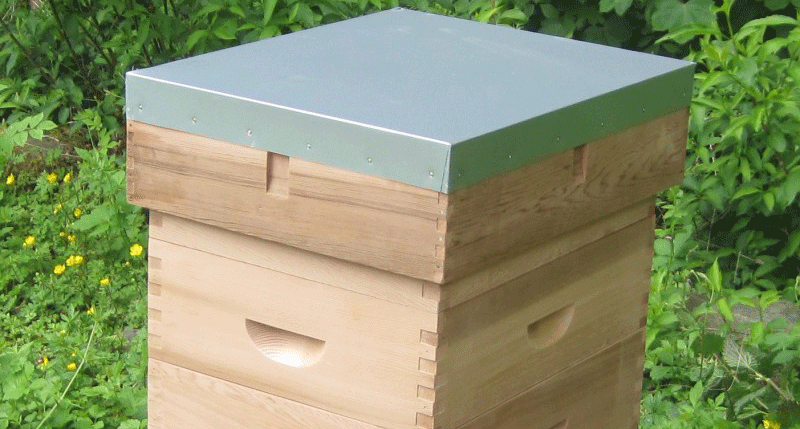
Completed hive side view.
His original design, patented in 1852, looks complicated, but it’s actually simple to build, requiring only a few hand tools and a table saw. Langstroth assures us the saw can be powered either by steam, water, or horse power. If none of these power sources are available, electricity will work fine. Besides a table saw, you’ll need a drill press with 1¼” and 1-3/8” bits, and a router with a straight cutter.
Langstroth’s plans are not so easy to follow. He tended to leave out details or put them somewhere else in his book. The illustrations and descriptions don’t quite match. He offers five hive models, from a basic box to a complicated double walled hive with a glass window. He recommends his “hive #2 without observing-glass” for “those largely engaged in bee culture”. This is the model described here.
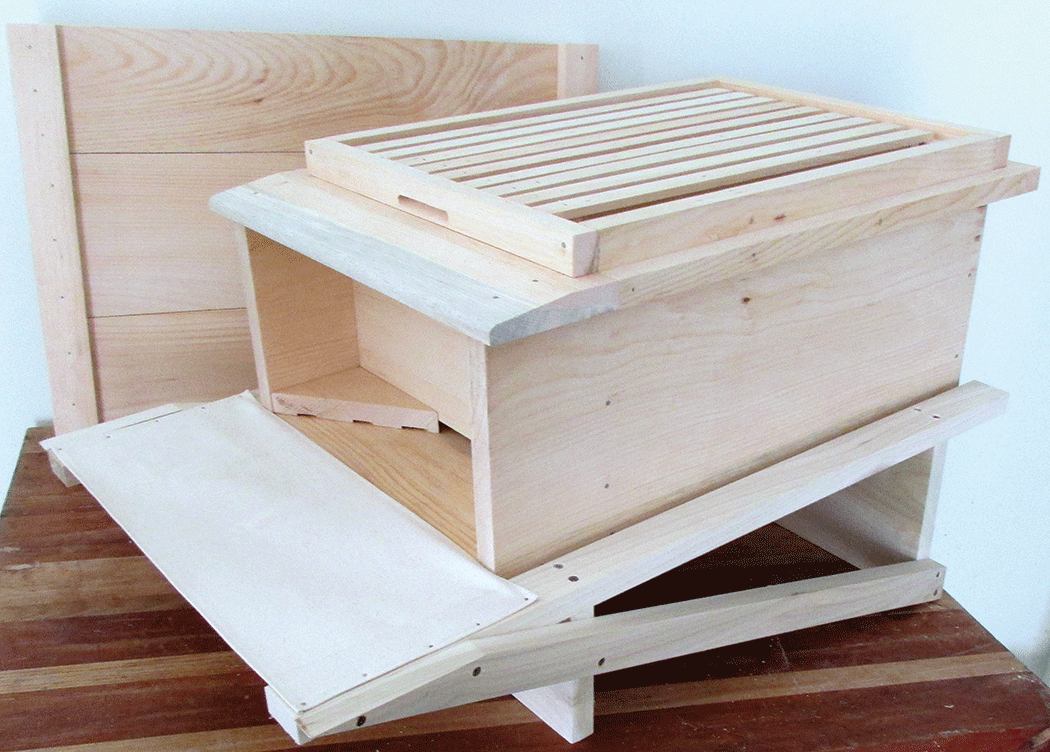
Completed hive side view.
Langstroth’s hives were meant to be stacked. The lower box contains the brood; the upper box was for surplus. Unlike the modern hive, you stack an entire hive, including the bottom board, on top of the lower hive. The bottom board has holes drilled in it allowing access to the upper hive. You can make multiple hives and stack them, or just put a modern super on top.
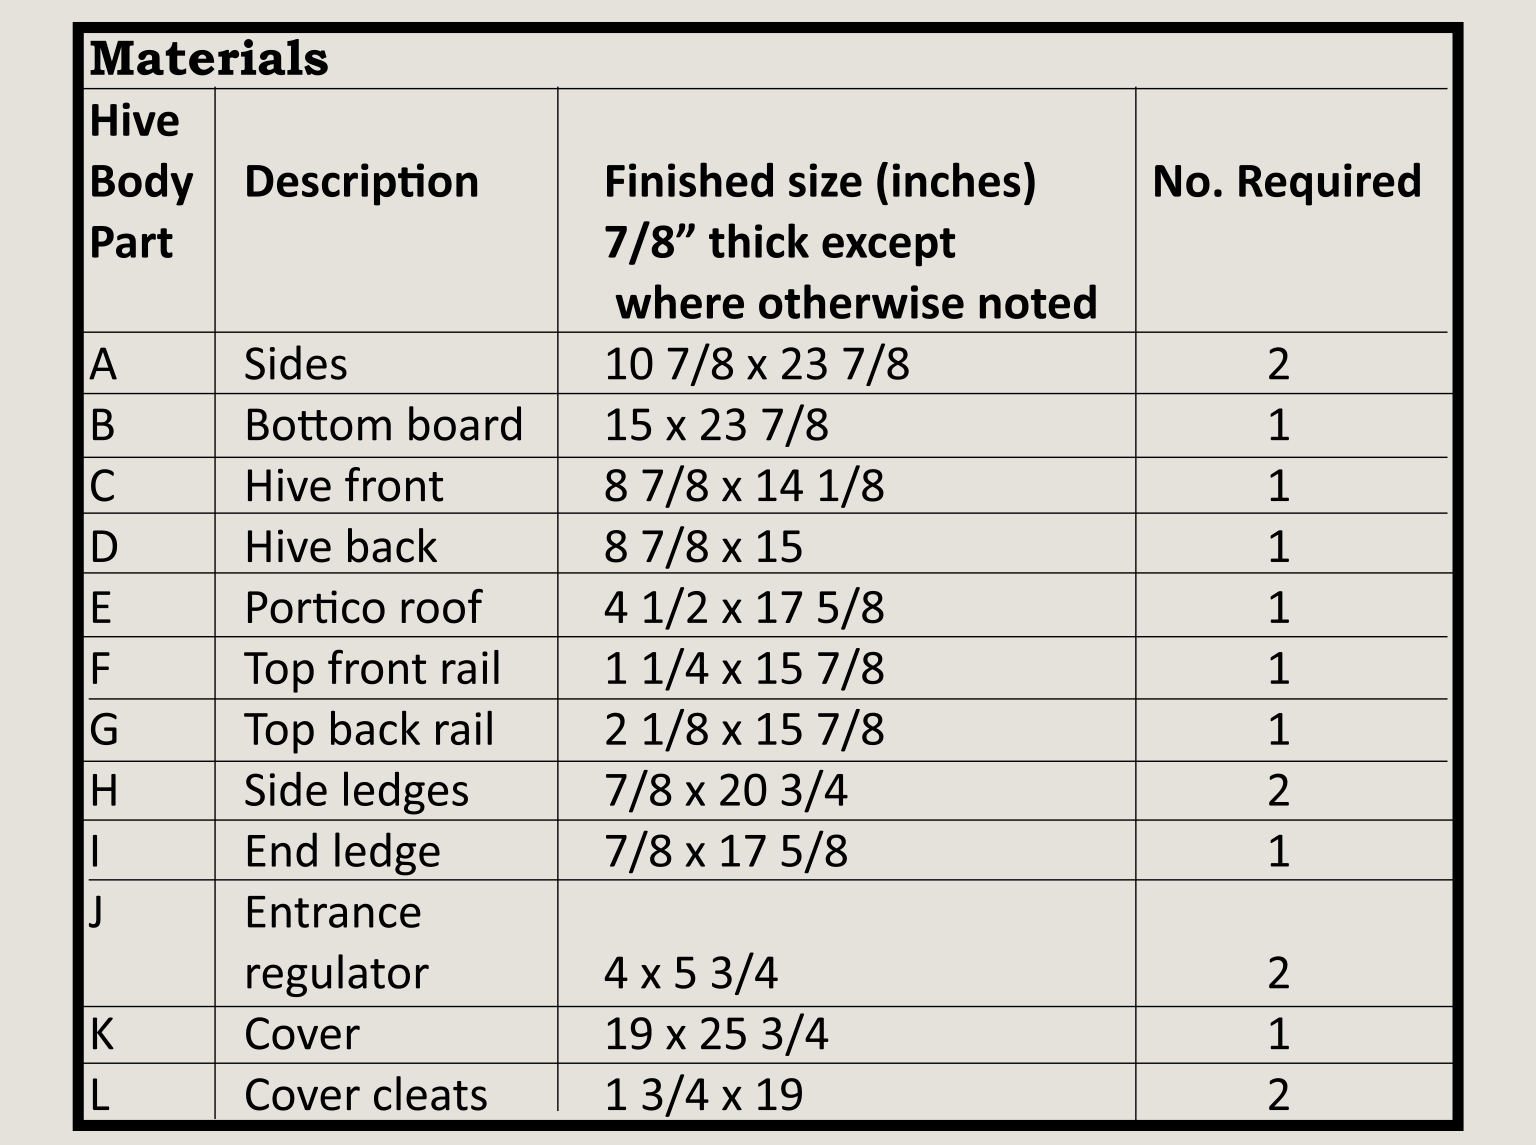
Lumber in the nineteenth century was planed to 7/8”. Almost all components are based on this thickness. You won’t find this at building supply centers, but any lumber company selling rough lumber can custom surface lumber to 7/8”. Langstroth recommends cedar, basswood, poplar, or pine. Other species will work as well.
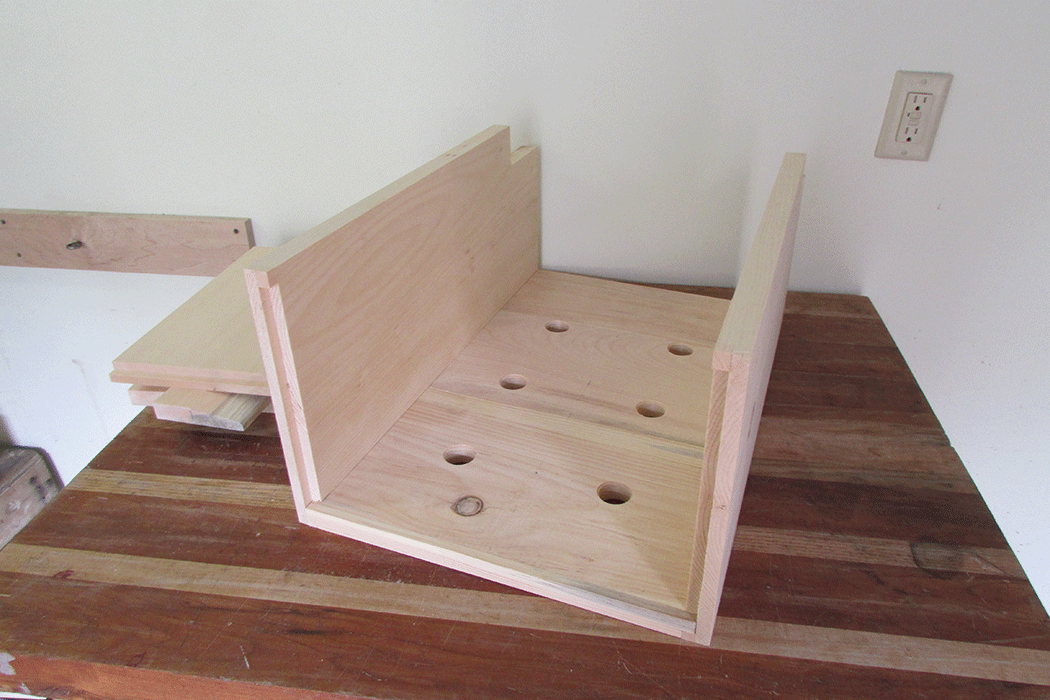
Rabbet on sides.
Constructing the Box
1. Cut two sides 10-7/8” x 23-7/8”. Cut the front to 8-7/8” x 14-1/8”, and the back to 8-7/8” x 15”.
2. The sides are mirror images of each other. On the sides cut a 2-1/8” x 4” notch on the upper front (see diagram). Mill a 7/16” groove across the bottom of the sides, 7/16” above the bottom edge. The floor fits into this groove.
3. The back will be “halved into” the sides. Cut a 7/16” x 7/16” rabbet on the ends of the back. Cut a mating rabbet in the back of the sides.

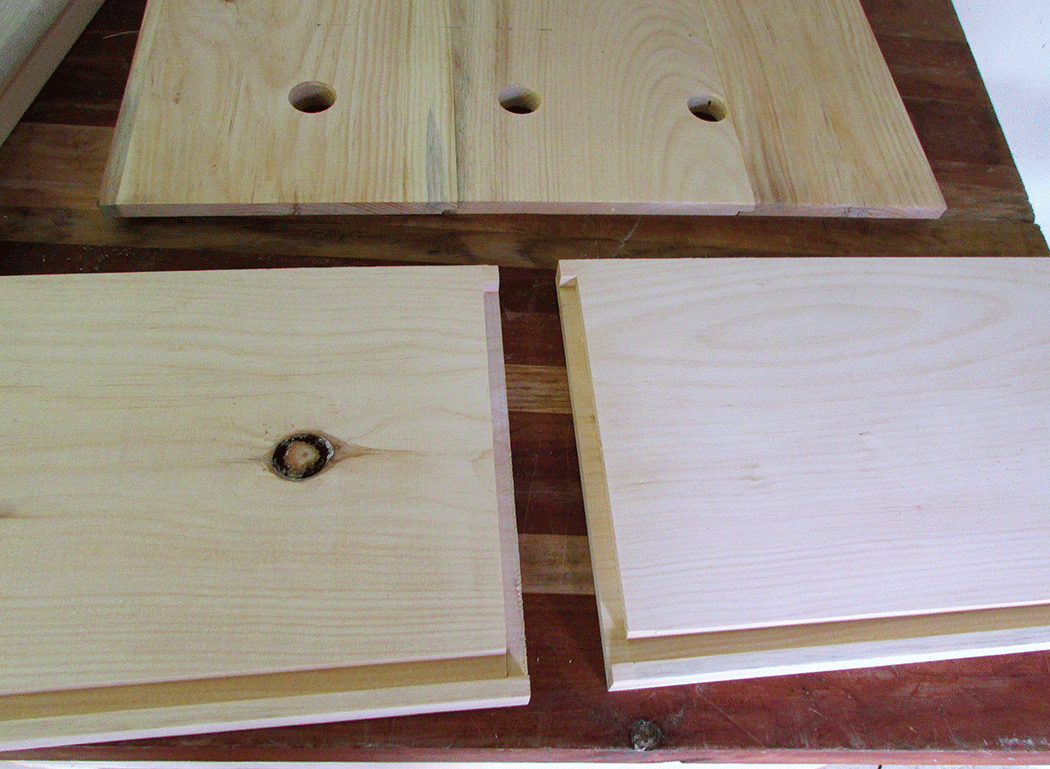
Sides and bottom rear view.
This rabbet starts 5/8” from the top of the sides and stops at the lower rabbet. Nineteenth century carpenters would have bored a row of holes 7/16” deep, and then chiseled out the waste wood by hand. Using a router with a straight bit is easier. Clamp a straightedge to the side to guide the router. Square the upper end with a chisel. A simpler but weaker construction would be to skip the rabbets, cut the back to 14-1/8” and nail in place.
Floor
4. Both floor and roof are tongue and grooved, so mill them both at the same time. The grain on the floor runs from side to side, the roof runs end to end. After tongue and grooving, crosscut to 15” enough material to make a floor 23-7/8” wide. Mill a 7/16” rabbet on the end grain.
Sides and bottom rear view.
Make sure it slides easily into the groove on the sides without play. The bottom of the sides should be flush with the bottom of the floor.
5. When hives are stacked, the bees pass between stories through six holes in the bottom board. Start with the 1-3/8” bit, drill 1/16” deep, then drill through with a 1¼” bit. For the lower box, close the holes with 1-3/8” disks cut from tin. When using a second hive for surplus honey, remove the disks.
Portico Roof and Top Rails
6. Langstroth’s hive’s distinctive look comes from the portico, the
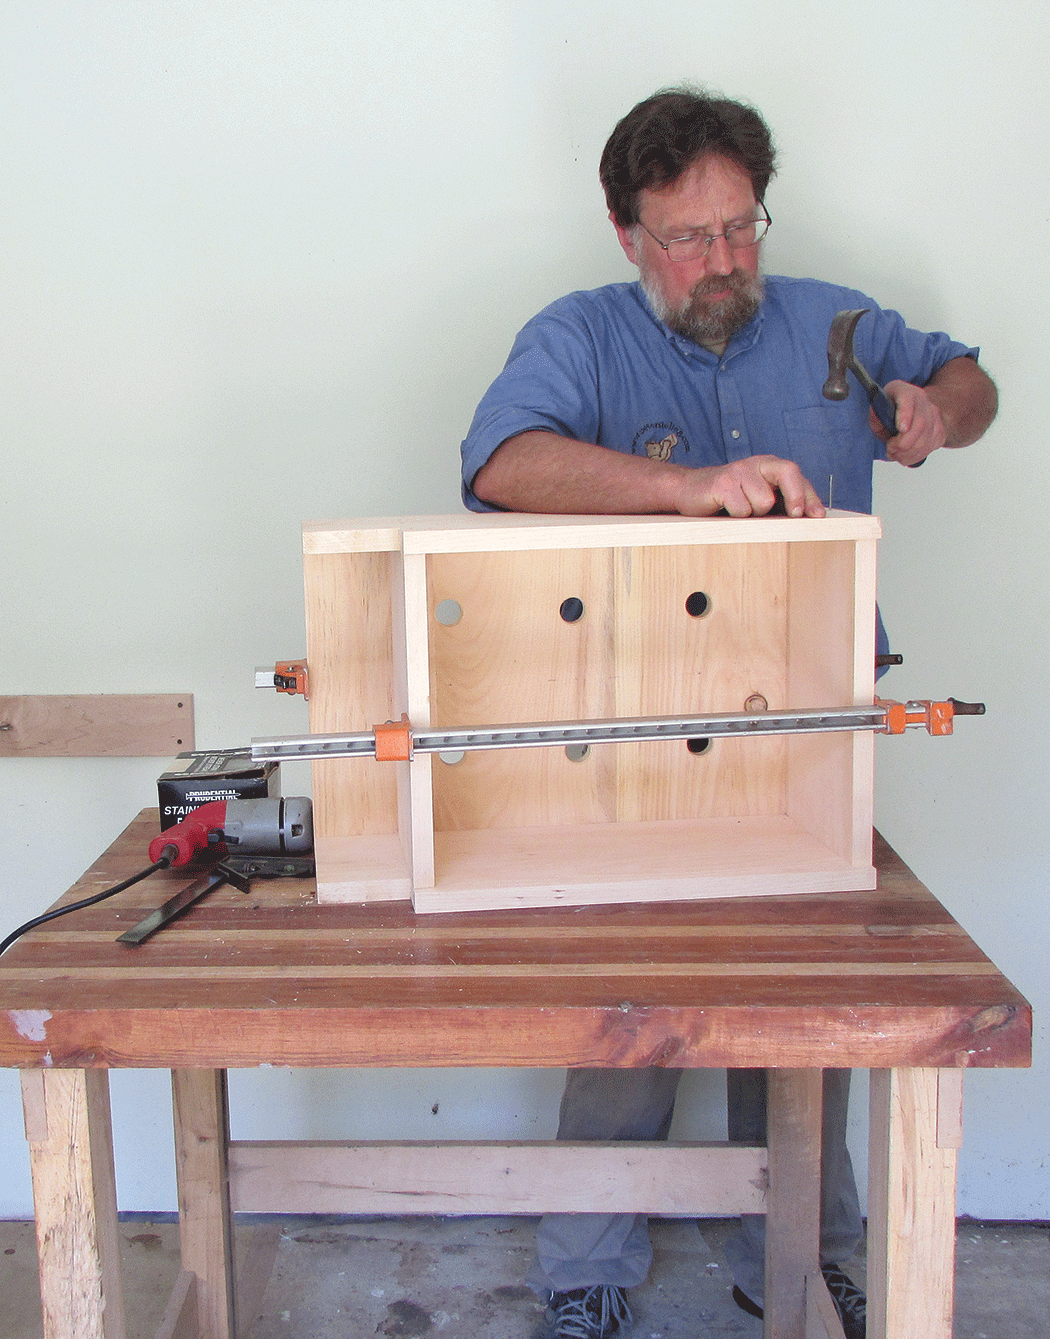
Fastening ends to sides.
porch that extends 4” past the hive front. Cut a board to 4½” x 17-5/8”. Bevel the front from 1/2” to full thickness 2½” back, then round the front drip edge.
7. The frames rest on top of the two ends. The front and back rail form the back of the frame rests. Both rails are 15-7/8” long. The back is 2-1/8” wide. The front, which sits on the portico roof, is 1¼” wide. The front rail has an upper entrance, 3” long by 1/4” wide and slanting downward from inside to outside.
8. Make two ledges to run from the portico roof to the back rail, 7/8” square by 20-3/4”. One back ledge, 7/8” square by 17-5/8” completes the hive body.
Triangular Entrance Regulators
9. Make a block 4” x 5¾”. Cut in half diagonally. On the bottom, cut grooves 1/8” deep x ½” wide. The grooves are supposed to attract wax moth larvae for you to remove periodically. The entrance regulators remain loose and can be added or removed as needed, depending on the strength of the colony.
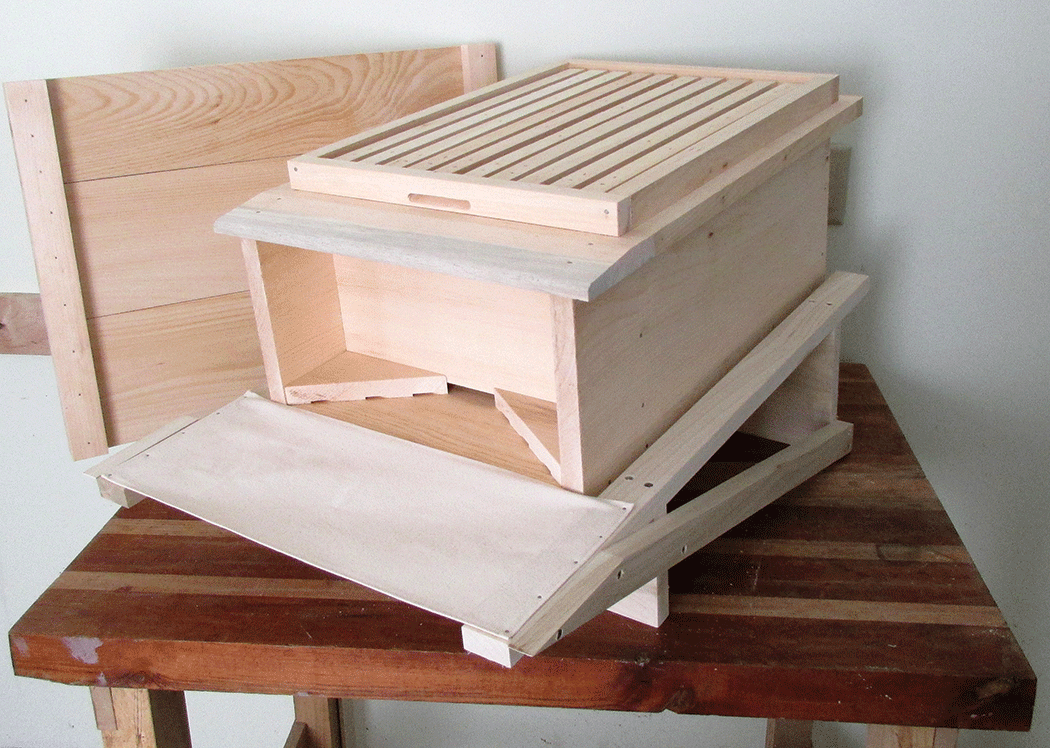
Cover
10. Make a panel from tongue and groove stock 25-3/4” x 19” with the grain running lengthwise. Langstroth recommends rain-grooves at the tongue and groove seams – bevels forming a gutter to draw water away from the seams. A better solution would be to cover the top with sheet metal. Two cleats, 2” x 19”, fasten to the underside, flush with the ends.
Frames
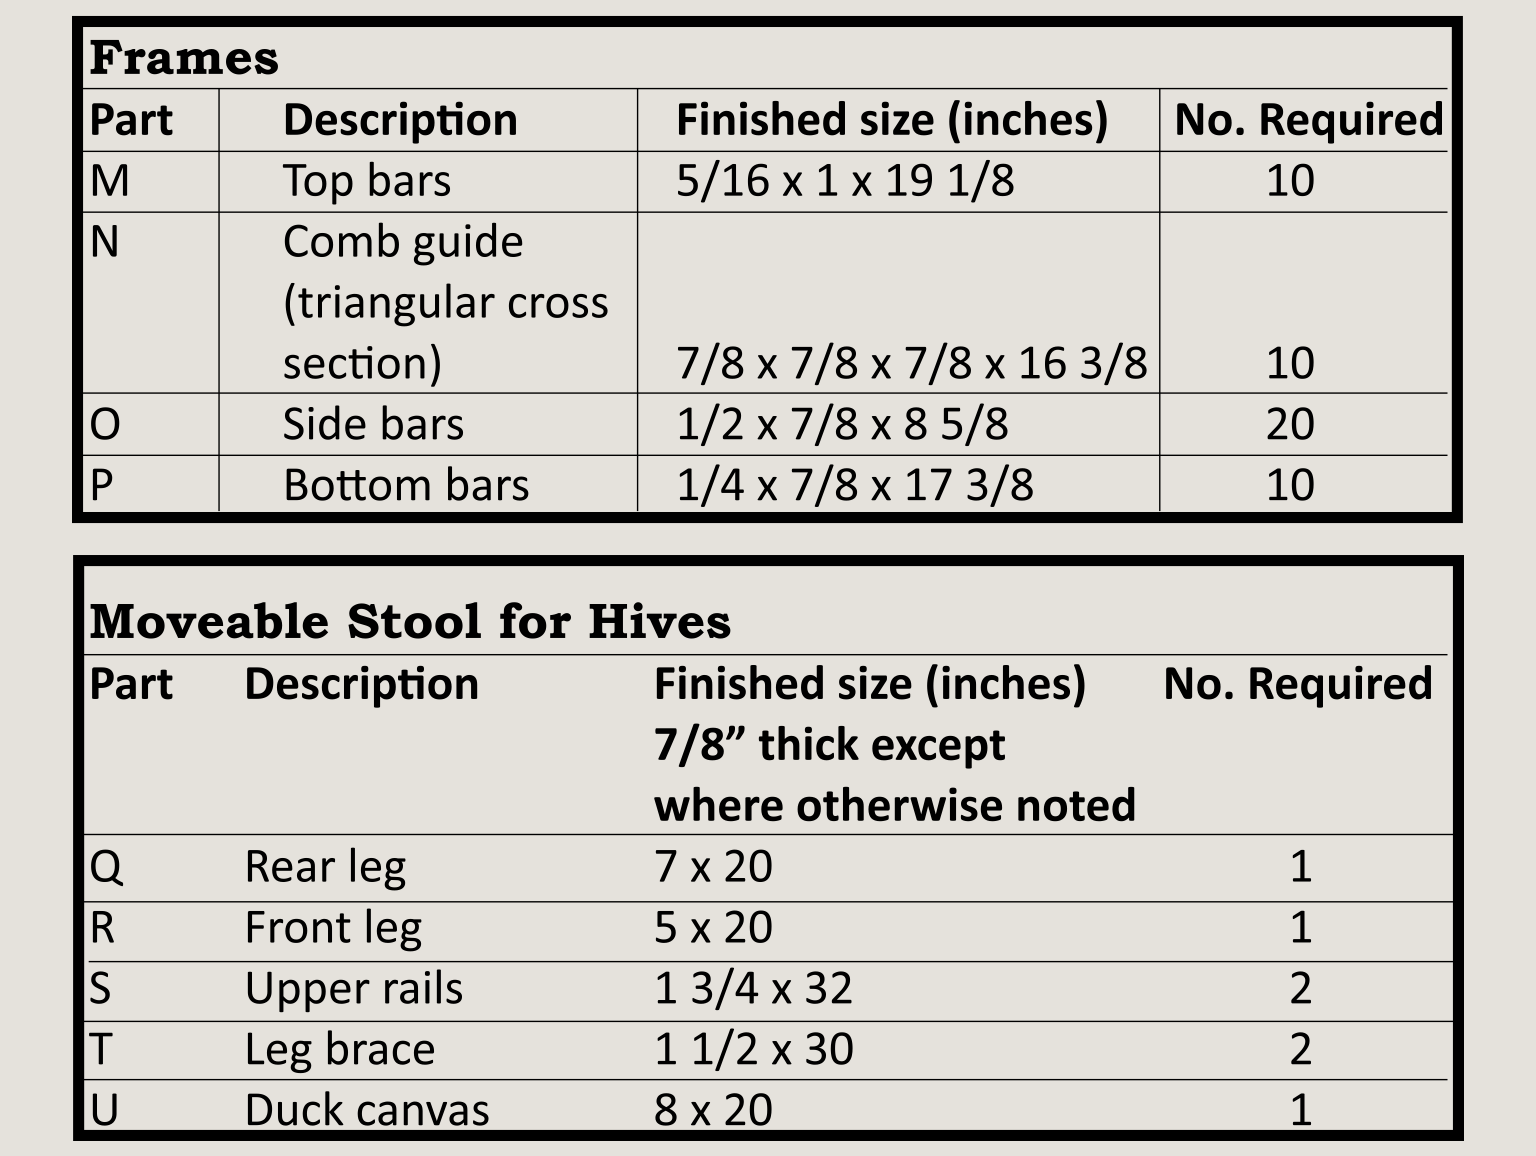
11. Make 10 top bars 5/16” x 1” x 19-1/8”. If you plan to fasten comb to the top bar, you are done.
12. If starting a colony without combs, you’ll need triangular comb guides. Crosscut the wood to 16-3/8”. Set the table saw arbor to 30 degrees and the fence 7/8” from the bottom of the saw blade. Use a push stick to prevent kickback. The first cut will be a waste piece. Rotate the stock end over end and saw out the first triangular piece. Continue until you have ten per box.
13. Make 20 side bars 1/2” x 7/8” x 8 5/8”.
14. Make 10 bottom bars, 1/4” x 7/8” x 17 3/8”.
Moveable Hive Stool
15. Make a front and rear leg, both 20” long, the front 5” wide and the rear 7”.
16. Make two pieces 1-3/4” x 32”. Nail them across the top of the two legs as illustrated, projecting 4” beyond the rear leg and 9” beyond the front leg.
17. Two more pieces, 1½” wide are trimmed to fit and attached to the sides to brace the legs.
18. Hem a piece of cotton duck canvas, 8” x 20”. Tack to the front as an alighting board for the bees. The hive fits loosely on the stand. Langstroth’s illustration shows small wooden wedges holding the hive in place.
Assembly
Use exterior nails, zinc coated or stainless steel for nailing the hive together. For maximum strength, use spiral threaded nails, 2”-2½” long when nailing into end grain. Use 1½” nails when nailing 7/8” to 7/8” pieces. Drilling pilot holes just smaller than the nail’s diameter prevents splitting and increases a nail’s holding power.
19. Nail the floor to the sides. The back end should fit into its grooves and flush at the back. The top of both ends should be 5/8” below the top of the sides and 3/8” above the floor. The front end is flush and square with the notch for the portico roof. Nail the ends in place.
20. Center and nail the portico roof. Nail the front and back rails. Add the two sides and one back ledge.
21. There is a back entrance at the bottom. Make a shim to fit (not pictured) and slide it into place. Most of the time that remains closed.
22. When assembling the frames, use 1½” pneumatic staples or standard frame nails to fasten the top and bottom bars to the side bars. If making several hives, make a jig to align the parts for nailing.
23. Assemble the stool. Tack the canvas to the frame after painting.
Once the hive and frames are assembled, prime and paint the hive with exterior paint. The hive is ready to stock with bees. For directions on stocking and using the original patent hive, read Langstroth’s Practical Treatise on the Hive and the Honey-bee. It is still in print or available online.
Peter Sieling is a beekeeper and expert craftsman. He builds hives and he builds other things out of hive parts from his home in Bath, NY.