By: Ed Simon
You have been keeping bees for several years and really enjoy the hobby.
You have built you honey customers up to a decent number and now find that you cannot keep them supplied all year around. This is a great situation to be in but now you must solve a supply problem.
After considerable thought, you decide to step up from a hobbyist beekeeper and increase the number of your hives. Until now you have been building your own equipment and find it enjoyable, satisfying and less expensive than buying ready-made equipment. You know that increasing the number of hives will make a change in the way you both work your hives and how you build your equipment.
This scenario was just like the situation a friend, Ron Stevenson, was in when he decided to expand the number of hives in his apiary from twelve to forty.
Some of the decisions he made about his operation were:
1- Change from telescoping covers to migratory covers for the following reasons.
- A migratory cover is cheaper to build than a telescoping cover
- A migratory cover is much easier to build than a telescoping cover
- An inner cover is no longer needed. The reason for an inner cover is so the bees can’t use propolis to glue the telescoping cover to the hive body.
- One less item to store (no inner cover to store)
- Smaller storage space was required
- Accessing the bees only required the removal of one cover.
- One less item to keep track of (no inner cover)
2- Stay with using individual bottom boards and not change to migratory pallets. Stevenson was not going to ship his bees anywhere during the Winter therefore:
- Individual bottom boards allow for more flexible placement of the hives.
- A simplified design made for easier and cheaper construction.
3- Additional honey supers and additional brood boxes would be made as required.
4- Stevenson would use the current equipment until it either wore out and needed to be replaced or it became cumbersome to maintain two styles of equipment.
5- Because of the cost and labor required, any equipment falling into disrepair would be further evaluated and would possibly be disposed of as opposed to repairing.
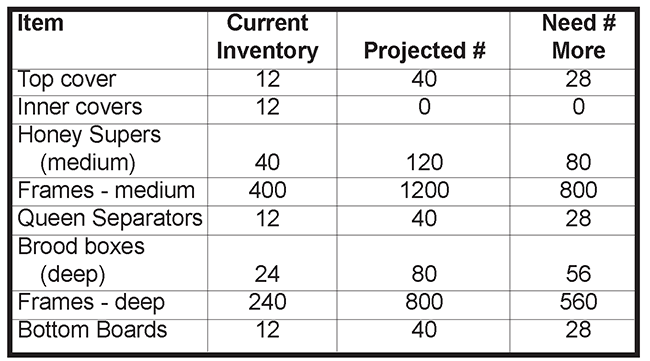
Stevenson’s current and the projected minimum inventory was:
With a goal established and space available to store the additional equipment, Stevenson asked me to help with his expansion. I had previously manufactured a lot of equipment and acquired some expertise in small volume manufacturing with monetary constraints. This situation needed a piece of equipment I had not included in my book Bee Equipment Essentials. As a result, this article will provide the building of migratory tops. All with the emphasis on volume construction and economy.
Migratory Top
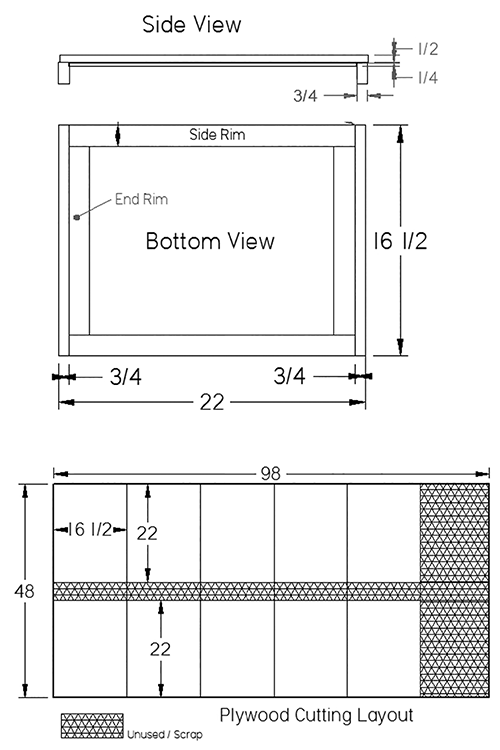
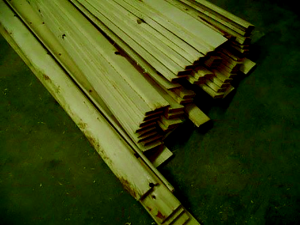
These instructions describe the assembly of a batch of 10 migratory top units. Ten units were chosen because ten migratory tops can be cut from one 4’ x 8’ sheet of plywood.
Parts
- ½” x 16½” x 22” – Pressure treated plywood (4 ply preferred) – Top (10) (1 per top)
- ¾” x 1½” x 16½” – Lip (20) (2 per top)
- ¼” x ??? x 20½”’ Lath – side rim (20) (2 per top) (See instructions)
- ¼” x ??? x ???”’ Lath – end rim (20) (2 per top) (See instructions)
- Paint, Glue and Nails/Screws/Staples
Note: The 16½” dimension for parts #1 and #2 are ¼” larger than needed for an exact fit. This allows a little leeway for the placement of the top on the hive. If you want an exact fit, use a 16¼” dimension. The 22” length of part #1 is overly generous to allow for inconsistent manufacturing and eventual warping of the top.
Note: If you are really going to get serious about constructing your own bee keeping equipment, I recommend investing in a good compressor and an air driven stapler. The time saved and the ease of assembly it provides makes the purchase well worth it. I made a mistake and delayed the purchase of compressor/stapler setup until I was overwhelmed by the time required when using nails and screws to build equipment.
Considerations
Both the length and the width of the cover are generous. This was done on purpose, to allow for easy placement of the cover after the hive bodies have been in use for years and are no longer in pristine condition.
The ½” thickness, pressure treated plywood for the migratory top was decided upon as a compromise using the following factors for evaluation.
- Longevity – treated plywood should last longer than non-treated plywood
- Thickness – ½” thickness plywood weighs about 1/3rd less than ¾” plywood or boards.
- Thickness – ⅜” Plywood will warp more the ½” plywood
- Thickness – 4 ply plywood warps less than 3 ply plywood
- Construction
Step #1 – Cut out the top (Part #1).
The ½” x 4’ x 8’ plywood sheet needs to be cut into to 22” x 16½” pieces. An easy way is to cut five 16½” x 4’ sections first. This reduces the plywood into easily manipulated sections. Then cut each section into two 22” x 16½” pieces. See the drawing for the layout of 4’ x 8’ sheet of plywood.
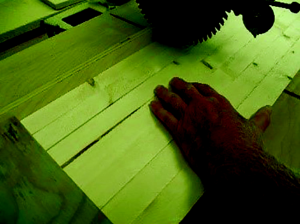
Hint: Cut the pieces on saw horses in the backyard or driveway to eliminate the clean-up of the sawdust.
Note: Some home improvement stores will cut the wood for you for free or for a minimum charge. If you purchase the wood early on a Sunday morning, when they are not busy, you will get better, quicker and more accommodating service.
Step #2 – Cut the lips (Parts #2) – two pieces per top.
Rip a ¾” piece of lumber to the width required for the lips on your cover.
Note: The width of the lip should not and I repeat NOT be wide enough so that when the cover is installed it touches or covers the handholds on the hive bodies.
Hint: If you are also making deep brood boxes and have saved the pieces trimmed from the 1” x 12” boards, you can use these pieces for the lips. These pieces should be about 1½” wide.
Step #3 – Attach the front and back lips to the underside of the top.
Select the smoothest surface for the top of the top and then using glue and staple, nails or screws attach the end lips to the bottom surface at each end.
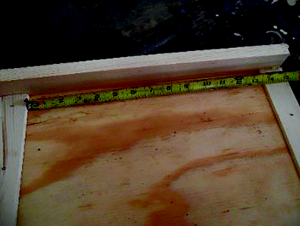
Step #4 – Cut the lath side rims (Parts #3) – two pieces per top.
Set a stop-block on your radial arm saw and cut 20 pieces of lath 20½” long.
Hint: Measure the distance between the lips of your top. Cut the length ⅛” shorter than needed for an exact fit, this adds just enough wiggle room to allow for inexact measurements and assembly without compromising the structure.

Get a copy of Ed Simon’s book Bee Equipment Essentials with detailed drawings, construction hints and how-to-use instructions for dozens of beekeeping tools and equipment from https://www.wicwas.com.
Note: Lath is available in most lumber stores. Unfortunately, it is not of consistent size and quality. It is cheap and is usually sold in bundles of 25 or 50 pieces. Each piece is about ¼” thick and is usually 4-foot long. Choose a bundle that is consistent in thickness and of decent quality. The width of the strips does not make any difference.
Note: By adding the lath to the underside of the top you do two things. You add rigidity to the top which helps resist warping. It also provides a small space above the frames in the same manner as an inner cover does.
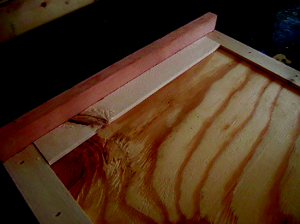
Step #5 – Add the side rims (Parts #3) to the underside of the top.
Glue and staple or nail the lath cut in a previous step to the underside of the cover.
Step #6 – Cut the lath end rims (Parts #4) – two pieces per top.
Measure the distance between the side rims that you installed in the previous step.
Set a stop-block on you saw and cut 20 pieces of lath ?? inches long.
Step #7 – Add the end rims to the underside of the top
Glue and staple or nail the lath cut in the previous step to the ends on the underside of the cover. Although lath is usually 1½” wide it is not always consistent, you may need to make minor adjustments to get them to fit.
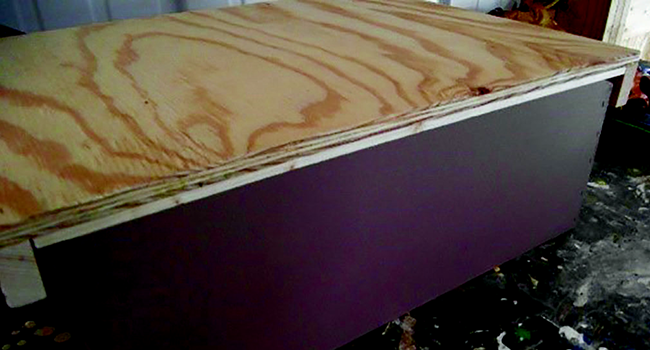
Step #8 – Paint the cover
Using the external latex paint you got from the recycling center, paint the cover.
Two coats of paint are needed, you should be extremely careful about covering the end grains of the lips and the side grain of the plywood and lathe.
Conclusion
Cheap, easy and fast to build, this migratory top will last for a decent time. Warping can be a problem, but considering the ease of assembly and the cost, it is easier to replace a unit than to mess around trying to fix it.
Drawings – Migratory Top
Note: The 16½” dimension is ¼” larger than needed for an exact fit. This allows a little leeway for the placement of the top on the hive. If you want an exact fit, use a 16¼” dimension.