By Jessica Louque
Do you ever have those neighbors that are always doing really strange things and you think maybe they are somewhere between slightly eccentric and slightly insane? Every time you go past their house, there’s a new contraption, piece of junk, large trash pile, or animal in their yard, and you can’t help but wonder if they know how strange they are? For our area, WE are those weird neighbors. We are the ones with random bee equipment scattered in the garden because it just hasn’t made it quite to where it should be, or a project that didn’t make it to completion, or we have bad children who leave their toys everywhere. Sometimes, it’s a little funny, like when we kill things that kill chickens and use the crossbow to bolt their carcass to the wall or a tree or something. Sometimes, it’s embarrassing, like when we sat trash on the front porch and something ripped it open overnight and it was all across the front yard. Every once in awhile, we don’t even realize it’s weird, like our vegetable-predator fence around the garden maybe seemed a little strange (once the neighbors asked why we had a circle garden) but it made sense to us at the time.
Even though we live in the country, most of our neighbors are not the gardening, outdoorsy type of people. While we are cramming our days with too much work and not enough time, they might grow a single tomato plant in a pot (and kill it). We usually donate to the needy, by which I mean we give extra vegetables to the neighbors, especially if they come water while we are gone on a weekend. Some of the gardening concepts seem to be pretty foreign to this group of people. Of course they know what food looks like (sometimes we have some oddballs and we get some questioning stares, but who wants to admit they don’t know what a vegetable is?), but how it’s grown is another story.
The first time I realized this was when one family didn’t understand why I had “dirt boxes” in the back yard. I was explaining the concept of raised beds to the blank stare of my neighbor, when I finally just told her that plants like to be higher up than the grass, which seemed to satisfy her (this is not true. I was just being snarky because she wasn’t listening to me). When we put the large raised beds in the front yard- that was a whole new round of questions. Why would you put those ugly boxes in the front? Why are they so tall? Can you put them somewhere else? Why are you hoarding cardboard? So many questions . . .
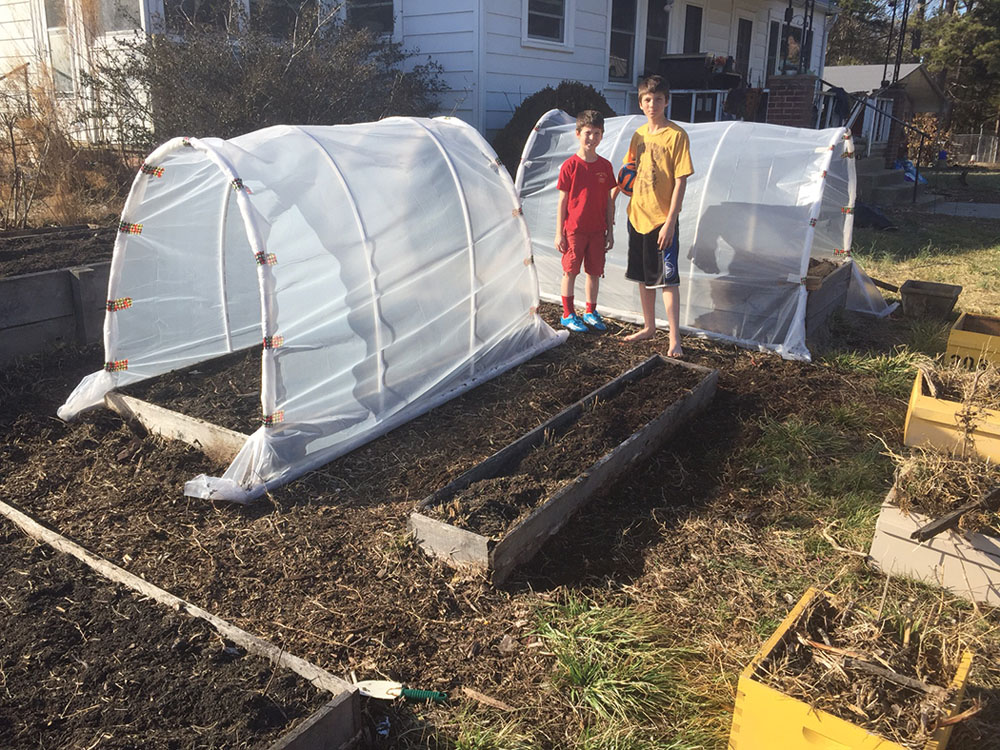
So now, we will have a show and tell demonstration of how, you too, can confuse your neighbors with your raised beds! Hopefully, your neighbors are a little more “in the know” than ours and won’t ask about your space tunnels in the front yard. What we really did is put up hoop houses on our beds to maximize our growing season, but I guess it could also be a space tunnel.
For our area, it’s time for cabbage, lettuce, beets, carrots, spinach, broccoli, bok choi, et cetera. In North Carolina the weather is extremely unpredictable, so we wanted to have a little more control over our gardening. We can’t go full force, but we’re going stir crazy with the Spring fever of garden season. Something has to be done! We’ve been talking about putting plastic on our raised beds, but never got around to it until now. I’ll explain what we did and what the cost was for each of our pieces. We bought everything at Lowes, which took two trips, because between the two of us I don’t think we could count to 20 unless we took our shoes off and we miscounted the number of brackets we would need.
We planned to cover three of our beds with plastic hoops. Two of the beds were 3×7 feet, and one was 3×10 feet. For the seven-foot beds, we wanted to do four ribs, and for the 10-foot bed we wanted six ribs. We also decided to make ends to attach to the sides when we need it without covering them permanently. Each rib is made of a 10’ – ½ inch PVC pipe. The end pieces were the same 10’ – ½ inch pipe, plus a three-foot section of pipe to close off the bottom. For this part, we needed 14 pieces for the ribs and eight to make the ends. We ended up buying two 20-packs of the 10’ PVC for $1.63 per pipe on the Contractor Discount for buying 10 or more. In the same section, we had to buy elbows to hook together the end pieces. Since we were making six end-pieces, we needed two elbows for each piece giving us a total of 12, which brought us in a $2.52 for a Contractor 10-pack and then another $0.28 each for two more. Note here that these were slip elbows of the ½ inch size, not threaded.
Our brackets were called “2-Hole Pipe Strap”, for those of you who need an actual name for “that thing made of metal that holds pipes and is shaped like an Omega” as would be my best description. Our mistake in calculation comes here where we originally accounted for one per rib, but really we needed two. With 14 ribs, we needed 28 brackets. We bought three Contractor 10-packs for $2.59 each in the ¾ inch size. A quarter inch size larger than our pipe gives enough maneuverability to work easily during the construction.
The next miscalculation was more of an oversight than anything. We purchased wood screws for $5.58 in a 50-pack, but we only came home with one box… except that each bracket has two holes and 28 x 2 does not = 50. When we went back for more brackets, we also bought another box of screws.


Our last purchase (but definitely not the least) was the plastic sheeting for the cover. The one we chose is Blue Hawk Consumer Sheeting in the Heavy-Duty 3.5 mil two-pack of 10×25’ rolls (500 square feet total). This was $19.98 for the two-pack, and we were able to cover the two eight-foot beds with one roll, and the 10-foot bed with the other, as well as the end pieces.
In total, our equipment list and cost was:
(22) 10-foot ½ inch PVC pipes @ $32.60
(12) 90° elbows @ $3.08
(3) 10-packs of brackets @ $7.77
(2) 50-pack 1” wood screws @ $11.16
(1) 2-pack plastic sheeting @ $19.98
Total cost: $74.59 +tax
Drill for the screws
Duct tape
Measuring tape
Hacksaw
Child labor (free! Not really, ever, are children free)
Slap stapler
Random long wood pieces (8 foot-ish)
The spacing was measured out first, with one rib on each end, and then the total length divided by thirds to place the other two ribs. The brackets were screwed on first, then we pushed the pipe in. We pulled the plastic over longways, so that the 10-foot wide part was the length of the bed and the 25-foot part was rolled over the ribs so we had enough on each side to anchor at the ground. We rolled the excess on each end around the ribs and had the boys hold them while we duct taped the rolled part to keep it stable. Then, the sides of the plastic were rolled up around some extra wood we had from tomato stakes last year. Bobby used the slap stapler to attach the plastic, and the weight of the wood is enough to anchor the sides. It took us about an hour per bed, doing two beds the first day, and having to go back for supplies the next day. It was relatively easy to put up, but did need an extra couple pairs of hands every once in awhile to make it manageable. The kids also enjoyed it because it’s a mostly quick project that has very apparent results at the end of the project. They like it when there’s a tangible product for the effort of work so they can see the fruits of their labor.

Overall, it seems to be a success. There are a few noticeable down sides to the hoops, with the lack of down sides being one (pun intended). Other than the removable ends, there’s no easy way to access the center of the beds without removing the ribs, or Bobby’s long arms can do the trick. The center of the 10-foot bed is especially difficult because you don’t want to put weight in the carefully fluffed soil to reach the middle and support your weight. It is also particularly rainy this week and we can’t just pull it off quickly to let the rain in, so the soil is a little drier than we would like. The placement of the beds doesn’t make this too bad of a problem since it’s about 10 feet from one of the outside spigots, but I’d rather it get rain if it were possible. Hopefully we won’t find out how it holds up to a snow/ice storm anymore in 2015, but again, in North Carolina, anything is possible. Other than those things, there doesn’t seem to be too many issues. If you’re making your own, you’ll probably come up with your own quirks or hacks to make it a little more suited to you or eliminate a few of these problems. I would absolutely recommend this project to anyone looking to extend their season or just wanting to make a space tunnel in your yard to confuse the neighbors.

Jessica Louque and her family are living off the land in North Carolina.