by Jim Thompson
I hear that question a lot and I didn’t give it much thought until I started building a display of hive tools.
I remember when I was mentoring a person to become a beekeeper and he showed up wearing two pairs of trousers, two long sleeved shirts and a veil that was duck taped to the outer shirt. His smoker had more duck tape than leather on the bellows and he was ready to do battle. I asked him if he had cleaned his hive tool and he answered “What’s a hive tool?” So I asked, “What do you open a hive with?” He replied, “A screwdriver.” So I guess that a screwdriver could be considered as a hive tool. Going back in history, a screwdriver was actually one of the tools that the early beekeepers used.

I thus began a search to find references to old hive tools. What I found was that in 1869 there were tools that were used to scrape and pull debris out the front entrance of a hive and tweezers to catch and kill wax moths. Some of these tools look similar to the top bar hive tools of today. Then I found references to the “Ideal” hive tool in 1907 in an advertisement in Gleanings in Bee Culture. In that advertisement it is easy to see that the Ideal Hive Tool could be known by different names such as: the William Muench hive tool, A Dr. Miller hive tool as he recommended it, and Root, Newman and Rowe.
Also in 1907, L.F. Sawyer patented his invention of his “Bee Knife.” In 1915 a bee article mentioned that beekeepers used an assortment of butcher knives, a glazer’s knife, and a tool made from a ground down buggy Spring. A glazer’s knife is another name for a putty knife. So is this a step backward or did someone not get the news that a hive tool has been invented? However a statement in the article mentioned beekeepers tend to use things that are readily available. In 1921, an article in the American Bee Journal showed similarities between the Arthur C. Miller hive tool and the 1907 Sawyer bee knife, as well as the J hook tools of today.
When I look on the internet at some of the beekeepers showing how to use a hive tool, I see they have three or four different types of hive tools but they prefer the J hook type. Most of these beekeepers doing the demonstrations live in Australia where the weather conditions are different. There isn’t anything wrong with a good J hook hive tool, but you must make sure that you assembled your wood frames correctly as the hook can make short order of separating the top bar of the frame from the end bars. After years of use some of the frames may have become fixtures in the super and the pivot point of the J hook, makes an indentation in the adjacent frame’s top bar while you are prying out a frame.
So we must take a short side trip and talk about frame assembly. Wood frames should be glued as well as being nailed together. The most important nail is the nail that goes through the end bar into the wood of the top bar that is left after the wedge has been removed. Since all the other nails go into end grain of the wood, the frame really needs to be glued. Staples do a good job of holding frames together as some staples reach 2½ inches in length.
If all you had to do was lift frames out of a hive, and you kept new frames in the hive, then the J hook hive tool is a good tool to use. But now we have a problem. Which J hook tool works the best? There are J hooks that have a right angle bend and J hooks that have an angle bend. You have to think, is it going to lift the frame or shove it sideways? My favorite blunder in the making of hive tools is the J hook hive tool that has a very short handle and the pivot point is in front of the hook. Not only is it uncomfortable to hold, but the pivot is in the wrong place. You wonder why people buy such an item. Either they wanted to show people what not to buy, wanted to have a pocket version, or looked at the price and wanted something cheap.
Don’t buy a hive tool just because it is inexpensive. I have seen many hive tools that bend and break during use because the materials used were too thin or the wrong type of metal.
A slight variation of the J hook hive tool is the jagged edge hive tool and that takes into account the different widths of the top bars and spacing of the frames. I haven’t used mine, but it has a nice feel to it and appears to be made of thick steel. The main problem that I see is you don’t have a 90° surface to hit with the heel of your hand to drive the blade in between supers. So I find that if I use a J hook or a jagged edge hook hive tool, I need to carry another hive tool for separating hive boxes.

Some people will get their hive tools from the local hardware stores where they find something that looks like a hive tool under categories of paint scrapers, pry bars, or molding bars. Again, these could be considered as hive tools and work okay, but have minor differences. The usual difference in most of these tools is that the taper of the blade is over a short distance to give the tool more strength from bending, but many have a problem inserting the blade in between the supers. The cast iron models may have a nail groove in the flat blade which will leave a mark if it is used as a scraper, but it is made of cast iron and the base of it can be used as a hammer. Since these tools are generally used to pull nails and pry things apart, they will generally have better defined nail holes and grooves and possibly the angle of the bend might be greater than a 90° angle.
Think of the nail holes that are put in many of the hive tools. Most of them are for appearances only as they have a large hole and two rounded cut outs for the shaft of a nail. Thus the only nails that one could pull would be the common or box nails that have a small enough head to go through the big hole in the hive tool. Then you would pick up the end of the hive tool and pull out the nail. You should use the longer end of the hive tool as a lever. I don’t think I could pick up the short end, and if I did I wouldn’t have much leverage or the pivot point is far away. So why have the second nail slot?
This brings us to the “regular” hive tool which has been around for years. When I started to keep bees, a seven-inch hive tool was offered by most of the bee supply companies in their beginning kits. There is nothing wrong with that, because everything was new and came apart easily. However over the years, things get propolized and you find yourself wanting a longer hive tool. So the standard became a 10 hive tool which may actually vary in length from being 9¾” to 10¼”.
The “regular” hive tool might be stainless steel, spring steel, or high carbon tempered steel. It may be available in many colors which sometimes aids in locating the hive tool if dropped. I can visualize that some hive tools such as green could get lost easily in the grass. However as you use a hive tool and clean it up, the paint will be scrubbed off with frequent use, it often becomes shiny. When it sits around without being used, it may become rusty and a rusty hive tool is also hard to find if dropped. Some people believe that a chrome plated hive tool is the answer, but many times the plating of the tool peels off. I have found that if I take fluorescent orange duck tape and put on the hive tool that helps me locate the tool. If the tape becomes tattered or dirty, it can be replaced.
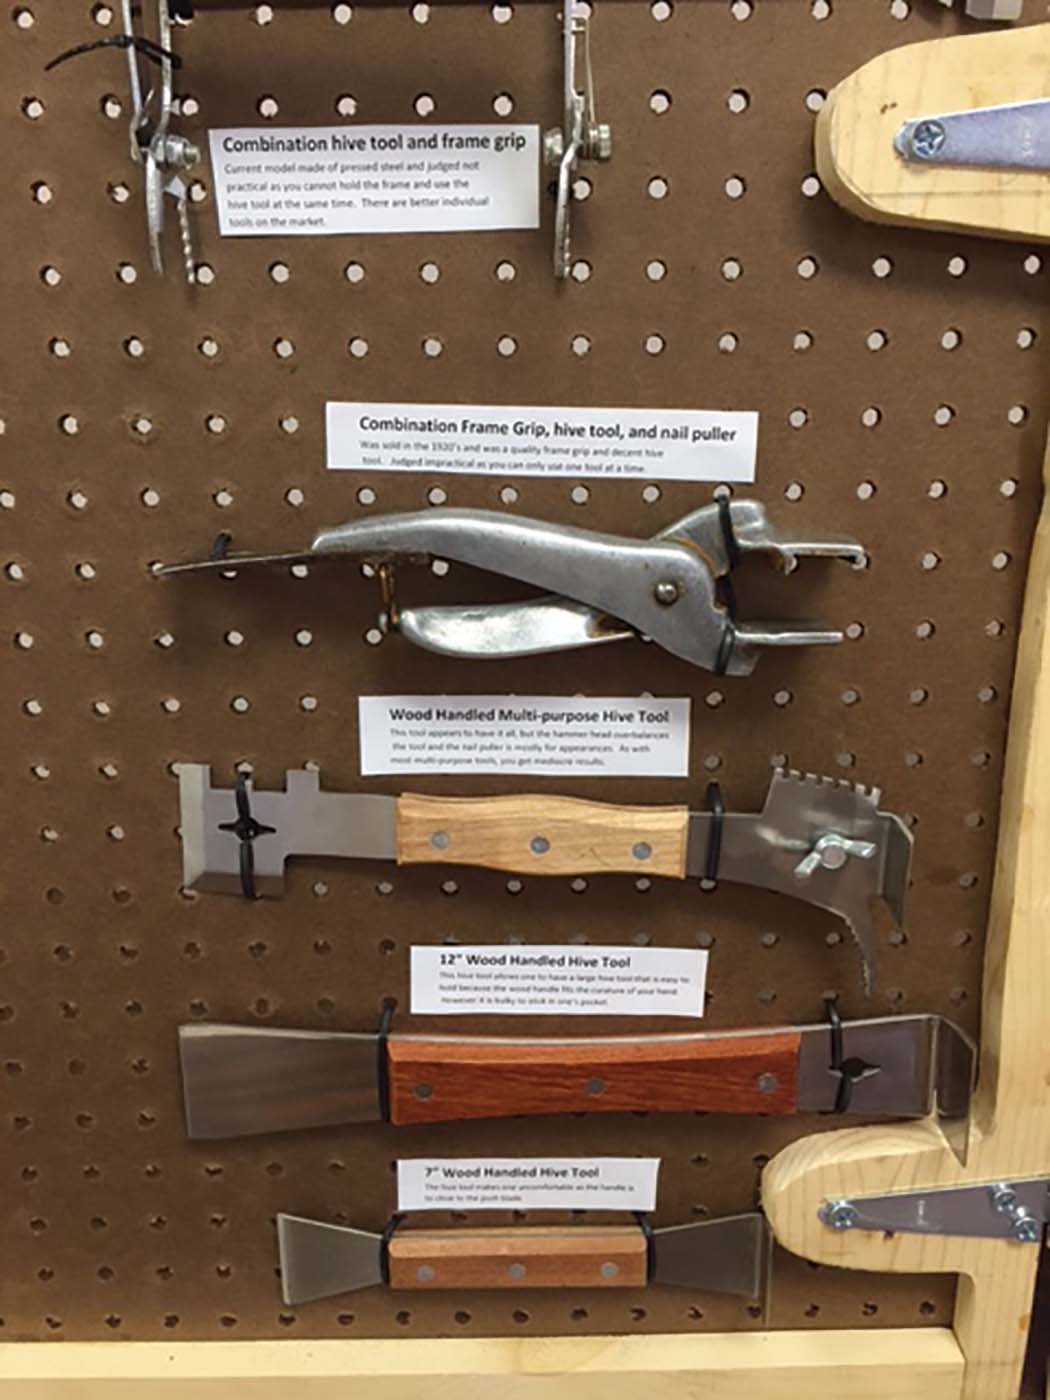
Some companies have started making 12” hive tools and longer hive tools which make it easier to separate supers but may give you a hive tool that is bulky to carry and a little too big for frame removal. Some hive tools will have plastic or wood handles which make it nicer to hold but give you a place that gets gummed up with wax, propolis, and honey. The addition of the wood or plastic may interfere with the pulling of nails and heating the blade for bending. There is a hive tool advertised as the strongest hive tool made and a very similar hive tool known as the Shizel. This type of hive tool is advertised to double as a nail puller, pry bar, leveler, chisel, hammer, can opener, and a trowel. It is a comfortable hive tool to hold and provides some distance between the bees and your hand. However I have found it to be bulky for fine work and to carry to many hives. The early models suffered overheating while being welded and thus many of them bent while being used separating supers because the temper had been ruined. To make a similar hive tool stronger, some beekeepers have used plate steel or car springs in creating real heavy hive tools to lug around.
To get the cleanest job of scraping wax and propolis off a frame, the blade of the hive tool should be vertical or at right angles to the wood. Thus it is common to use the bent end of the hive tool. With time, that end of the hive tool becomes dull and needs to be sharpened. The beekeeper may use a file or a grinder to sharpen the edge, but eventually it gets down to about a burr on the end of the hive tool. The old timers would heat up the end of the tool and flatten out the bend and reform a new bend about an inch down the blade. This process was repeated until the nail hole came up to the sharpened surface. Many times if you tried to clean up a frame by pushing the straight flat blade along the top bars, the blade dug in, gouging the wood.
Sometimes I like to use two hive tools to lever frames out of the supers or to hold a super up while the other tool is used to pry loose the sticking frames. In levering out the frames, it works best if you can get a hive tool on either side of the end bars. A better technique might be to remove an outside frame and work your way across the hive using the open space to your advantage. It also helps prevent rolling the queen and other bees. When you have a frame out that has a lot of burr comb or deformed comb, it is a good time to straighten out those problems before or replacing that frame.
The influence of items like the Swiss Army Knife may have spawned the invention of combination tools. You may see a hive tool and a frame grip combination. They may look useful, but think about it. If you are prying something with the blade, it would be very hard to use the frame grip at the same time. Many times, one of the pieces of the tool just gets in the way of your activity. One of the latest varieties of these frame grip and hive tool combination, would need a lot of filing to get the edges sharp enough for me to use.
There are new tools on the market called the Kent Williams “Outlaw” hive tool and a similar Kiwi Combo hive tool from New Zealand that incorporate the J hook and the regular hive tools. These two tools appear to have great possibilities to work very well as the pivot point of the hook is higher than the hook. There are many combination tools of this type on the market, but these are knock offs and have the bend of the blade even with the J hook making it practically useless in using the J hook to lift frames.
For years many people have made other hive tools that have special appendages and bends to make it easier to do certain jobs and usually there are disadvantages to these tools such as the appendage tearing up the upholstery, your pants, or punching holes in your body. Sometimes the “new” tool will be over built so is very heavy to carry around. However there is an EZ tool that has special bends allowing the lifting of frames and a bent end that you could use to strike with the heel of your hand in separating supers.
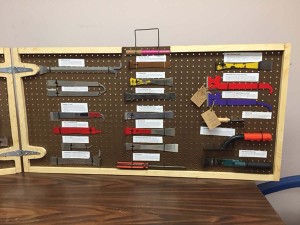
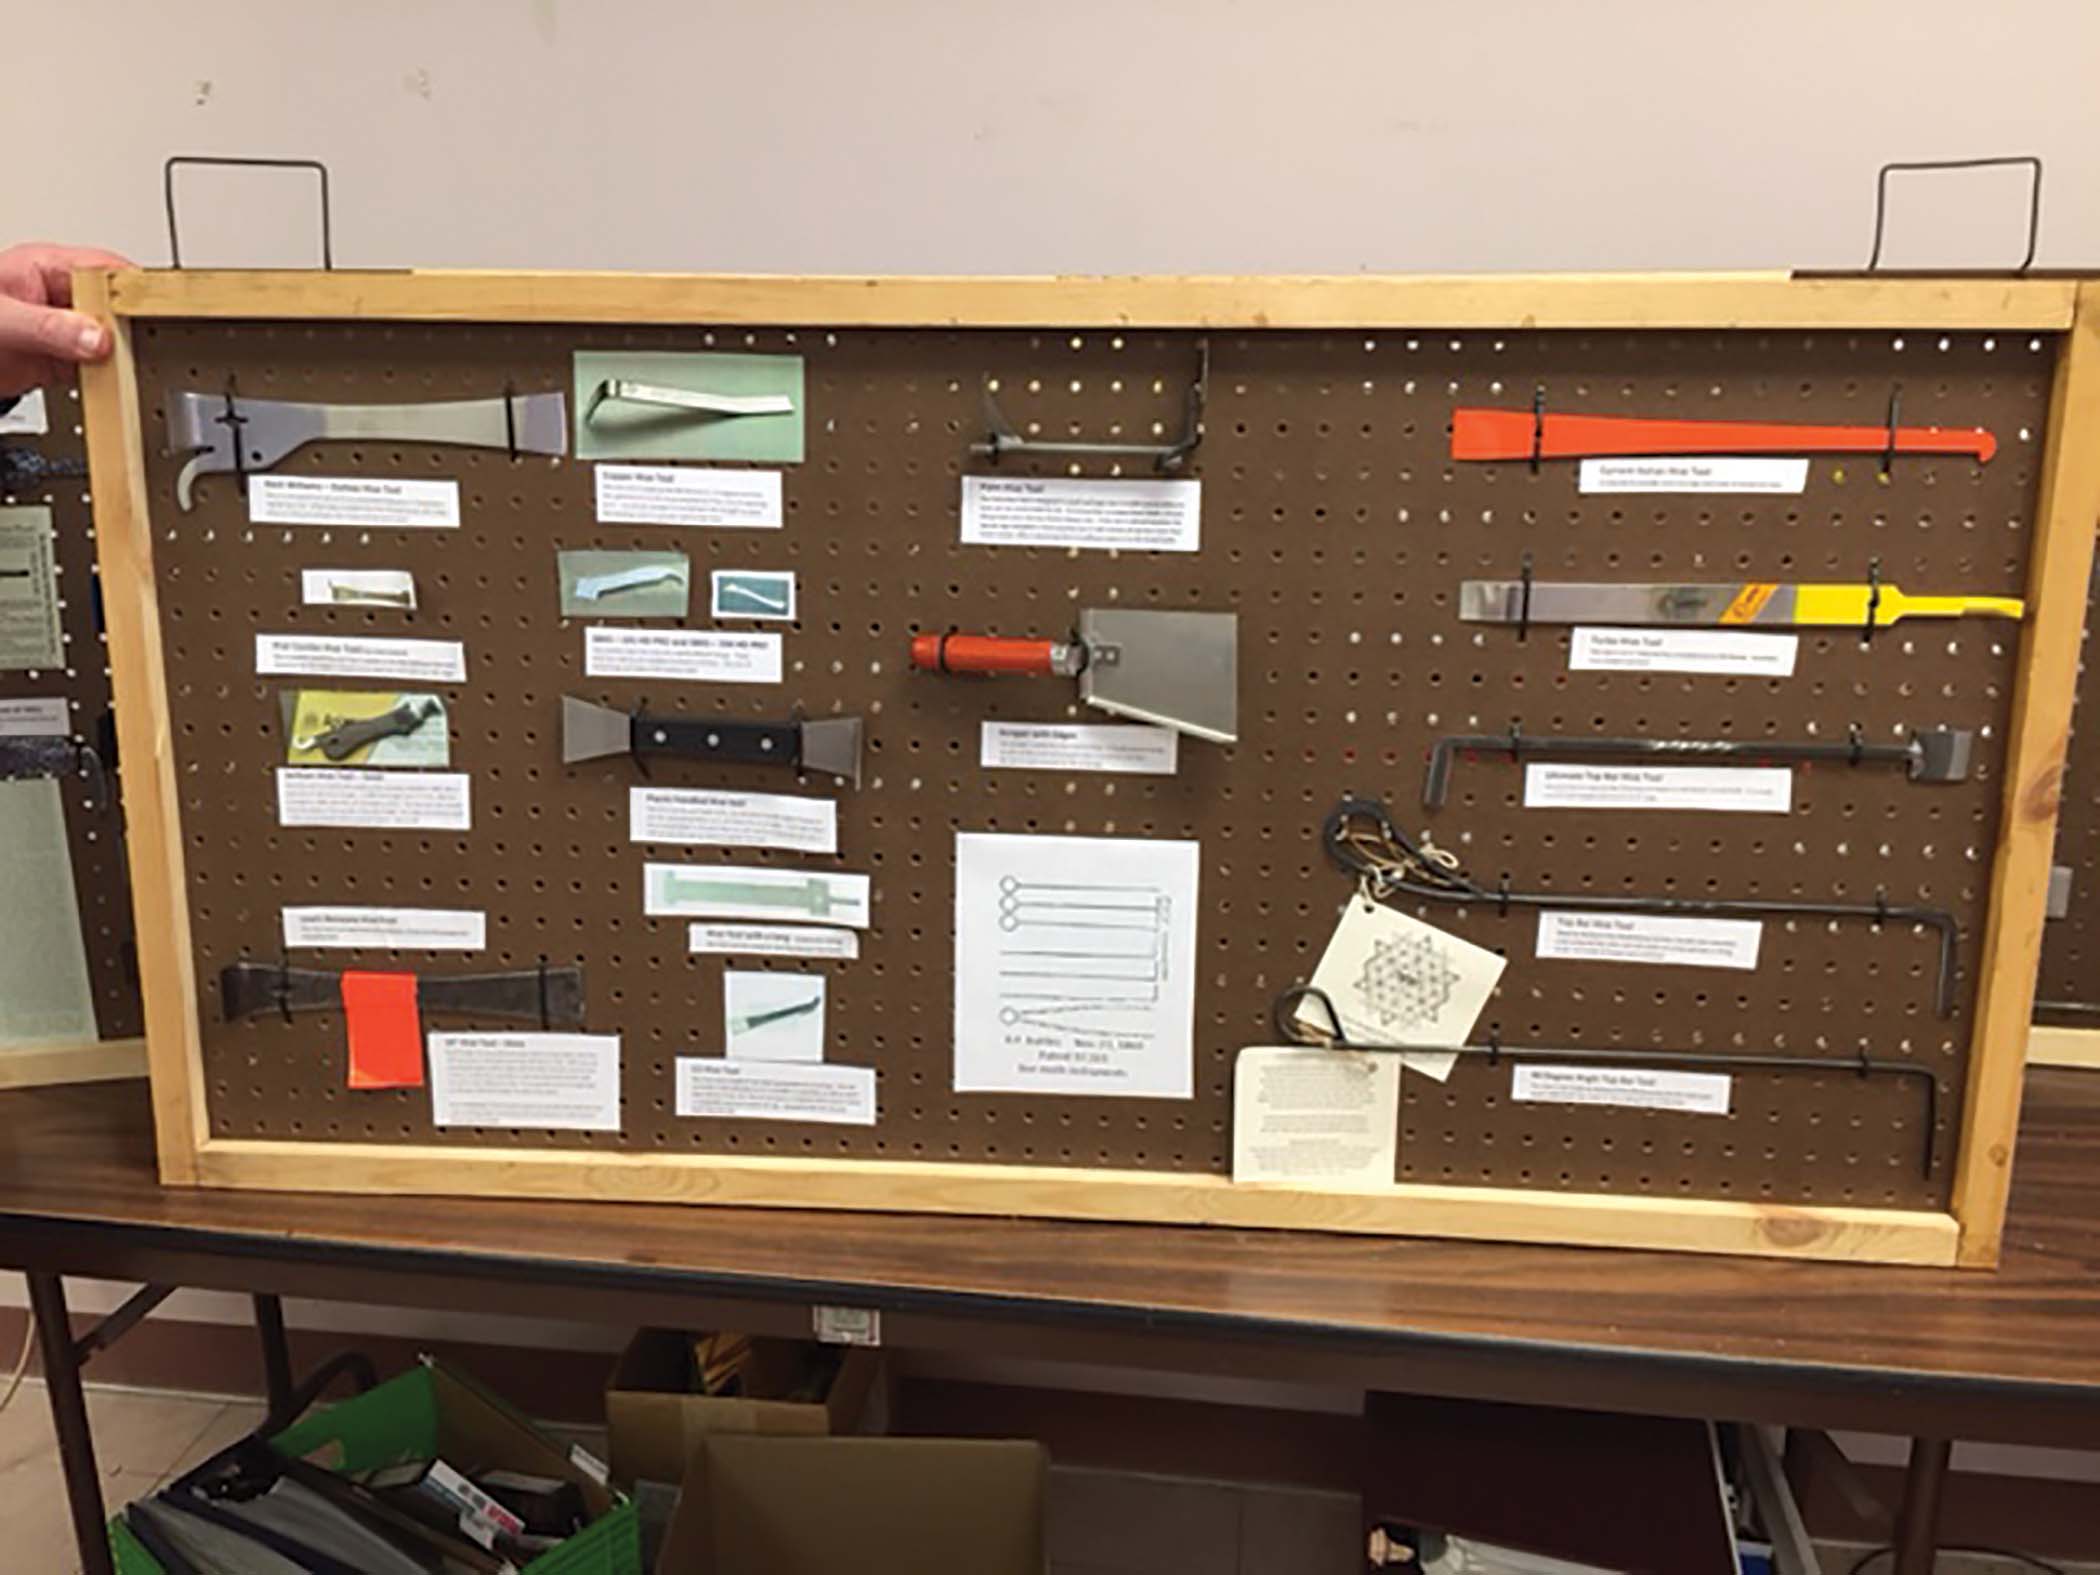
I am sure that I have not mentioned all of the tools in my collection, I see hive tools on displays and in pictures that I used to have and I can’t find them today. But most importantly, I see tools that were used in the 1860s that are similar to the Top Bar Hive Tools. Hive tools that were invented in 1907 that are similar to the J hooked tools of today and all kinds of variations of the regular hive tool of the 1920s have been carried on today. Beekeepers tend to use hive tools in the manner that they were taught and very few of them will change to another style. Certain hive tools work better for certain purposes and types of hives. I would suggest that you have at least two different hive tools so you can develop your own preference and in case a hive tool gets lost, you have something else to use until you can order a new one. The best hive tool is the one that works best for you.
References:
Gleanings In Bee Culture, January 15, 1907 page 77. Advertisement for the Ideal Hive Tool
American Bee Journal, January 1921, pages 17-18. Hive Tools, & Hive Tools by Arthur C. Miller Personal Collection.